12 高阶组件和Render Props
关于组件公共逻辑的抽离
- 高阶组件
HOC:模式简单,但增加组件层级 Render Props:代码简洁,学习成本较高
高阶组件
高阶组件(
Higher Order Componennt)本身其实不是组件,而是一个函数,这个函数接收一个元组件作为参数,然后返回一个新的增强组件,高阶组件的出现本身也是为了逻辑复用
简述:
- 高阶组件不是组件,是 增强函数,可以输入一个元组件,返回出一个新的增强组件;
- 高阶组件的主要作用是 代码复用,操作 状态和参数;
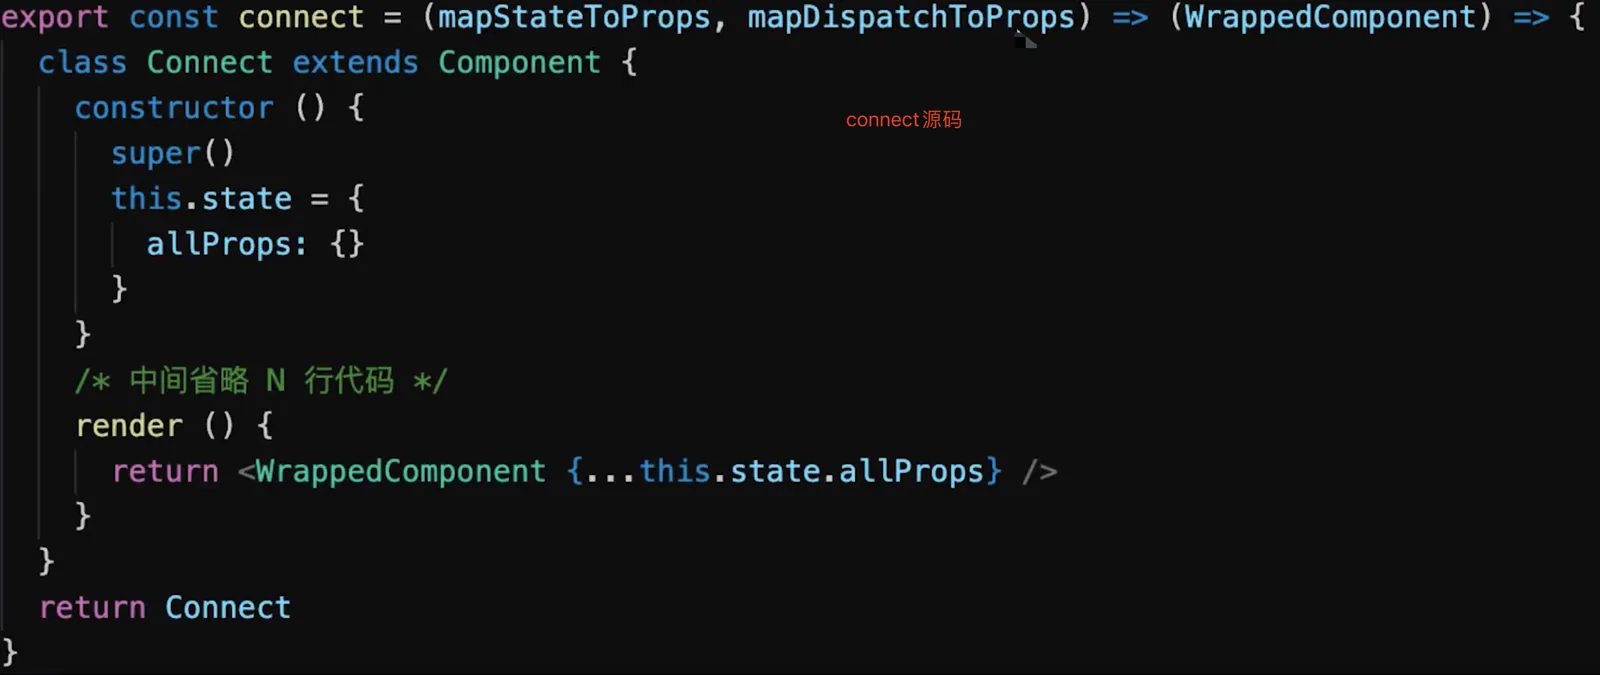
redux connect是高阶组件
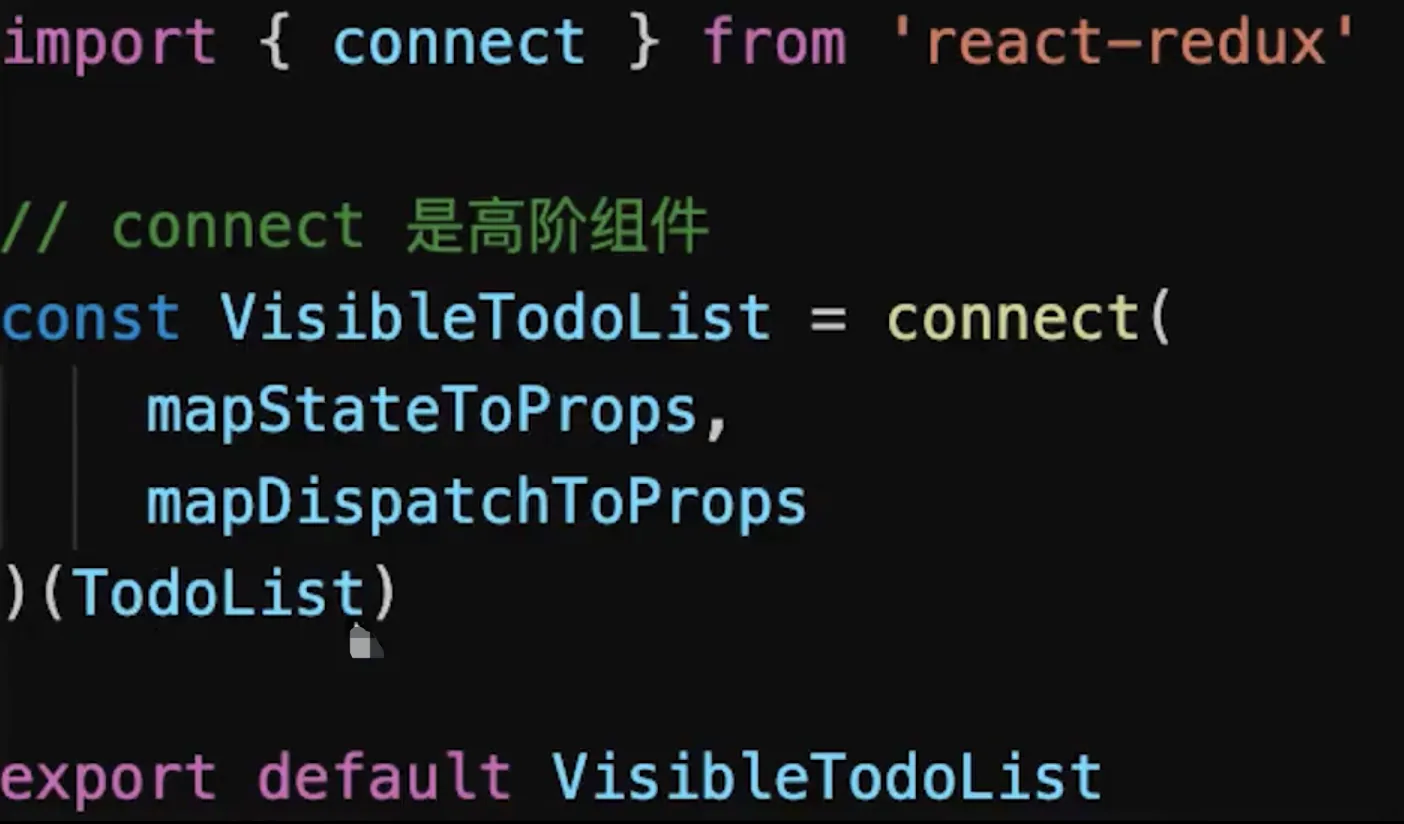
    import React from 'react'

    // 高阶组件
    const withMouse = (Component) => {
        class withMouseComponent extends React.Component {
            constructor(props) {
                super(props)
                this.state = { x: 0, y: 0 }
            }

            handleMouseMove = (event) => {
                this.setState({
                    x: event.clientX,
                    y: event.clientY
                })
            }

            render() {
                return (
                    <div style={{ height: '500px' }} onMouseMove={this.handleMouseMove}>
                        {/* 1. 透传所有 props 2. 增加 mouse 属性 */}
                        {/* props从使用高阶组件的地方传入 如<HocDemo a="100" /> */}
                        <Component {...this.props} mouse={this.state}/>
                    </div>
                )
            }
        }
        return withMouseComponent
    }

    const App = (props) => {
        const a = props.a
        const { x, y } = props.mouse // 接收 mouse 属性
        return (
            <div style={{ height: '500px' }}>
                <h1>The mouse position is ({x}, {y})</h1>
                <p>{a}</p>
            </div>
        )
    }

    export default withMouse(App) // 返回高阶函数
用法:
- 属性代理 (
Props Proxy): 返回出一个组件,它基于被包裹组件进行 功能增强;
- 默认参数: 可以为组件包裹一层默认参数;
    function proxyHoc(Comp) {
    	return class extends React.Component {
    		render() {
    			const newProps = {
    				name: 'test1',
    				age: 1,
    			}
    			return <Comp {...this.props} {...newProps} />
    		}
    	}
    }
- 提取状态: 可以通过
props将被包裹组件中的state依赖外层,例如用于转换受控组件:
    function withOnChange(Comp) {
    	return class extends React.Component {
    		constructor(props) {
    			super(props)
    			this.state = {
    				name: '',
    			}
    		}
    		onChangeName = () => {
    			this.setState({
    				name: 'test',
    			})
    		}
    		render() {
    			const newProps = {
    				value: this.state.name,
    				onChange: this.onChangeName,
    			}
    			return <Comp {...this.props} {...newProps} />
    		}
    	}
    }
使用姿势如下,这样就能非常快速的将一个 Input 组件转化成受控组件。
    const NameInput = props => (<input name="name" {...props} />)
    export default withOnChange(NameInput)
包裹组件: 可以为被包裹元素进行一层包装,
    function withMask(Comp) {
      return class extends React.Component {
          render() {
    		  return (
    		      <div>
    				  <Comp {...this.props} />
    					<div style={{
    					  width: '100%',
    					  height: '100%',
    					  backgroundColor: 'rgba(0, 0, 0, .6)',
    				  }}
    			  </div>
    		  )
    	  }
      }
    }
反向继承 (
Inheritance Inversion): 返回出一个组件,继承于被包裹组件,常用于以下操作
    function IIHoc(Comp) {
        return class extends Comp {
            render() {
                return super.render();
            }
        };
    }
渲染劫持 (Render Highjacking)
条件渲染: 根据条件,渲染不同的组件
    function withLoading(Comp) {
        return class extends Comp {
            render() {
                if(this.props.isLoading) {
                    return <Loading />
                } else {
                    return super.render()
                }
            }
        };
    }
可以直接修改被包裹组件渲染出的 React 元素树
操作状态 (Operate State) : 可以直接通过 this.state 获取到被包裹组件的状态,并进行操作。但这样的操作容易使 state 变得难以追踪,不易维护,谨慎使用。
应用场景:
权限控制,通过抽象逻辑,统一对页面进行权限判断,按不同的条件进行页面渲染:
    function withAdminAuth(WrappedComponent) {
        return class extends React.Component {
    		constructor(props){
    			super(props)
    			this.state = {
    		    	isAdmin: false,
    			}
    		}
    		async componentWillMount() {
    		    const currentRole = await getCurrentUserRole();
    		    this.setState({
    		        isAdmin: currentRole === 'Admin',
    		    });
    		}
    		render() {
    		    if (this.state.isAdmin) {
    		        return <Comp {...this.props} />;
    		    } else {
    		        return (<div>您没有权限查看该页面,请联系管理员!</div>);
    		    }
    		}
        };
    }
性能监控 ,包裹组件的生命周期,进行统一埋点:
    function withTiming(Comp) {
        return class extends Comp {
            constructor(props) {
                super(props);
                this.start = Date.now();
                this.end = 0;
            }
            componentDidMount() {
                super.componentDidMount && super.componentDidMount();
                this.end = Date.now();
                console.log(`${WrappedComponent.name} 组件渲染时间为 ${this.end - this.start} ms`);
            }
            render() {
                return super.render();
            }
        };
    }
代码复用,可以将重复的逻辑进行抽象。
使用注意:
- 纯函数: 增强函数应为纯函数,避免侵入修改元组件;
- 避免用法污染: 理想状态下,应透传元组件的无关参数与事件,尽量保证用法不变;
- 命名空间: 为
HOC增加特异性的组件名称,这样能便于开发调试和查找问题; - 引用传递 : 如果需要传递元组件的
refs引用,可以使用React.forwardRef; - 静态方法 : 元组件上的静态方法并无法被自动传出,会导致业务层无法调用;解决:
- 函数导出
- 静态方法赋值
- 重新渲 染: 由于增强函数每次调用是返回一个新组件,因此如果在
Render中使用增强函数,就会导致每次都重新渲染整个HOC,而且之前的状态会丢失;
render props
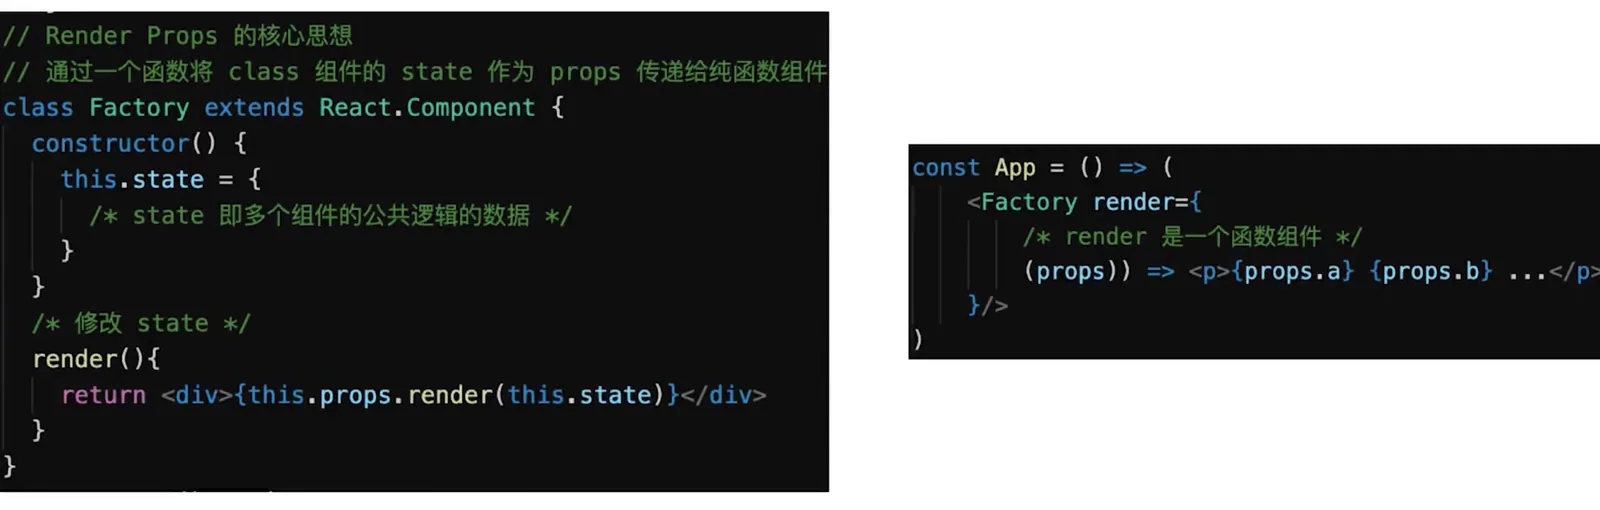
    import React from 'react'
    import PropTypes from 'prop-types'

    class Mouse extends React.Component {
        constructor(props) {
            super(props)
            this.state = { x: 0, y: 0 }
        }

        handleMouseMove = (event) => {
          this.setState({
            x: event.clientX,
            y: event.clientY
          })
        }

        render() {
          return (
            <div style={{ height: '500px' }} onMouseMove={this.handleMouseMove}>
                {/* 将当前 state 作为 props ,传递给 render (render 是一个函数组件) */}
                {this.props.render(this.state)}
            </div>
          )
        }
    }
    Mouse.propTypes = {
        render: PropTypes.func.isRequired // 必须接收一个 render 属性,而且是函数
    }

    const App = (props) => (
        <div style={{ height: '500px' }}>
            <p>{props.a}</p>
            <Mouse render={
                /* render 是一个函数组件 */
                ({ x, y }) => <h1>The mouse position is ({x}, {y})</h1>
            }/>

        </div>
    )

    /**
     * 即,定义了 Mouse 组件,只有获取 x y 的能力。
     * 至于 Mouse 组件如何渲染,App 说了算,通过 render prop 的方式告诉 Mouse 。
     */

    export default App
拓展:vue中实现高阶组件
function withAvatarURL (InnerComponent) {
return {
props: ['username','url'],
inheritAttrs: false,
data () {
return { id: null }
},
created () {
fetchURL(this.id, url => {
this.username = username
})
},
render (h) {// 使用h函数渲染组件
return h(InnerComponent, {
attrs: this.$attrs,
props: {
src: this.username
}
})
}
}
}
const SmartAvatar = withAvatarURL(Item)
new Vue({
el: '#app',
components: { SmartAvatar }
})