原文链接: https://interview.poetries.top/docs/excellent-docs/6-React.html
0 如何理解React State不可变性的原则
在 React 中,不可变性是指数据一旦被创建,就不能被修改。React 推崇使用不可变数据的原则,这意味着在更新数据时,应该创建新的数据对象而不是直接修改现有的数据。
以下是理解 React 中不可变性原则的几个关键点:
- 数据一旦创建就不能被修改 :在 React 中,组件的状态(state)和属性(props)应该被视为不可变的。一旦创建了状态或属性对象,就不应该直接修改它们的值。这样可以确保组件的数据在更新时是不可变的,从而避免意外的数据改变和副作用。
- 创建新的数据对象 :当需要更新状态或属性时,应该创建新的数据对象。这可以通过使用对象展开运算符、数组的
concat()、slice()等方法,或者使用不可变数据库(如Immutable.js、Immer等)来创建新的数据副本。 - 比较数据变化 :React 使用
Virtual DOM来比较前后两个状态树的差异,并仅更新需要更新的部分。通过使用不可变数据,React 可以更高效地进行比较,因为它可以简单地比较对象引用是否相等,而不必逐个比较对象的属性。 - 性能优化 :使用不可变数据可以带来性能上的优势。由于 React 可以更轻松地比较前后状态的差异,可以减少不必要的重新渲染和组件更新,提高应用的性能和响应性。
不可变性的原则在 React 中有以下好处:
- 简化数据变更追踪 :由于数据不可变,可以更轻松地追踪数据的变化。这样可以更好地理解代码的行为和数据的流动。
- 避免副作用 :可变数据容易引发副作用和难以追踪的 bug。通过使用不可变数据,可以避免许多与副作用相关的问题。
- 方便的历史记录和回滚 :不可变数据使得记录和回滚应用状态的历史变得更容易。可以在不改变原始数据的情况下,创建和保存不同时间点的数据快照。
1 JSX本质
React.createElement即h函数,返回vnode- createElement 与 cloneElement 的区别是什么
createElement函数是JSX编译之后使用的创建React Element的函数- 而
cloneElement则是用于复制某个元素并传入新的Props
- createElement 与 cloneElement 的区别是什么
- 第一个参数,可能是组件,也可能是
html tag - 组件名,首字母必须是大写(
React规定)
    React.createElement(
      type,
      [props],
      [...children]
    )
    // - 第一个参数是必填,传入的是似HTML标签名称,eg: ul, li
    // - 第二个参数是选填,表示的是属性,eg: className
    // - 第三个参数是选填, 子节点,eg: 要显示的文本内容
    // React.createElement写法
    React.createElement('tag', null, [child1,child2])
    React.createElement('tag', props, child1,child2,child3)
    React.createElement(Comp, props, child1,child2,'文本节点')
    // jsx基本用法
    <div className="container">
      <p>tet</p>
      <img src={imgSrc} />
    </div>

    // 编译后 https://babeljs.io/repl
    React.createElement(
      "div",
      {
        className: "container"
      },
      React.createElement("p", null, "tet"),
      React.createElement("img", {
        src: imgSrc
      })
    );
    // jsx style
    const styleData = {fontSize:'20px',color:'#f00'}
    const styleElem = <p style={styleData}>设置style</p>

    // 编译后
    const styleData = {
      fontSize: "20px",
      color: "#f00"
    };
    const styleElem = React.createElement(
      "p",
      {
        style: styleData
      },
      "\u8BBE\u7F6Estyle"
    );
    // jsx加载组件
    const app = <div>
        <Input submitTitle={onSubmitTitle} />
        <List list={list} />
    </div>

    // 编译后
    const app = React.createElement(
      "div",
      null,
      React.createElement(Input, {
        submitTitle: onSubmitTitle
      }),
      React.createElement(List, {
        list: list
      })
    );
    // jsx事件
    const eventList = <p onClick={this.clickHandler}>text</p>

    // 编译后
    const eventList = React.createElement(
      "p",
      {
        onClick: (void 0).clickHandler
      },
      "text"
    );
    // jsx列表
    const listElem = <ul>
    {
      this.state.list.map((item,index)=>{
        return <li key={index}>index:{index},title:{item.title}</li>
      })
     }
    </ul>

    // 编译后

    const listElem = React.createElement(
      "ul",
      null,
      (void 0).state.list.map((item, index) => {
        return React.createElement(
          "li",
          {
            key: index
          },
          "index:",
          index,
          ",title:",
          item.title
        );
      })
    );
2 React合成事件机制
React16事件绑定到document上React17事件绑定到root组件上,有利于多个react版本共存,例如微前端event不是原生的,是SyntheticEvent合成事件对象- 和
Vue不同,和DOM事件也不同
为了解决跨浏览器兼容性问题,
React会将浏览器原生事件(Browser Native Event)封装为合成事件(SyntheticEvent)传入设置的事件处理器中。这里的合成事件提供了与原生事件相同的接口,不过它们屏蔽了底层浏览器的细节差异,保证了行为的一致性。另外有意思的是,React并没有直接将事件附着到子元素上,而是以单一事件监听器的方式将所有的事件发送到顶层进行处理。这样React在更新DOM的时候就不需要考虑如何去处理附着在DOM上的事件监听器,最终达到优化性能的目的
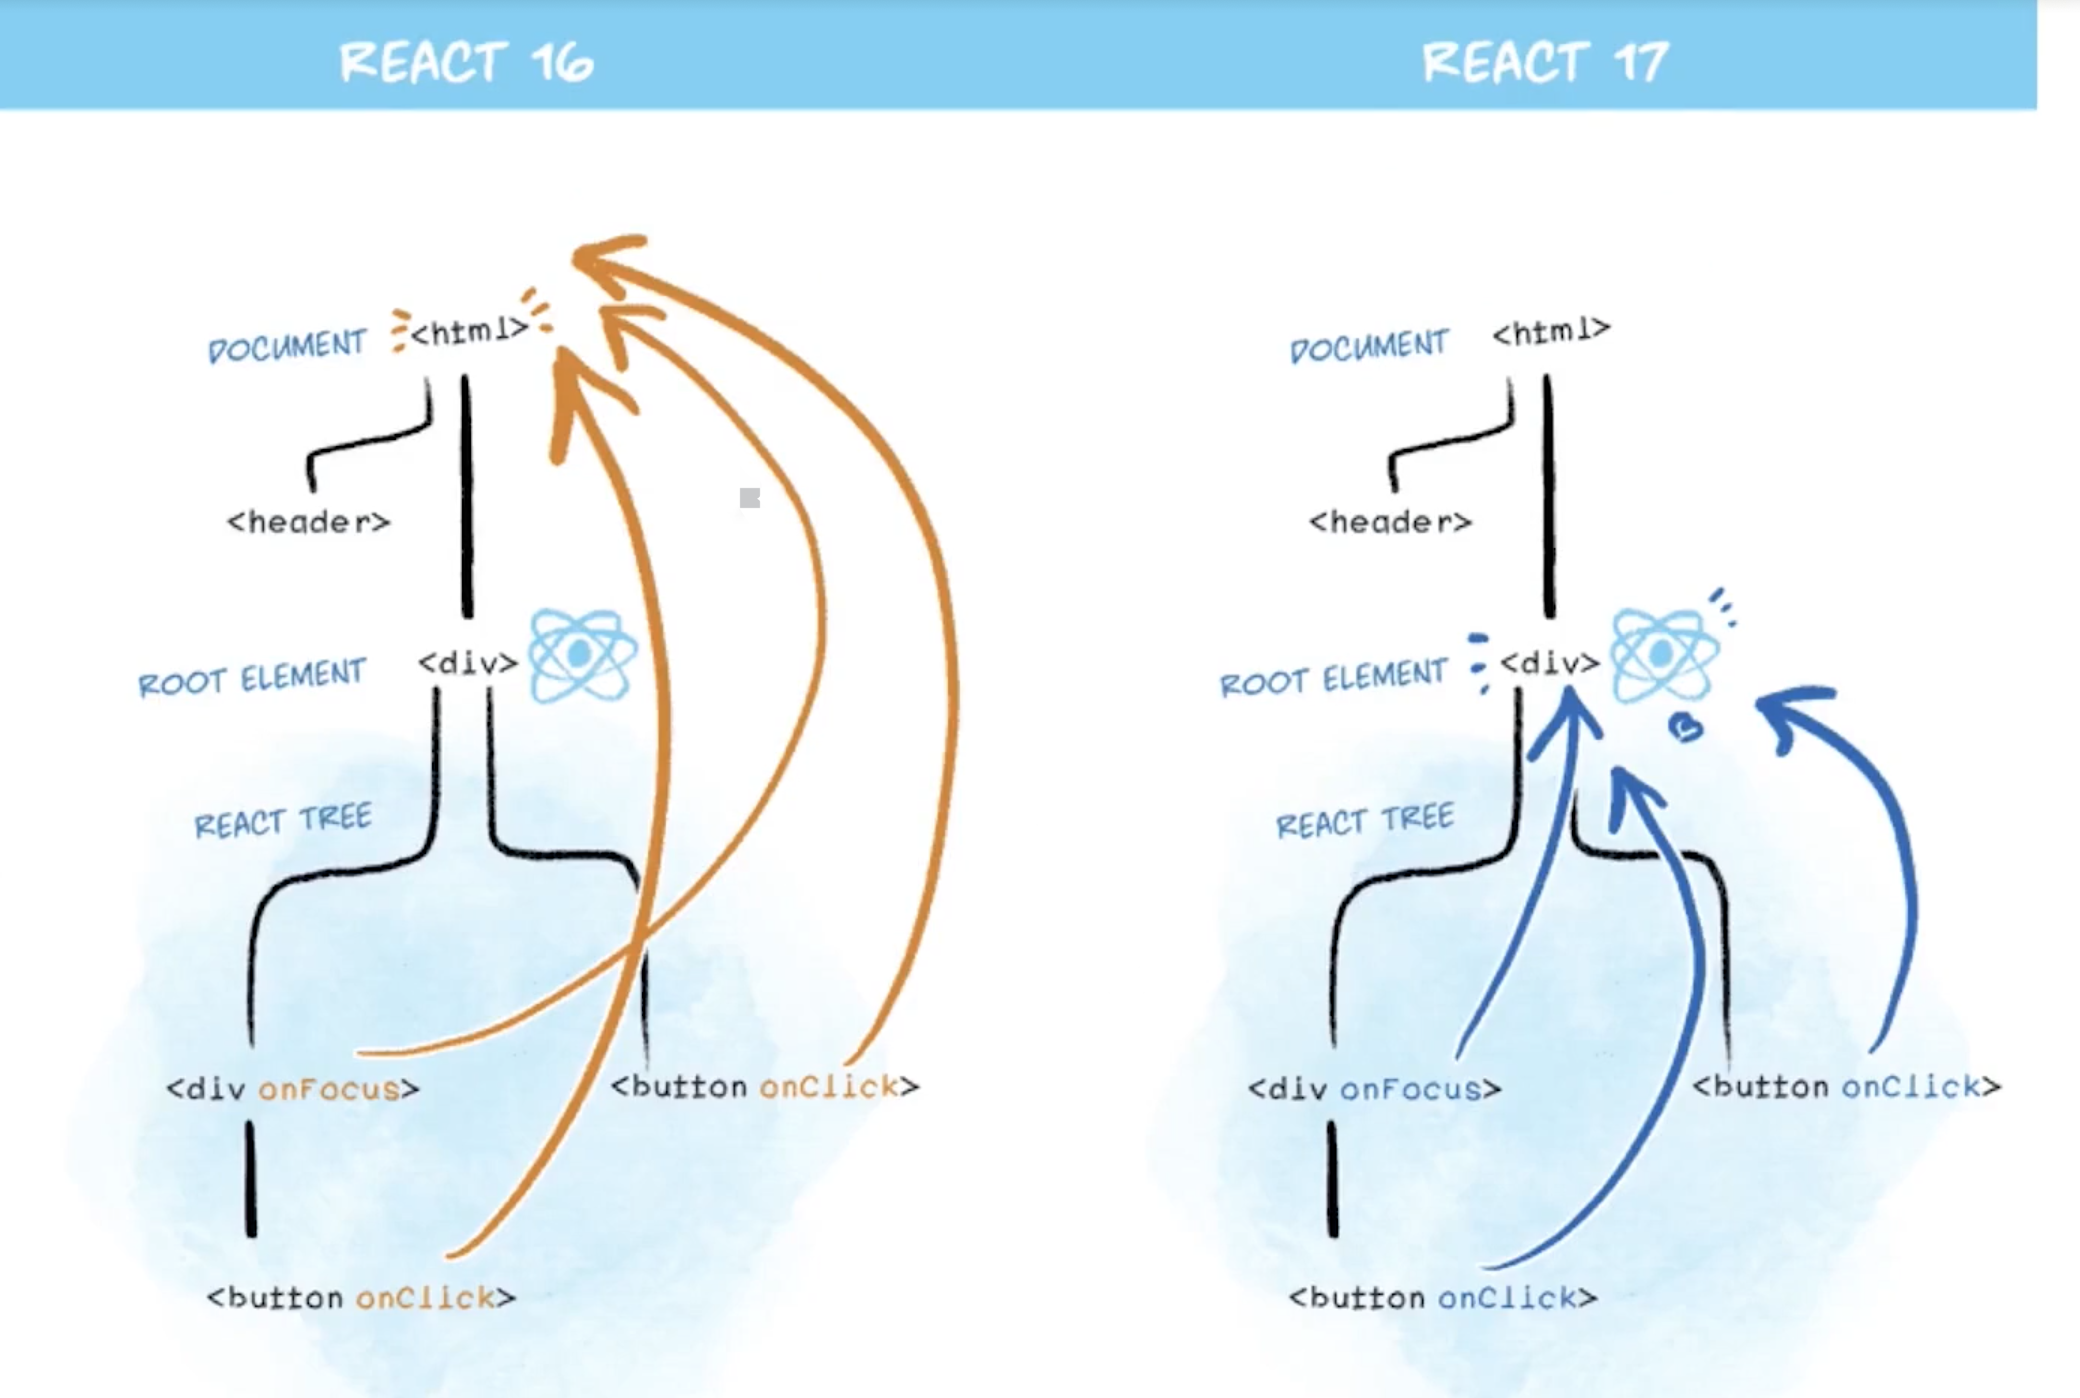
合成事件图示
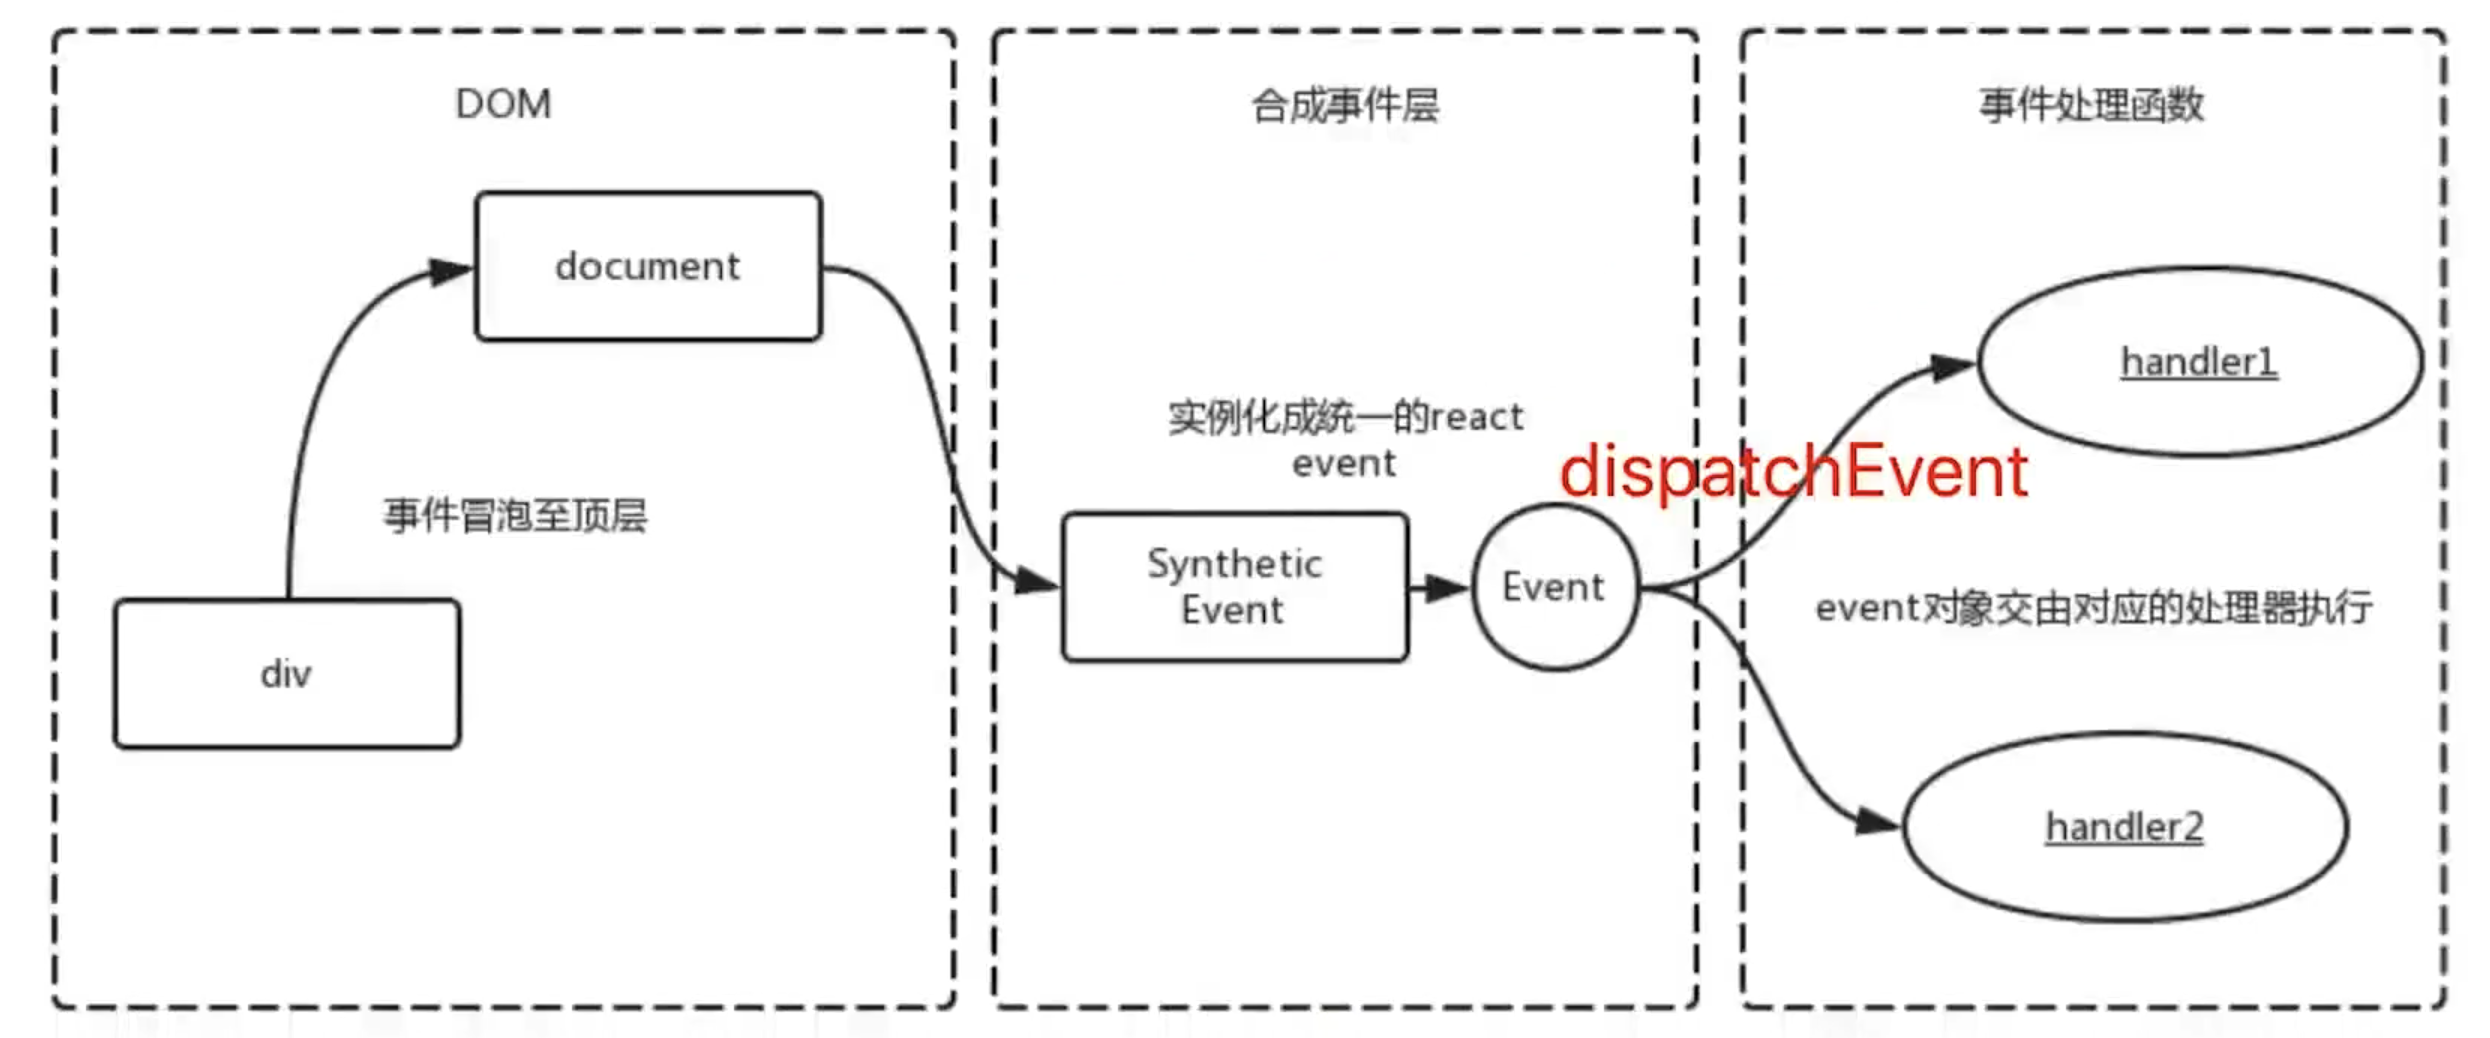
为何需要合成事件
- 更好的兼容性和跨平台,如
react native - 挂载到
document或root上,减少内存消耗,避免频繁解绑 - 方便事件的统一管理(如事务机制)
    // 事件的基本使用
    import React from 'react'

    class EventDemo extends React.Component {
        constructor(props) {
            super(props)
            this.state = {
                name: 'zhangsan',
                list: [
                    {
                        id: 'id-1',
                        title: '标题1'
                    },
                    {
                        id: 'id-2',
                        title: '标题2'
                    },
                    {
                        id: 'id-3',
                        title: '标题3'
                    }
                ]
            }

            // 修改方法的 this 指向
            this.clickHandler1 = this.clickHandler1.bind(this)
        }
        render() {
            // // this - 使用 bind
            // return <p onClick={this.clickHandler1}>
            //     {this.state.name}
            // </p>

            // // this - 使用静态方法
            // return <p onClick={this.clickHandler2}>
            //     clickHandler2 {this.state.name}
            // </p>

            // // event
            // return <a href="https://test.com/" onClick={this.clickHandler3}>
            //     click me
            // </a>

            // 传递参数 - 用 bind(this, a, b)
            return <ul>{this.state.list.map((item, index) => {
                return <li key={item.id} onClick={this.clickHandler4.bind(this, item.id, item.title)}>
                    index {index}; title {item.title}
                </li>
            })}</ul>
        }
        clickHandler1() {
            // console.log('this....', this) // this 默认是 undefined
            this.setState({
                name: 'lisi'
            })
        }
        // 静态方法,this 指向当前实例
        clickHandler2 = () => {
            this.setState({
                name: 'lisi'
            })
        }
        // 获取 event
        clickHandler3 = (event) => {
            event.preventDefault() // 阻止默认行为
            event.stopPropagation() // 阻止冒泡
            console.log('target', event.target) // 指向当前元素,即当前元素触发
            console.log('current target', event.currentTarget) // 指向当前元素,假象!!!

            // 注意,event 其实是 React 封装的。可以看 __proto__.constructor 是 SyntheticEvent 组合事件
            console.log('event', event) // 不是原生的 Event ,原生的 MouseEvent
            console.log('event.__proto__.constructor', event.__proto__.constructor)

            // 原生 event 如下。其 __proto__.constructor 是 MouseEvent
            console.log('nativeEvent', event.nativeEvent)
            console.log('nativeEvent target', event.nativeEvent.target)  // 指向当前元素,即当前元素触发
            console.log('nativeEvent current target', event.nativeEvent.currentTarget) // 指向 document !!!

            // 1. event 是 SyntheticEvent ,模拟出来 DOM 事件所有能力
            // 2. event.nativeEvent 是原生事件对象
            // 3. 所有的事件,都被挂载到 document 上
            // 4. 和 DOM 事件不一样,和 Vue 事件也不一样
        }
        // 传递参数
        clickHandler4(id, title, event) {
            console.log(id, title)
            console.log('event', event) // 最后追加一个参数,即可接收 event
        }
    }
3 setState和batchUpdate机制
setState在react事件、生命周期中是异步的(在react上下文中是异步);在setTimeout、自定义DOM事件中是同步的- 有时合并(对象形式
setState({})=> 通过Object.assign形式合并对象),有时不合并(函数形式setState((prevState,nextState)=>{}))
setState主流程
setState是否是异步还是同步,看是否能命中batchUpdate机制,判断isBatchingUpdates- 哪些能命中
batchUpdate机制- 生命周期
react中注册的事件和它调用的函数- 总之在
react的上下文中
- 哪些不能命中
batchUpdate机制setTimeout、setInterval等- 自定义
DOM事件 - 总之不在
react的上下文中,react管不到的
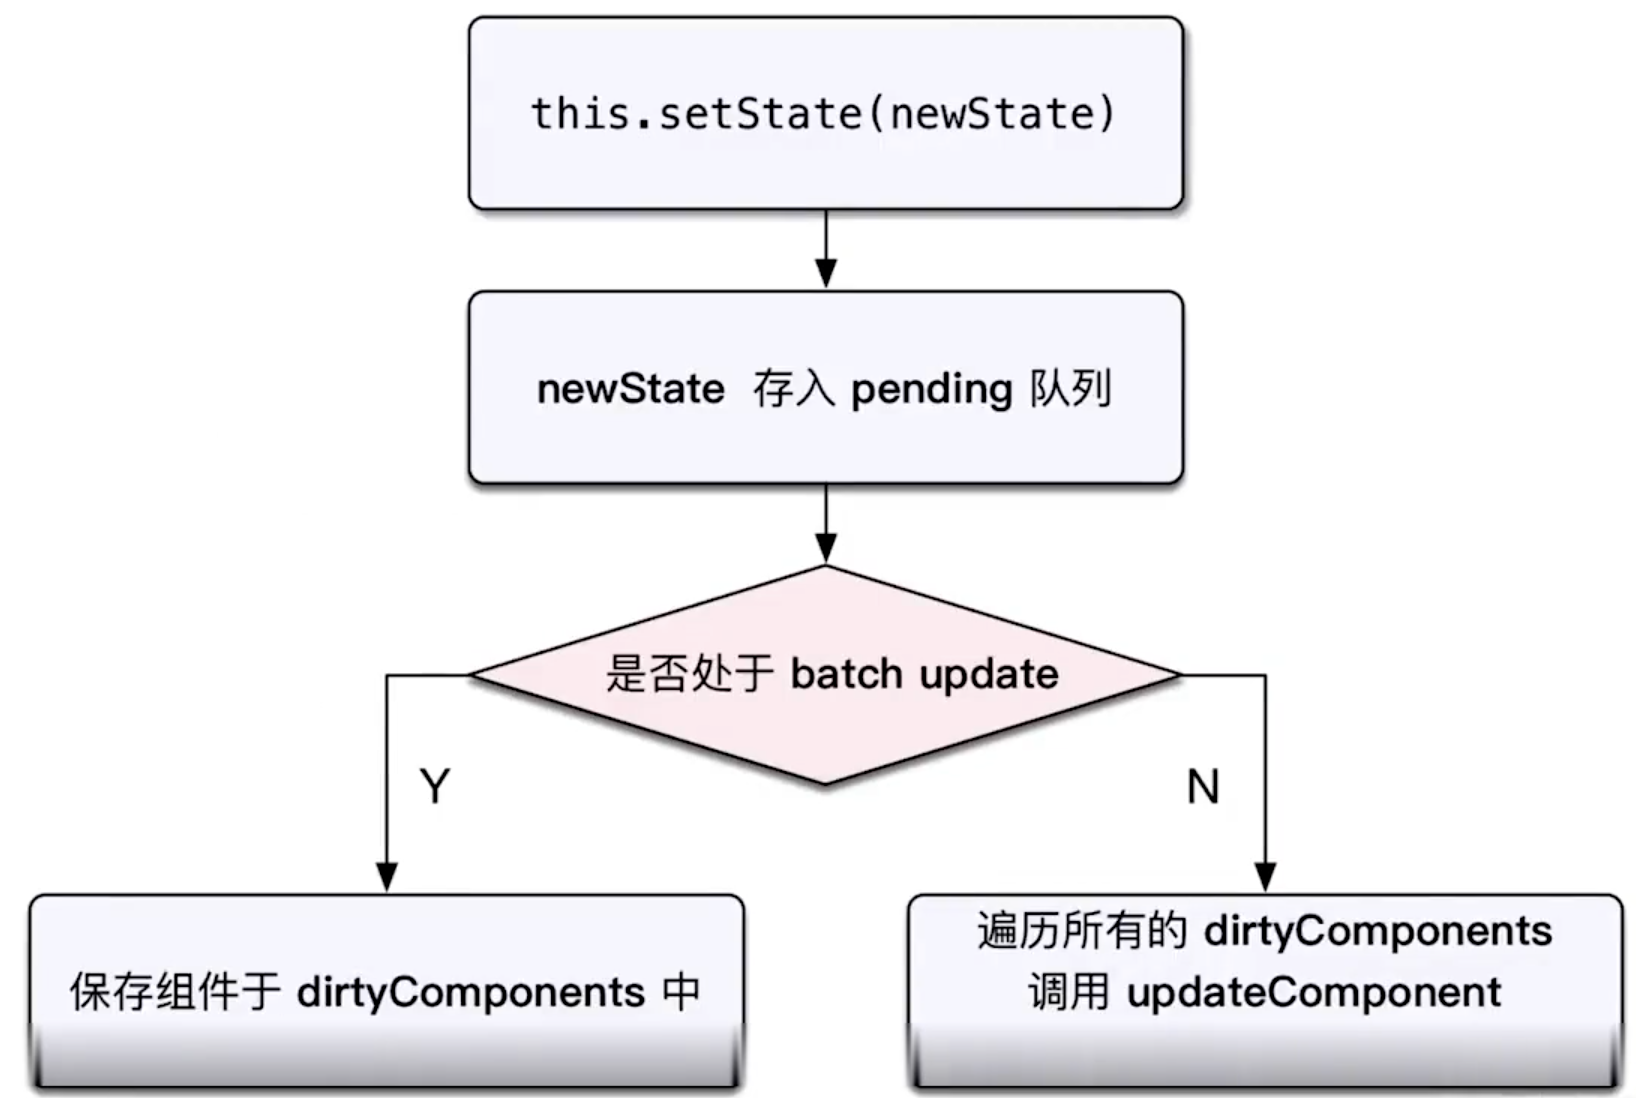
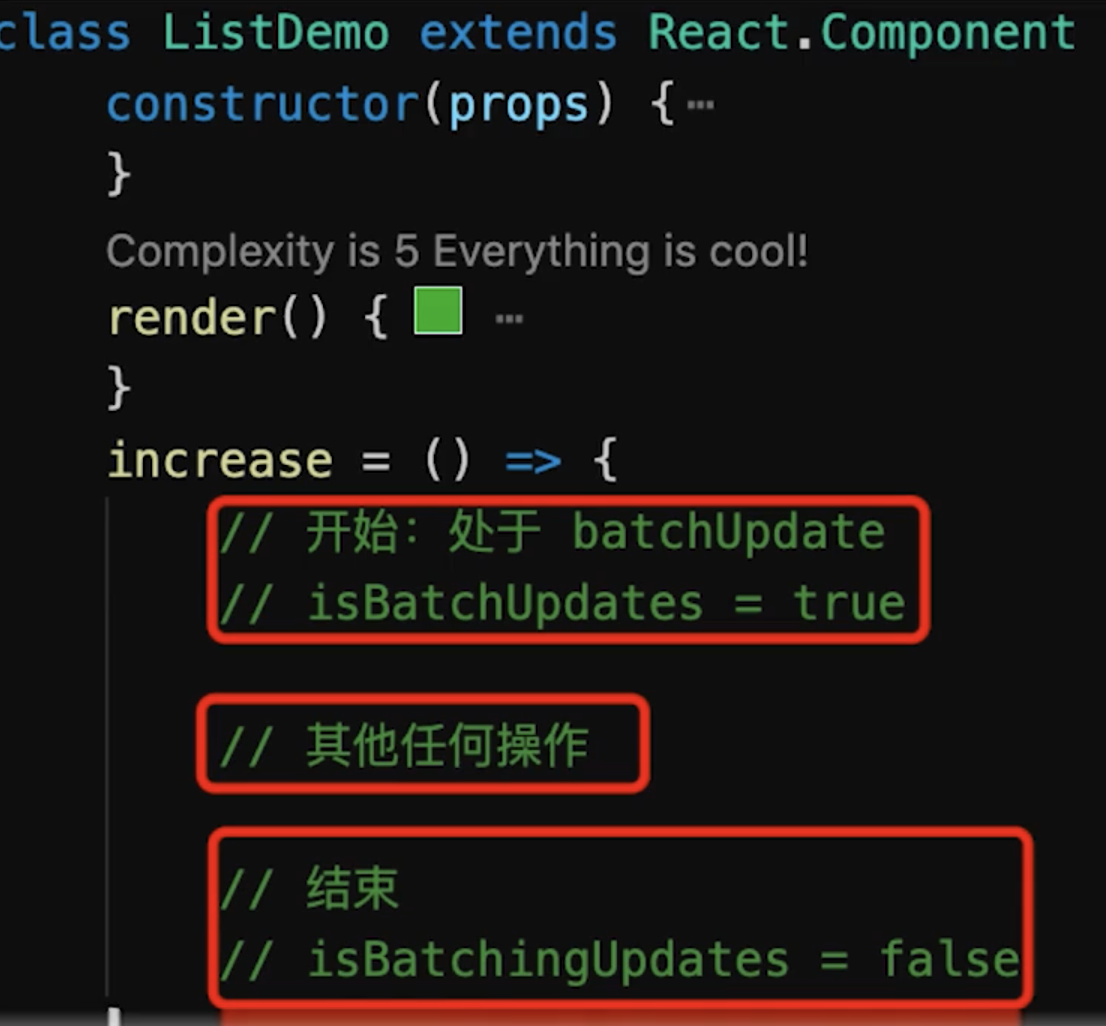
batchUpdate机制
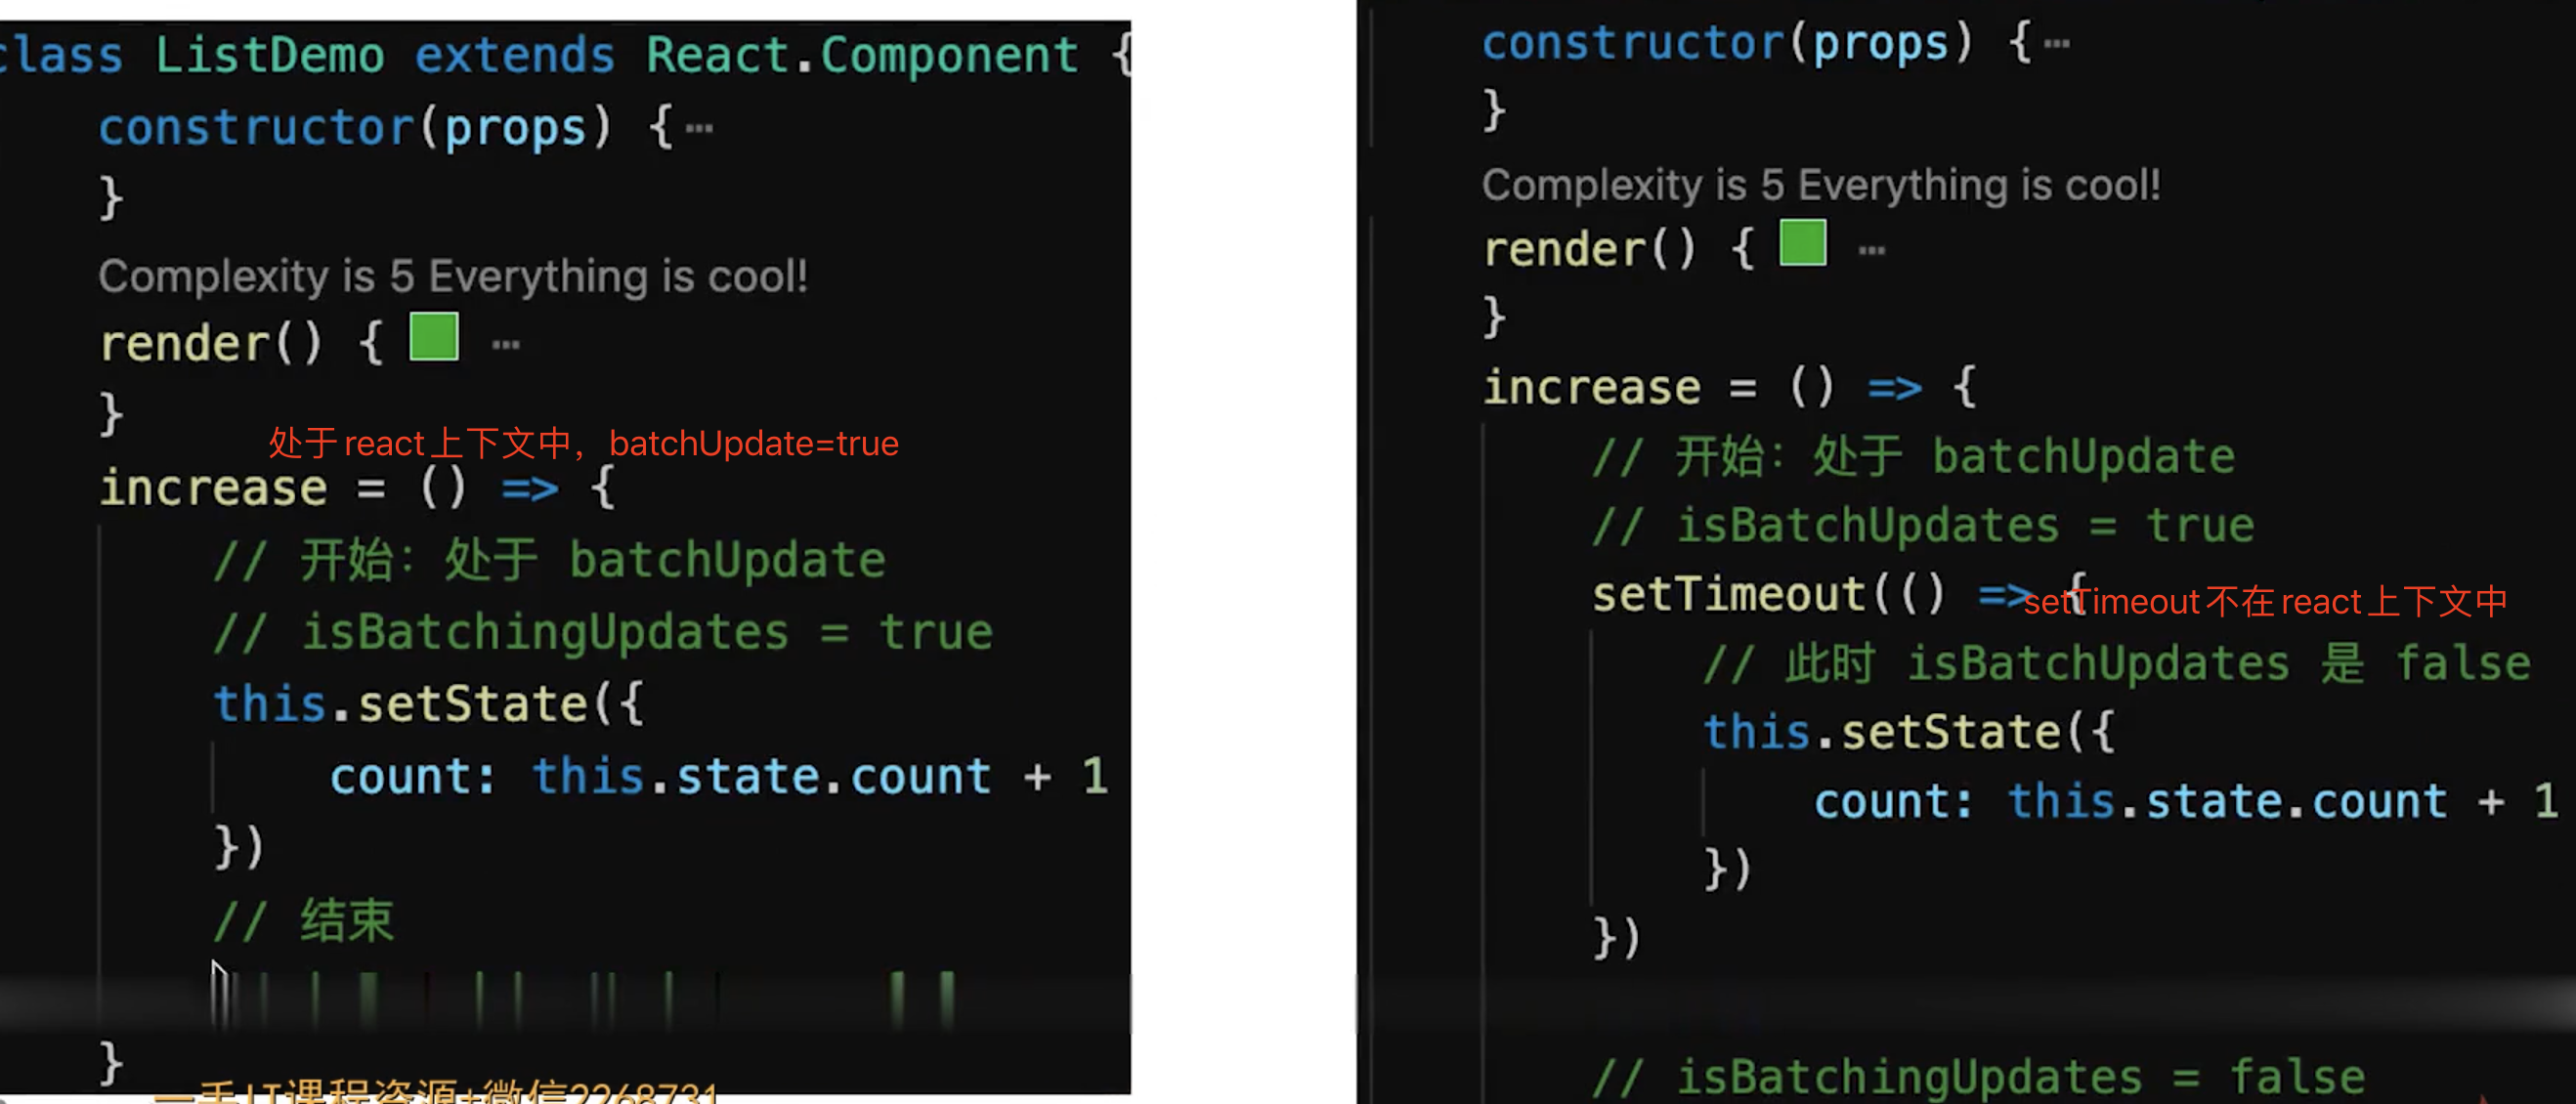
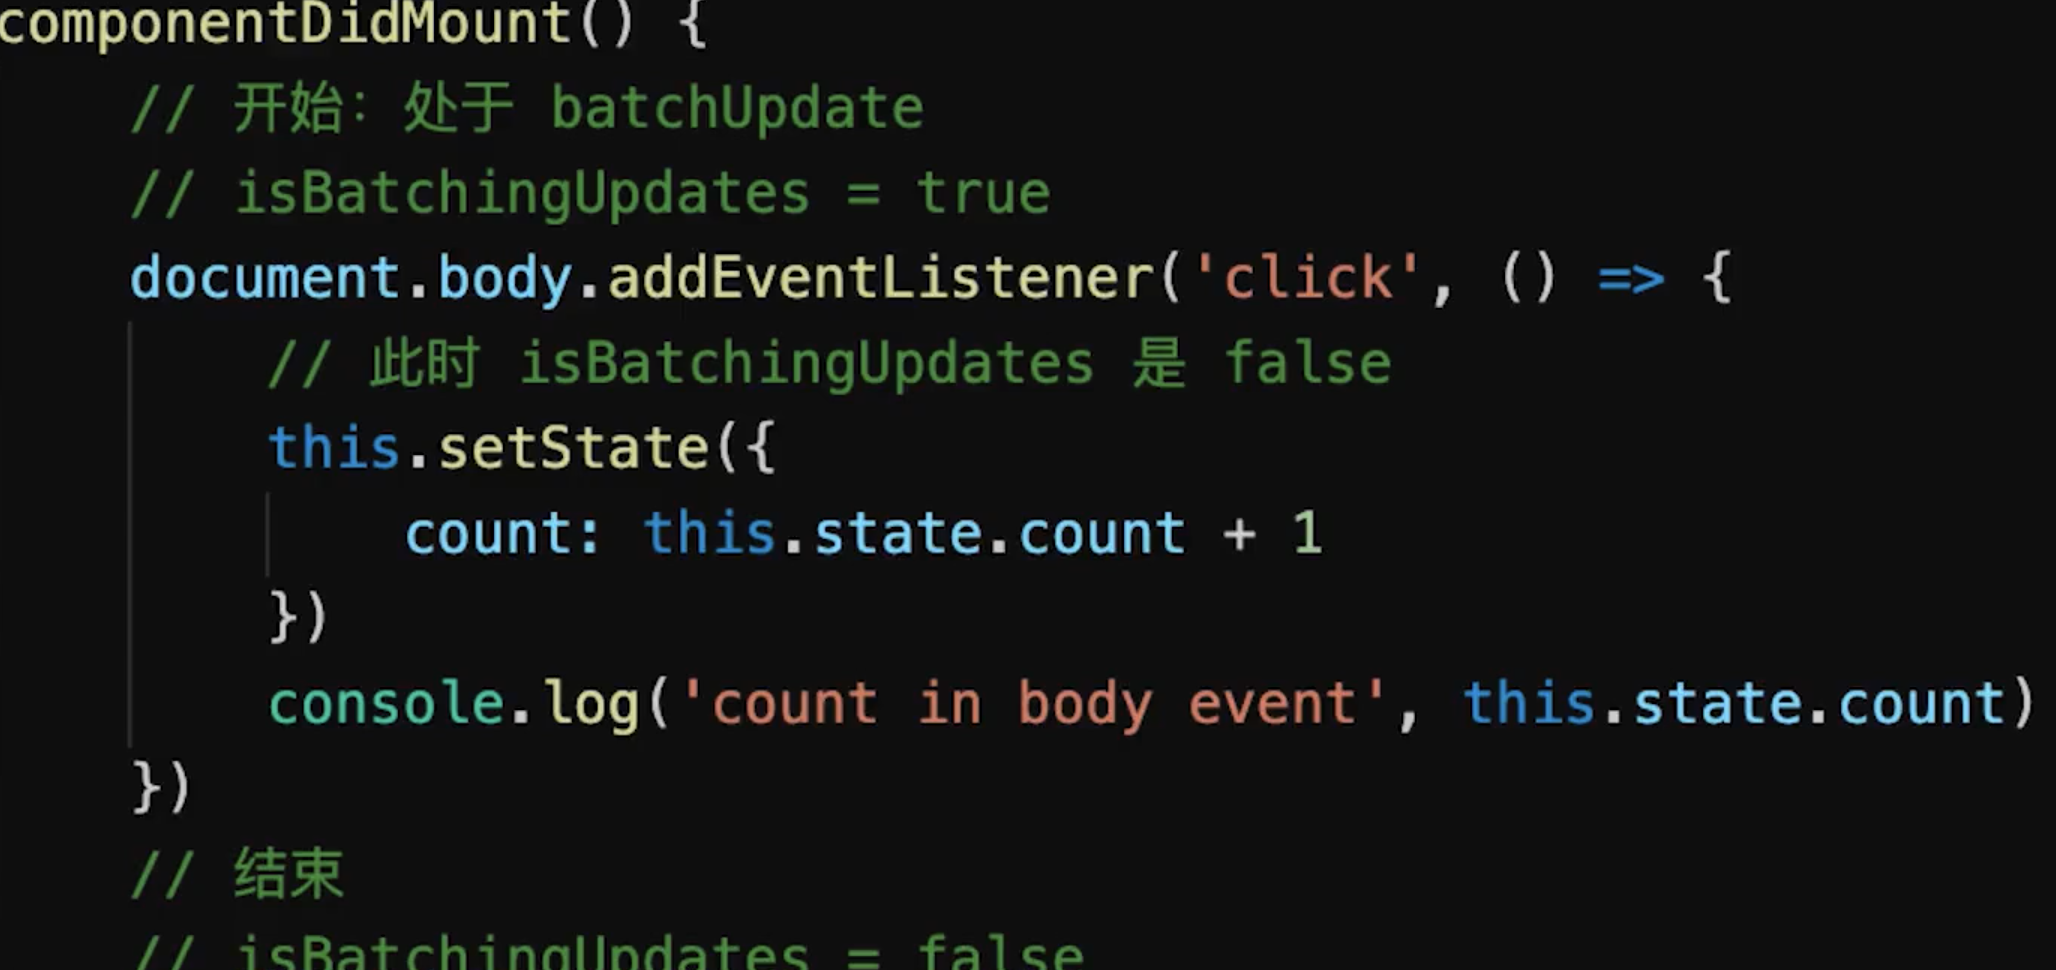
    // setState batchUpdate原理模拟
    let isBatchingUpdate = true;

    let queue = [];
    let state = {number:0};
    function setState(newSate){
      //state={...state,...newSate}
      // setState异步更新
      if(isBatchingUpdate){
        queue.push(newSate);
      }else{
        // setState同步更新
        state={...state,...newSate}
      }
    }

    // react事件是合成事件,在合成事件中isBatchingUpdate需要设置为true
    // 模拟react中事件点击
    function handleClick(){
      isBatchingUpdate=true; // 批量更新标志

      /**我们自己逻辑开始 */
      setState({number:state.number+1});
      setState({number:state.number+1});
      console.log(state); // 0
      setState({number:state.number+1});
      console.log(state); // 0
      /**我们自己逻辑结束 */

      state= queue.reduce((newState,action)=>{
        return {...newState,...action}
      },state);

      isBatchingUpdate=false; // 执行结束设置false
    }
    handleClick();
    console.log(state); // 1
transaction事务机制
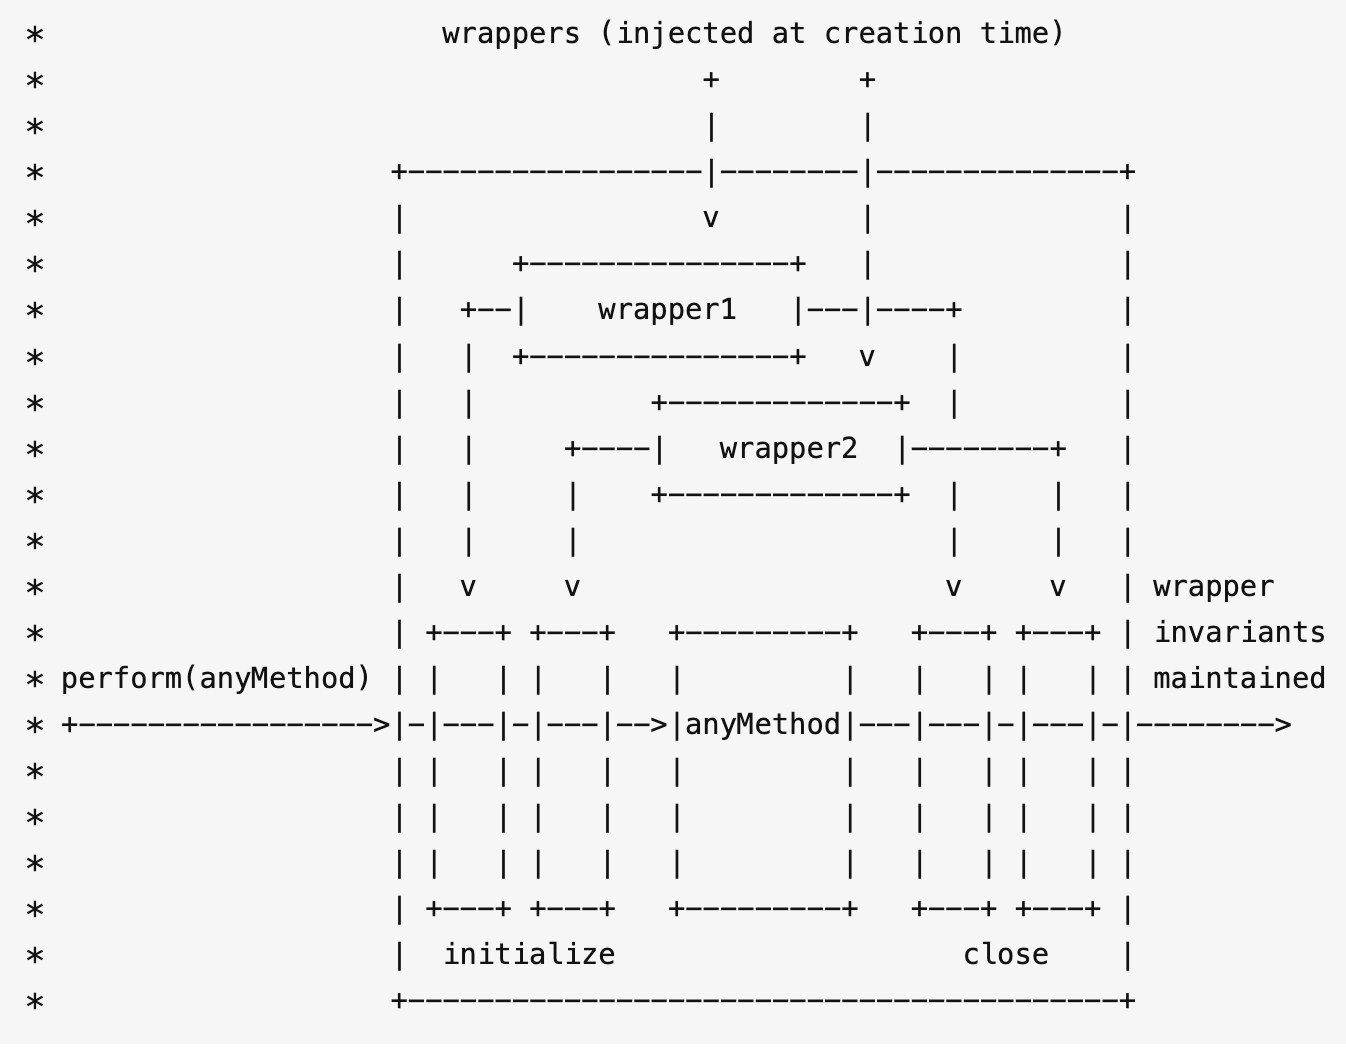
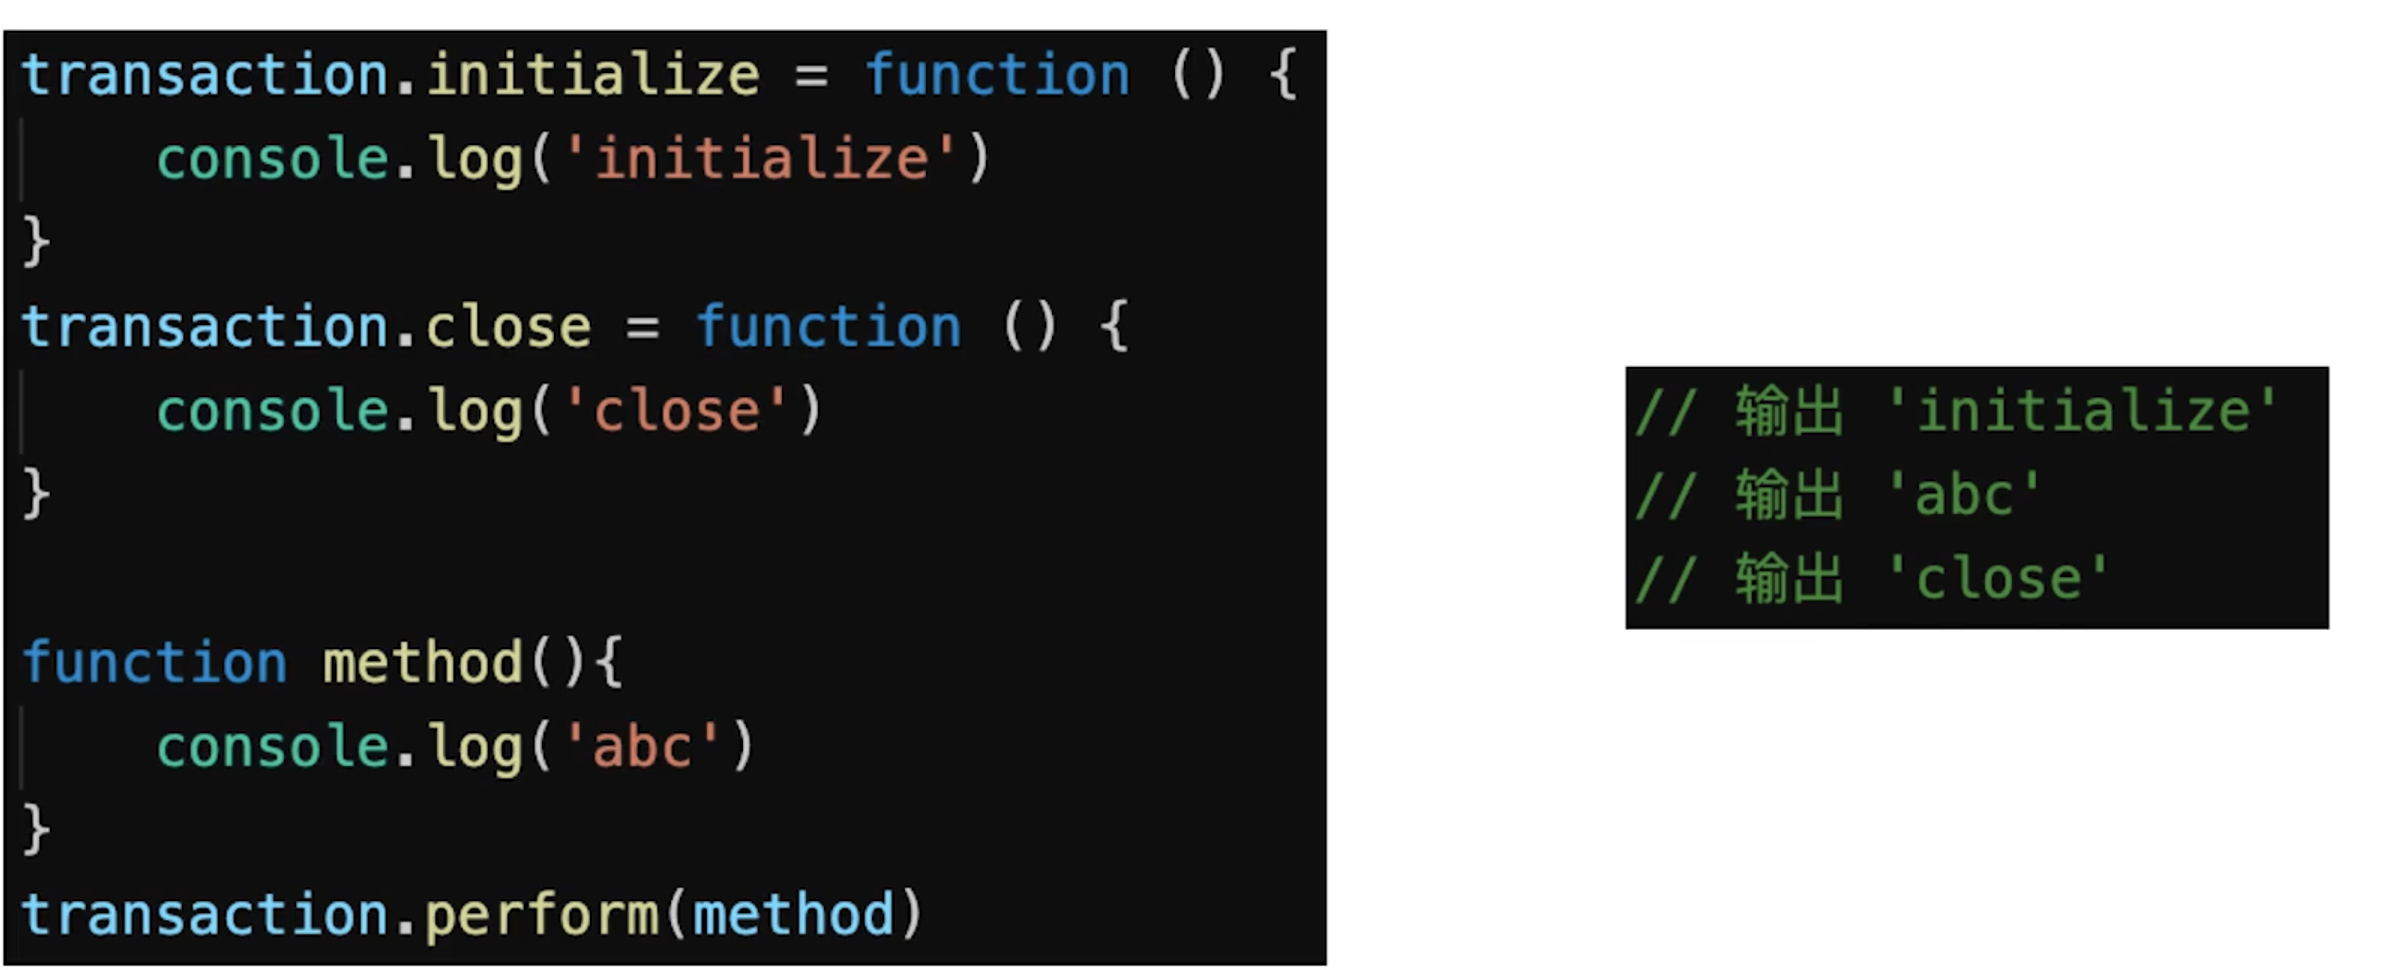
    // setState现象演示

    import React from 'react'

    // 默认没有 state
    class StateDemo extends React.Component {
        constructor(props) {
            super(props)

            // 第一,state 要在构造函数中定义
            this.state = {
                count: 0
            }
        }
        render() {
            return <div>
                <p>{this.state.count}</p>
                <button onClick={this.increase}>累加</button>
            </div>
        }
        increase = () => {
            // // 第二,不要直接修改 state ,使用不可变值 ----------------------------
            // // this.state.count++ // 错误
            // this.setState({
            //     count: this.state.count + 1 // SCU
            // })
            // 操作数组、对象的的常用形式

            // 第三,setState 可能是异步更新(有可能是同步更新) ----------------------------

            // this.setState({
            //     count: this.state.count + 1
            // }, () => {
            //     // 联想 Vue $nextTick - DOM
            //     console.log('count by callback', this.state.count) // 回调函数中可以拿到最新的 state
            // })
            // console.log('count', this.state.count) // 异步的,拿不到最新值

            // // setTimeout 中 setState 是同步的
            // setTimeout(() => {
            //     this.setState({
            //         count: this.state.count + 1
            //     })
            //     console.log('count in setTimeout', this.state.count)
            // }, 0)

            // 自己定义的 DOM 事件,setState 是同步的。再 componentDidMount 中

            // 第四,state 异步更新的话,更新前会被合并 ----------------------------

            // 传入对象,会被合并(类似 Object.assign )。执行结果只一次 +1
            // this.setState({
            //     count: this.state.count + 1
            // })
            // this.setState({
            //     count: this.state.count + 1
            // })
            // this.setState({
            //     count: this.state.count + 1
            // })

            // 传入函数,不会被合并。执行结果是 +3
            this.setState((prevState, props) => {
                return {
                    count: prevState.count + 1
                }
            })
            this.setState((prevState, props) => {
                return {
                    count: prevState.count + 1
                }
            })
            this.setState((prevState, props) => {
                return {
                    count: prevState.count + 1
                }
            })
        }
        // bodyClickHandler = () => {
        //     this.setState({
        //         count: this.state.count + 1
        //     })
        //     console.log('count in body event', this.state.count)
        // }
        // componentDidMount() {
        //     // 自己定义的 DOM 事件,setState 是同步的
        //     document.body.addEventListener('click', this.bodyClickHandler)
        // }
        // componentWillUnmount() {
        //     // 及时销毁自定义 DOM 事件
        //     document.body.removeEventListener('click', this.bodyClickHandler)
        //     // clearTimeout
        // }
    }

    export default StateDemo

    // -------------------------- 我是分割线 -----------------------------

    // 不可变值(函数式编程,纯函数) - 数组
    // const list5Copy = this.state.list5.slice()
    // list5Copy.splice(2, 0, 'a') // 中间插入/删除
    // this.setState({
    //     list1: this.state.list1.concat(100), // 追加
    //     list2: [...this.state.list2, 100], // 追加
    //     list3: this.state.list3.slice(0, 3), // 截取
    //     list4: this.state.list4.filter(item => item > 100), // 筛选
    //     list5: list5Copy // 其他操作
    // })
    // // 注意,不能直接对 this.state.list 进行 push pop splice 等,这样违反不可变值

    // 不可变值 - 对象
    // this.setState({
    //     obj1: Object.assign({}, this.state.obj1, {a: 100}),
    //     obj2: {...this.state.obj2, a: 100}
    // })
    // // 注意,不能直接对 this.state.obj 进行属性设置,这样违反不可变值
    // setState笔试题考察 下面这道题输出什么
    class Example extends React.Component {
      constructor() {
      super()
      this.state = {
        val: 0
      }
    }
    // componentDidMount中isBatchingUpdate=true setState批量更新
    componentDidMount() {
      // setState传入对象会合并,后面覆盖前面的Object.assign({})
      this.setState({ val: this.state.val + 1 }) // 添加到queue队列中,等待处理
      console.log(this.state.val)
      // 第 1 次 log
      this.setState({ val: this.state.val + 1 }) // 添加到queue队列中,等待处理
      console.log(this.state.val)
      // 第 2 次 log
      setTimeout(() => {
        // 到这里this.state.val结果等于1了
        // 在原生事件和setTimeout中(isBatchingUpdate=false),setState同步更新,可以马上获取更新后的值
        this.setState({ val: this.state.val + 1 }) // 同步更新
        console.log(this.state.val)
        // 第 3 次 log
        this.setState({ val: this.state.val + 1 }) // 同步更新
        console.log(this.state.val)
        // 第 4 次 log
        }, 0)
      }
      render() {
        return null
      }
    }

    // 答案:0, 0, 2, 3
注意
在
React 18之前,setState在React的合成事件中是合并更新的,在setTimeout的原生事件中是同步按序更新的。例如
    handleClick = () => {
      this.setState({ age: this.state.age + 1 });
      console.log(this.state.age); // 0
      this.setState({ age: this.state.age + 1 });
      console.log(this.state.age); // 0
      this.setState({ age: this.state.age + 1 });
      console.log(this.state.age); // 0
      setTimeout(() => {
        this.setState({ age: this.state.age + 1 });
        console.log(this.state.age); // 2
        this.setState({ age: this.state.age + 1 });
        console.log(this.state.age); // 3
      });
    };
而在
React 18中,不论是在合成事件中,还是在宏任务中,都是会合并更新
    function handleClick() {
      setState({ age: state.age + 1 }, onePriority);
      console.log(state.age);// 0
      setState({ age: state.age + 1 }, onePriority);
      console.log(state.age); // 0
      setTimeout(() => {
        setState({ age: state.age + 1 }, towPriority);
        console.log(state.age); // 1
        setState({ age: state.age + 1 }, towPriority);
        console.log(state.age); // 1
      });
    }
传入 setState 函数的第二个参数的作用是什么
该函数会在
setState函数调用完成并且组件开始重渲染的时候被调用,我们可以用该函数来监听渲染是否完成:
    this.setState(
      { username: 'test' },
      () => console.log('setState has finished and the component has re-rendered.')
    )
    this.setState((prevState, props) => {
      return {
        streak: prevState.streak + props.count
      }
    })
调用 setState 之后发生了什么
在代码中调用
setState函数之后,React会将传入的参数与之前的状态进行合并,然后触发所谓的调和过程(Reconciliation)。经过调和过程,React会以相对高效的方式根据新的状态构建React元素树并且着手重新渲染整个UI界面。在React得到元素树之后,React会计算出新的树和老的树之间的差异,然后根据差异对界面进行最小化重新渲染。通过diff算法,React能够精确制导哪些位置发生了改变以及应该如何改变,这就保证了按需更新,而不是全部重新渲染。
- 在
setState的时候,React会为当前节点创建一个updateQueue的更新列队。 - 然后会触发
reconciliation过程,在这个过程中,会使用名为Fiber的调度算法,开始生成新的Fiber树,Fiber算法的最大特点是可以做到异步可中断的执行。 - 然后
React Scheduler会根据优先级高低,先执行优先级高的节点,具体是执行doWork方法。 - 在
doWork方法中,React会执行一遍updateQueue中的方法,以获得新的节点。然后对比新旧节点,为老节点打上 更新、插入、替换 等Tag。 - 当前节点
doWork完成后,会执行performUnitOfWork方法获得新节点,然后再重复上面的过程。 - 当所有节点都
doWork完成后,会触发commitRoot方法,React进入commit阶段。 - 在
commit阶段中,React会根据前面为各个节点打的Tag,一次性更新整个dom元素
setState总结
setState到底是异步还是同步 有时表现出异步,有时表现出同步
setState只在合成事件和钩子函数中是“异步”的,在原生事件和setTimeout中都是同步的setState的“异步”并不是说内部由异步代码实现,其实本身执行的过程和代码都是同步的,只是合成事件和钩子函数的调用顺序在更新之前,导致在合成事件和钩子函数中没法立马拿到更新后的值,形成了所谓的“异步”,当然可以通过第二个参数setState(partialState, callback)中的callback拿到更新后的结果setState的批量更新优化也是建立在“异步”(合成事件、钩子函数)之上的,在原生事件和setTimeout中不会批量更新,在“异步”中如果对同一个值进行多次setState,setState的批量更新策略会对其进行覆盖,取最后一次的执行,如果是同时setState多个不同的值,在更新时会对其进行合并批量更新
事务 (Transaction) 是
React中的一个调用结构,用于包装一个方法,结构为:initialize - perform(method) - close。通过事务,可以统一管理一个方法的开始与结束;处于事务流中,表示进程正在执行一些操作
setState: React 中用于修改状态,更新视图。它具有以下特点:
- 异步与同步:
setState并不是单纯的异步或同步,这其实与调用时的环境相关: - 在合成事件 和 生命周期钩子(除
componentDidUpdate)中,setState是"异步"的;- 原因: 因为在
setState的实现中,有一个判断: 当更新策略正在事务流的执行中时,该组件更新会被推入dirtyComponents队列中等待执行;否则,开始执行batchedUpdates队列更新;- 在生命周期钩子调用中,更新策略都处于更新之前,组件仍处于事务流中,而
componentDidUpdate是在更新之后,此时组件已经不在事务流中了,因此则会同步执行; - 在合成事件中,
React是基于 事务流完成的事件委托机制 实现,也是处于事务流中;
- 在生命周期钩子调用中,更新策略都处于更新之前,组件仍处于事务流中,而
- 问题: 无法在
setState后马上从this.state上获取更新后的值。 - 解决: 如果需要马上同步去获取新值,
setState其实是可以传入第二个参数的。setState(updater, callback),在回调中即可获取最新值;
- 原因: 因为在
- 在 原生事件 和
setTimeout中,setState是同步的,可以马上获取更新后的值;- 原因: 原生事件是浏览器本身的实现,与事务流无关,自然是同步;而setTimeout是放置于定时器线程中延后执行,此时事务流已结束,因此也是同步;
- 批量更新 : 在 合成事件 和 生命周期钩子 中,
setState更新队列时,存储的是 合并状态(Object.assign)。因此前面设置的key值会被后面所覆盖,最终只会执行一次更新; - 函数式 : 由于
Fiber及 合并 的问题,官方推荐可以传入 函数 的形式。setState(fn),在fn中返回新的state对象即可,例如this.setState((state, props) => newState);- 使用函数式,可以用于避免
setState的批量更新的逻辑,传入的函数将会被 顺序调用;
- 使用函数式,可以用于避免
注意事项:
setState合并,在 合成事件 和 生命周期钩子 中多次连续调用会被优化为一次;- 当组件已被销毁,如果再次调用
setState,React会报错警告,通常有两种解决办法- 将数据挂载到外部,通过
props传入,如放到Redux或 父级中; - 在组件内部维护一个状态量 (
isUnmounted),componentWillUnmount中标记为true,在setState前进行判断;
- 将数据挂载到外部,通过
4 组件渲染和更新过程
JSX如何渲染为页面setState之后如何更新页面- 面试考察全流程
组件的本质
- 组件指的是页面的一部分,本质就是一个类,最本质就是一个构造函数
- 类编译成构造函数
1.组件渲染过程
- 分析
props、state变化render()生成vnodepatch(elem, vnode)渲染到页面上(react并一定用patch)
- 渲染过程
setState(newState)=>newState存入pending队列,判断是否处于batchUpdate状态,保存组件于dirtyComponents中(可能有子组件)
- 遍历所有的
dirtyComponents调用updateComponent生成newVnode patch(vnode,newVnode)2.组件更新过程
patch更新被分为两个阶段- reconciliation阶段 :执行
diff算法,纯JS计算 - commit阶段 :将
diff结果渲染到DOM中
- reconciliation阶段 :执行
- 如果不拆分,可能有性能问题
JS是单线程的,且和DOM渲染共用一个线程- 当组件足够复杂,组件更新时计算和渲染都压力大
- 同时再有
DOM操作需求(动画、鼠标拖拽等)将卡顿
- 解决方案Fiber
reconciliation阶段拆分为多个子任务DOM需要渲染时更新,空闲时恢复在执行计算- 通过
window.requestIdleCallback来判断浏览器是否空闲
5 Diff算法相关
为什么虚拟dom会提高性能
虚拟
dom相当于在js和真实dom中间加了一个缓存,利用dom diff算法避免了没有必要的dom操作,从而提高性能
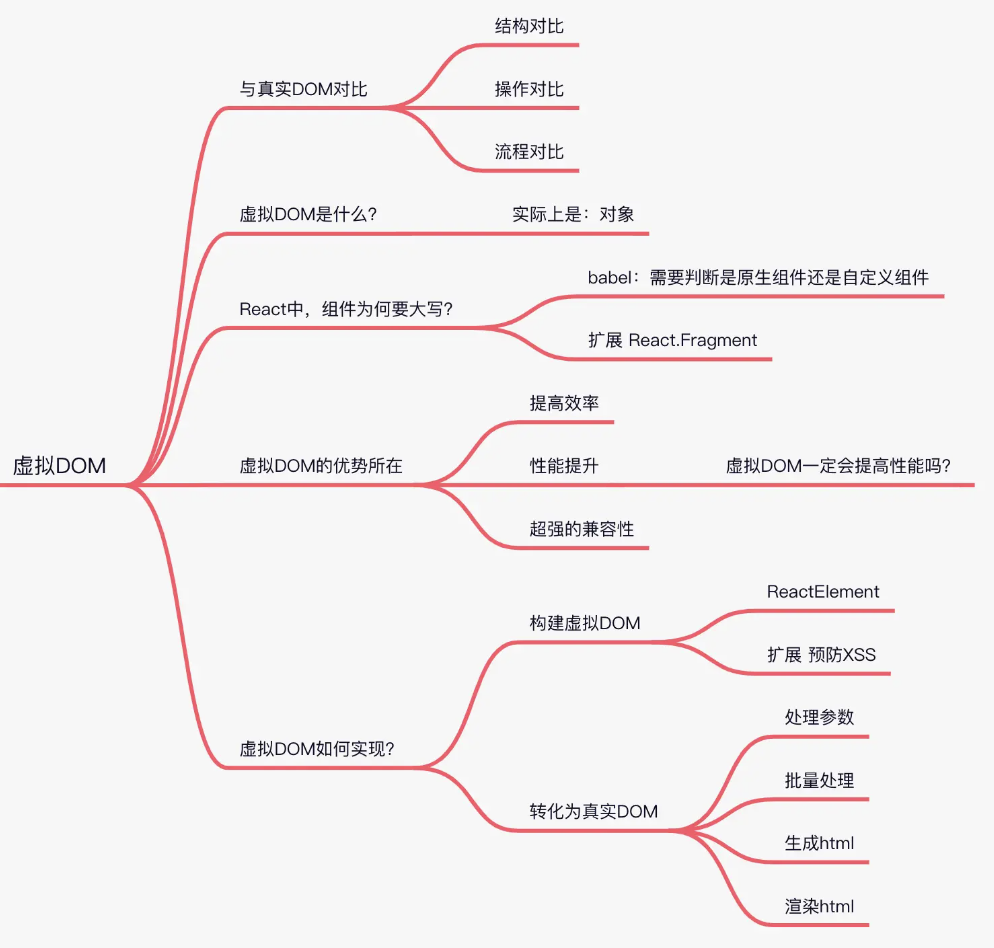
首先说说为什么要使用
Virturl DOM,因为操作真实DOM的耗费的性能代价太高,所以react内部使用js实现了一套dom结构,在每次操作在和真实dom之前,使用实现好的diff算法,对虚拟dom进行比较,递归找出有变化的dom节点,然后对其进行更新操作。为了实现虚拟DOM,我们需要把每一种节点类型抽象成对象,每一种节点类型有自己的属性,也就是prop,每次进行diff的时候,react会先比较该节点类型,假如节点类型不一样,那么react会直接删除该节点,然后直接创建新的节点插入到其中,假如节点类型一样,那么会比较prop是否有更新,假如有prop不一样,那么react会判定该节点有更新,那么重渲染该节点,然后在对其子节点进行比较,一层一层往下,直到没有子节点
具体实现步骤如下
- 用
JavaScript对象结构表示DOM树的结构;然后用这个树构建一个真正的DOM树,插到文档当中 - 当状态变更的时候,重新构造一棵新的对象树。然后用新的树和旧的树进行比较,记录两棵树差异
- 把记录的差异应用到真正的
DOM树上,视图就更新
虚拟DOM一定会提高性能吗?
很多人认为虚拟
DOM一定会提高性能,一定会更快,其实这个说法有点片面,因为虚拟DOM虽然会减少DOM操作,但也无法避免DOM操作
- 它的优势是在于
diff算法和批量处理策略,将所有的DOM操作搜集起来,一次性去改变真实的DOM,但在首次渲染上,虚拟DOM会多了一层计算,消耗一些性能,所以有可能会比html渲染的要慢 - 注意,虚拟
DOM实际上是给我们找了一条最短,最近的路径,并不是说比DOM操作的更快,而是路径最简单
react 的渲染过程中,兄弟节点之间是怎么处理的?也就是key值不一样的时候
通常我们输出节点的时候都是map一个数组然后返回一个
ReactNode,为了方便react内部进行优化,我们必须给每一个reactNode添加key,这个key prop在设计值处不是给开发者用的,而是给react用的,大概的作用就是给每一个reactNode添加一个身份标识,方便react进行识别,在重渲染过程中,如果key一样,若组件属性有所变化,则react只更新组件对应的属性;没有变化则不更新,如果key不一样,则react先销毁该组件,然后重新创建该组件
diff算法
我们知道
React会维护两个虚拟DOM,那么是如何来比较,如何来判断,做出最优的解呢?这就用到了diff算法
diff算法的作用
计算出Virtual DOM中真正变化的部分,并只针对该部分进行原生DOM操作,而非重新渲染整个页面。
传统diff算法
通过循环递归对节点进行依次对比,算法复杂度达到
O(n^3),n是树的节点数,这个有多可怕呢?——如果要展示1000个节点,得执行上亿次比较。即便是CPU快能执行30亿条命令,也很难在一秒内计算出差异。
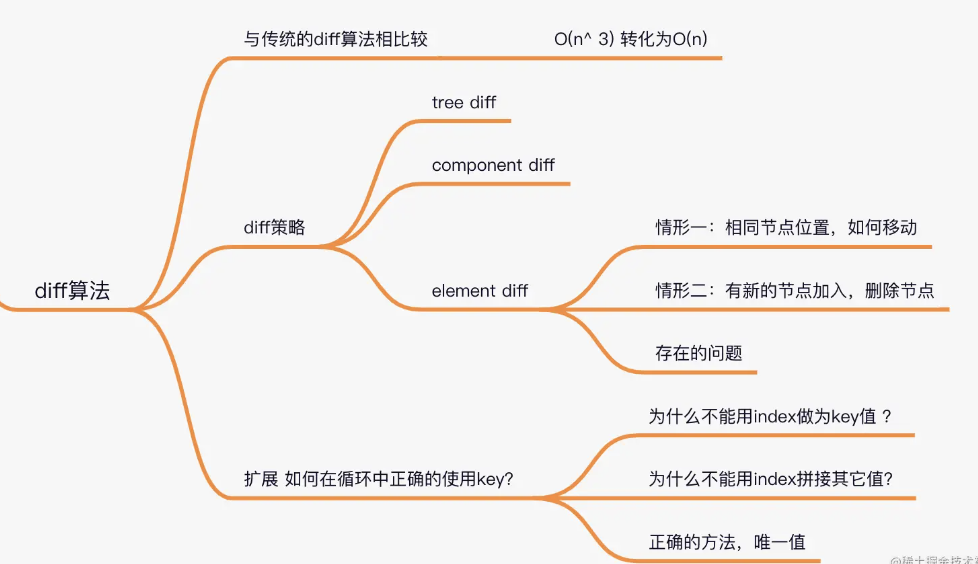
- 把树形结构按照层级分解,只比较同级元素。
- 给列表结构的每个单元添加唯一的
key属性,方便比较。 React只会匹配相同class的component(这里面的class指的是组件的名字)- 合并操作,调用
component的setState方法的时候,React将其标记为 -dirty.到每一个事件循环结束,React检查所有标记dirty的component重新绘制. - 开发人员可以重写
shouldComponentUpdate提高diff的性能
diff策略
React用 三大策略 将
O(n^3)杂度 转化为O(n)复杂度
策略一(tree diff):
- Web UI中DOM节点跨层级的移动操作特别少,可以忽略不计
- 同级比较,既然DOM 节点跨层级的移动操作少到可以忽略不计,那么React通过updateDepth 对 Virtual DOM 树进行层级控制,也就是同一层,在对比的过程中,如果发现节点不在了,会完全删除不会对其他地方进行比较,这样只需要对树遍历一次就OK了
策略二(component diff):
- 拥有相同类的两个组件 生成相似的树形结构,
- 拥有不同类的两个组件 生成不同的树形结构。
策略三(element diff):
对于同一层级的一组子节点,通过唯一id区分。
tree diff
React通过updateDepth对Virtual DOM树进行层级控制。- 对树分层比较,两棵树 只对同一层次节点 进行比较。如果该节点不存在时,则该节点及其子节点会被完全删除,不会再进一步比较。
- 只需遍历一次,就能完成整棵DOM树的比较。
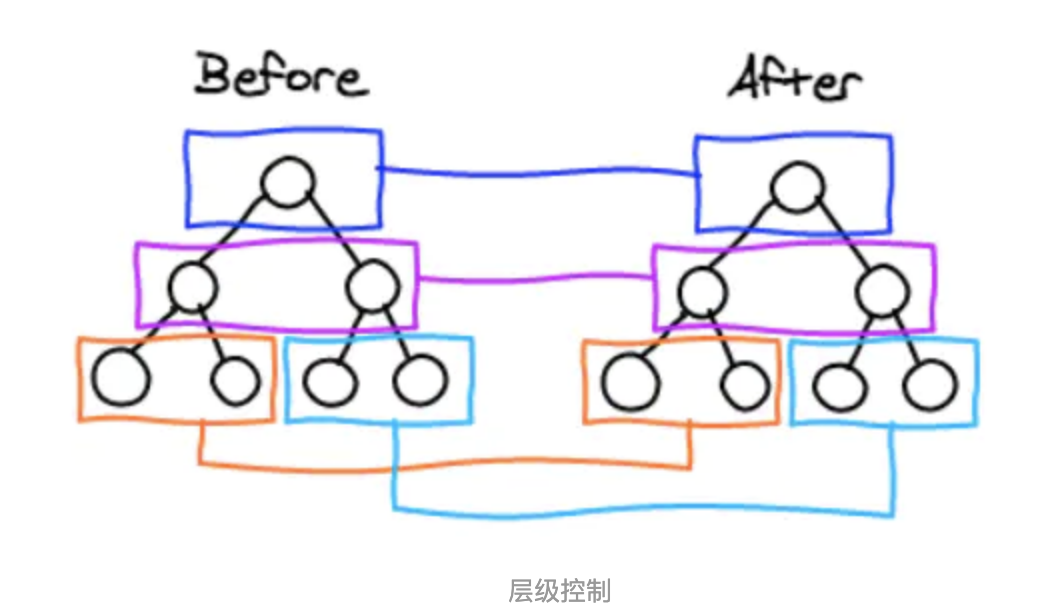
那么问题来了,如果DOM节点出现了跨层级操作,diff会咋办呢?
diff只简单考虑同层级的节点位置变换,如果是跨层级的话,只有创建节点和删除节点的操作。
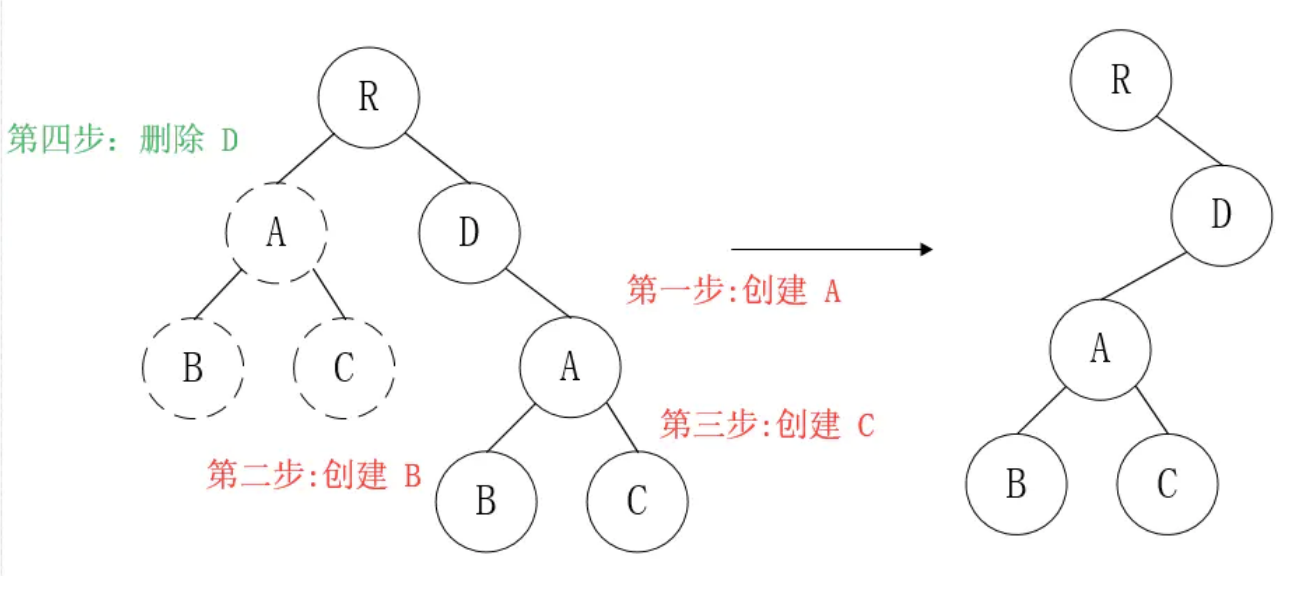
如上图所示,以A为根节点的整棵树会被重新创建,而不是移动,因此 官方建议不要进行DOM节点跨层级操作,可以通过CSS隐藏、显示节点,而不是真正地移除、添加DOM节点
component diff
React对不同的组件间的比较,有三种策略
- 同一类型的两个组件,按原策略(层级比较)继续比较
Virtual DOM树即可。 - 同一类型的两个组件,组件A变化为组件B时,可能
Virtual DOM没有任何变化,如果知道这点(变换的过程中,Virtual DOM没有改变),可节省大量计算时间,所以 用户 可以通过shouldComponentUpdate()来判断是否需要 判断计算。 - 不同类型的组件,将一个(将被改变的)组件判断为
dirty component(脏组件),从而替换 整个组件的所有节点。
注意:如果组件
D和组件G的结构相似,但是React判断是 不同类型的组件,则不会比较其结构,而是删除 组件D及其子节点,创建组件G及其子节点。
element diff
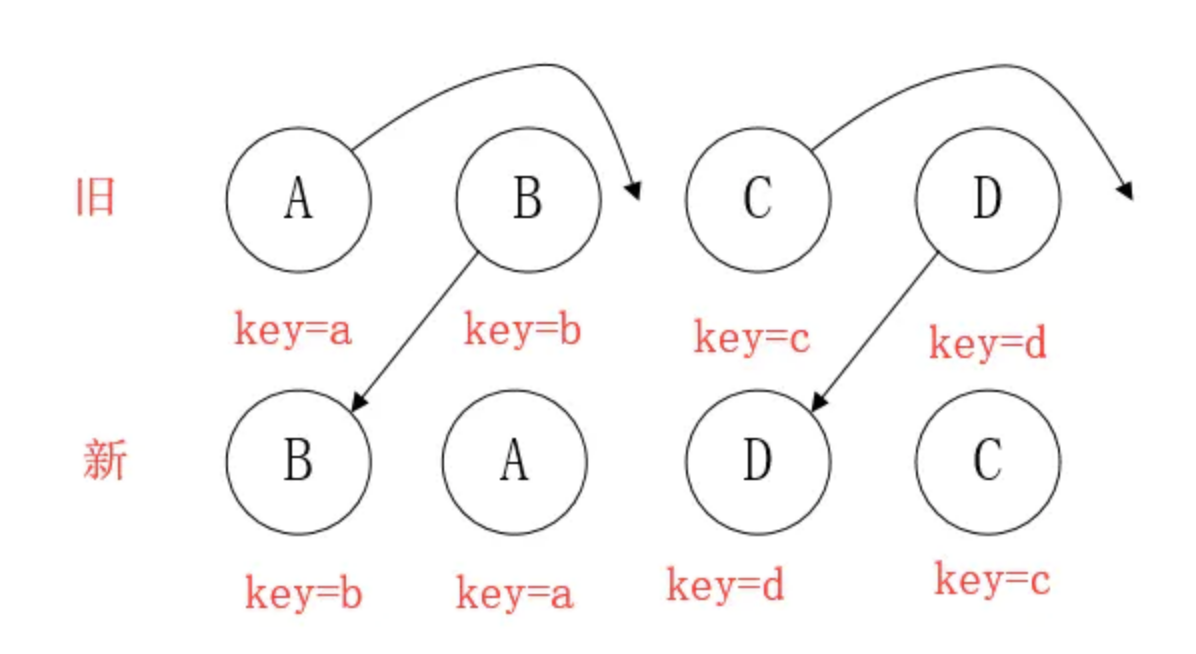
当节点处于同一层级时,
diff提供三种节点操作:删除、插入、移动。
- 插入 :组件
C不在集合(A,B)中,需要插入 - 删除 :
- 组件
D在集合(A,B,D)中,但D的节点已经更改,不能复用和更新,所以需要删除旧的D,再创建新的。 - 组件
D之前在 集合(A,B,D)中,但集合变成新的集合(A,B)了,D就需要被删除。
- 组件
- 移动 :组件D已经在集合(
A,B,C,D)里了,且集合更新时,D没有发生更新,只是位置改变,如新集合(A,D,B,C),D在第二个,无须像传统diff,让旧集合的第二个B和新集合的第二个D比较,并且删除第二个位置的B,再在第二个位置插入D,而是 (对同一层级的同组子节点) 添加唯一key进行区分,移动即可。
diff的不足与待优化的地方
尽量减少类似将最后一个节点移动到列表首部的操作,当节点数量过大或更新操作过于频繁时,会影响React的渲染性能
Diff 的瓶颈以及 React 的应对
由于 diff 操作本身会带来性能上的损耗,在 React 文档中提到过,即使最先进的算法中,将前后两棵树完全比对的算法复杂度为O(n3),其中 n 为树中元素的数量。
如果 React 使用了该算法,那么仅仅一千个元素的页面所需要执行的计算量就是十亿的量级,这无疑是无法接受的。
为了降低算法的复杂度,React 的 diff 会预设三个限制:
- 只对同级元素进行
diff比对。如果一个元素节点在前后两次更新中跨越了层级,那么React不会尝试复用它 - 两个不同类型的元素会产生出不同的树。如果元素由
div变成p,React会销毁div及其子孙节点,并新建p及其子孙节点 - 开发者可以通过
key来暗示哪些子元素在不同的渲染下能保持稳定
React 中 key 的作用是什么
Key是React用于追踪哪些列表中元素被修改、被添加或者被移除的辅助标识- 给每一个
vnode的唯一id,可以依靠key,更准确,更快的拿到oldVnode中对应的vnode节点
    <!-- 更新前 -->
    <div>
      <p key="a">a</p>
      <h3 key="b">b</he>
    </div>

    <!-- 更新后 -->
    <div>
      <h3 key="b">b</h3>
      <p key="a">a</p>
    </div>
- 如果没有
key,React会认为div的第一个子节点由p变成h3,第二个子节点由h3变成p,则会销毁这两个节点并重新构造 - 但是当我们用
key指明了节点前后对应关系后,React知道key === "a"的p更新后还在,所以可以复用该节点,只需要交换顺序。 key是React用来追踪哪些列表元素被修改、被添加或者被移除的辅助标志。- 在开发过程中,我们需要保证某个元素的
key在其同级元素中具有唯一性。在React diff算法中,React会借助元素的Key值来判断该元素是新近创建的还是被移动而来的元素,从而减少不必要的元素重新渲染
关于Fiber
React Fiber用类似requestIdleCallback的机制来做异步diff。但是之前数据结构不支持这样的实现异步diff,于是React实现了一个类似链表的数据结构,将原来的递归diff(不可被中断) 变成了现在的遍历diff,这样就能做到异步可更新并且可以中断恢复执行
React 的核心流程可以分为两个部分:
reconciliation(调度算法,也可称为render)- 更新
state与props; - 调用生命周期钩子;
- 生成
virtual dom- 这里应该称为
Fiber Tree更为符合;
- 这里应该称为
- 通过新旧
vdom进行diff算法,获取vdom change - 确定是否需要重新渲染
- 更新
commit- 如需要,则操作
dom节点更新
- 如需要,则操作
要了解
Fiber,我们首先来看为什么需要它
- 问题 : 随着应用变得越来越庞大,整个更新渲染的过程开始变得吃力,大量的组件渲染会导致主进程长时间被占用,导致一些动画或高频操作出现卡顿和掉帧的情况。而关键点,便是 同步阻塞。在之前的调度算法中,React 需要实例化每个类组件,生成一颗组件树,使用
同步递归的方式进行遍历渲染,而这个过程最大的问题就是无法 暂停和恢复。 - 解决方案 : 解决同步阻塞的方法,通常有两种:
异步与任务分割。而React Fiber便是为了实现任务分割而诞生的 - 简述
- 在
React V16将调度算法进行了重构, 将之前的stack reconciler重构成新版的fiber reconciler,变成了具有链表和指针的 单链表树遍历算法。通过指针映射,每个单元都记录着遍历当下的上一步与下一步,从而使遍历变得可以被暂停和重启 - 这里我理解为是一种 任务分割调度算法,主要是 将原先同步更新渲染的任务分割成一个个独立的 小任务单位,根据不同的优先级,将小任务分散到浏览器的空闲时间执行,充分利用主进程的事件循环机制
- 在
- 核心
Fiber这里可以具象为一个数据结构
    class Fiber {
    	constructor(instance) {
    		this.instance = instance
    		// 指向第一个 child 节点
    		this.child = child
    		// 指向父节点
    		this.return = parent
    		// 指向第一个兄弟节点
    		this.sibling = previous
    	}
    }
- 链表树遍历算法 : 通过
节点保存与映射,便能够随时地进行停止和重启,这样便能达到实现任务分割的基本前提- 首先通过不断遍历子节点,到树末尾;
- 开始通过
sibling遍历兄弟节点; - return 返回父节点,继续执行2;
- 直到 root 节点后,跳出遍历;
- 任务分割 ,React 中的渲染更新可以分成两个阶段
- reconciliation 阶段 : vdom 的数据对比,是个适合拆分的阶段,比如对比一部分树后,先暂停执行个动画调用,待完成后再回来继续比对
- Commit 阶段 : 将 change list 更新到 dom 上,并不适合拆分,才能保持数据与 UI 的同步。否则可能由于阻塞 UI 更新,而导致数据更新和 UI 不一致的情况
- 分散执行: 任务分割后,就可以把小任务单元分散到浏览器的空闲期间去排队执行,而实现的关键是两个新API:
requestIdleCallback与requestAnimationFrame- 低优先级的任务交给
requestIdleCallback处理,这是个浏览器提供的事件循环空闲期的回调函数,需要pollyfill,而且拥有deadline参数,限制执行事件,以继续切分任务; - 高优先级的任务交给
requestAnimationFrame处理;
- 低优先级的任务交给
    // 类似于这样的方式
    requestIdleCallback((deadline) => {
        // 当有空闲时间时,我们执行一个组件渲染;
        // 把任务塞到一个个碎片时间中去;
        while ((deadline.timeRemaining() > 0 || deadline.didTimeout) && nextComponent) {
            nextComponent = performWork(nextComponent);
        }
    });
- 优先级策略: 文本框输入 > 本次调度结束需完成的任务 > 动画过渡 > 交互反馈 > 数据更新 > 不会显示但以防将来会显示的任务
Fiber其实可以算是一种编程思想,在其它语言中也有许多应用(Ruby Fiber)。- 核心思想是 任务拆分和协同,主动把执行权交给主线程,使主线程有时间空挡处理其他高优先级任务。
- 当遇到进程阻塞的问题时,任务分割、异步调用 和 缓存策略 是三个显著的解决思路。
6 受控组件与非受控组件
受控组件
- 表单的值,受到
state控制 - 需要自行监听
onChange,更新state - 对比非受控组件
    import React from 'react'

    class FormDemo extends React.Component {
        constructor(props) {
            super(props)
            this.state = {
                name: 'test',
                info: '个人信息',
                city: 'shenzhen',
                flag: true,
                gender: 'male'
            }
        }
        render() {

            // 受控组件
            // return <div>
            //     <p>{this.state.name}</p>
            //     <label htmlFor="inputName">姓名:</label> {/* 用 htmlFor 代替 for */}
            //     <input id="inputName" value={this.state.name} onChange={this.onInputChange}/>
            // </div>

            // textarea - 使用 value
            return <div>
                <textarea value={this.state.info} onChange={this.onTextareaChange}/>
                <p>{this.state.info}</p>
            </div>

            // // select - 使用 value
            // return <div>
            //     <select value={this.state.city} onChange={this.onSelectChange}>
            //         <option value="beijing">北京</option>
            //         <option value="shanghai">上海</option>
            //         <option value="shenzhen">深圳</option>
            //     </select>
            //     <p>{this.state.city}</p>
            // </div>

            // // checkbox
            // return <div>
            //     <input type="checkbox" checked={this.state.flag} onChange={this.onCheckboxChange}/>
            //     <p>{this.state.flag.toString()}</p>
            // </div>

            // // radio
            // return <div>
            //     male <input type="radio" name="gender" value="male" checked={this.state.gender === 'male'} onChange={this.onRadioChange}/>
            //     female <input type="radio" name="gender" value="female" checked={this.state.gender === 'female'} onChange={this.onRadioChange}/>
            //     <p>{this.state.gender}</p>
            // </div>

            // 非受控组件 - 后面再讲
        }
        onInputChange = (e) => {
            this.setState({
                name: e.target.value
            })
        }
        onTextareaChange = (e) => {
            this.setState({
                info: e.target.value
            })
        }
        onSelectChange = (e) => {
            this.setState({
                city: e.target.value
            })
        }
        onCheckboxChange = () => {
            this.setState({
                flag: !this.state.flag
            })
        }
        onRadioChange = (e) => {
            this.setState({
                gender: e.target.value
            })
        }
    }

    export default FormDemo
非受控组件
ref访问DOM元素或者某个组件实例的句柄ref有两种使用方式React.createRef()创建ref,通过ref访问DOM元素或者某个组件实例React.forwardRef()函数组件中传递ref,通过ref访问DOM元素或者某个组件实例
ref有两种使用场景defaultValue、defaultChecked- 手动操作
DOM元素
使用场景
- 必须手动操作
DOM元素,setState实现不了 - 文件上传
<input type="file" /> - 某些富文本编辑器,需要传入
DOM元素
    import React from 'react'

    class App extends React.Component {
        constructor(props) {
            super(props)
            this.state = {
                name: 'test',
                flag: true,
            }
            this.nameInputRef = React.createRef() // 创建 ref
            this.fileInputRef = React.createRef()
        }
        render() {
            // // input defaultValue
            // return <div>
            //     {/* 使用 defaultValue 而不是 value ,使用 ref */}
            //     <input defaultValue={this.state.name} ref={this.nameInputRef}/>
            //     {/* state 并不会随着改变 */}
            //     <span>state.name: {this.state.name}</span>
            //     <br/>
            //     <button onClick={this.alertName}>alert name</button>
            // </div>

            // // checkbox defaultChecked
            // return <div>
            //     <input
            //         type="checkbox"
            //         defaultChecked={this.state.flag}
            //     />
            // </div>

            // file
            return <div>
                <input type="file" ref={this.fileInputRef}/>
                <button onClick={this.alertFile}>alert file</button>
            </div>

        }
        alertName = () => {
            const elem = this.nameInputRef.current // 通过 ref 获取 DOM 节点
            alert(elem.value) // 不是 this.state.name
        }
        alertFile = () => {
            const elem = this.fileInputRef.current // 通过 ref 获取 DOM 节点
            alert(elem.files[0].name)
        }
    }

    export default App
7 组件生命周期
[点击查看各个版本的生命周期 (opens new window)](https://projects.wojtekmaj.pl/react- lifecycle-methods-diagram/)
> =16.4
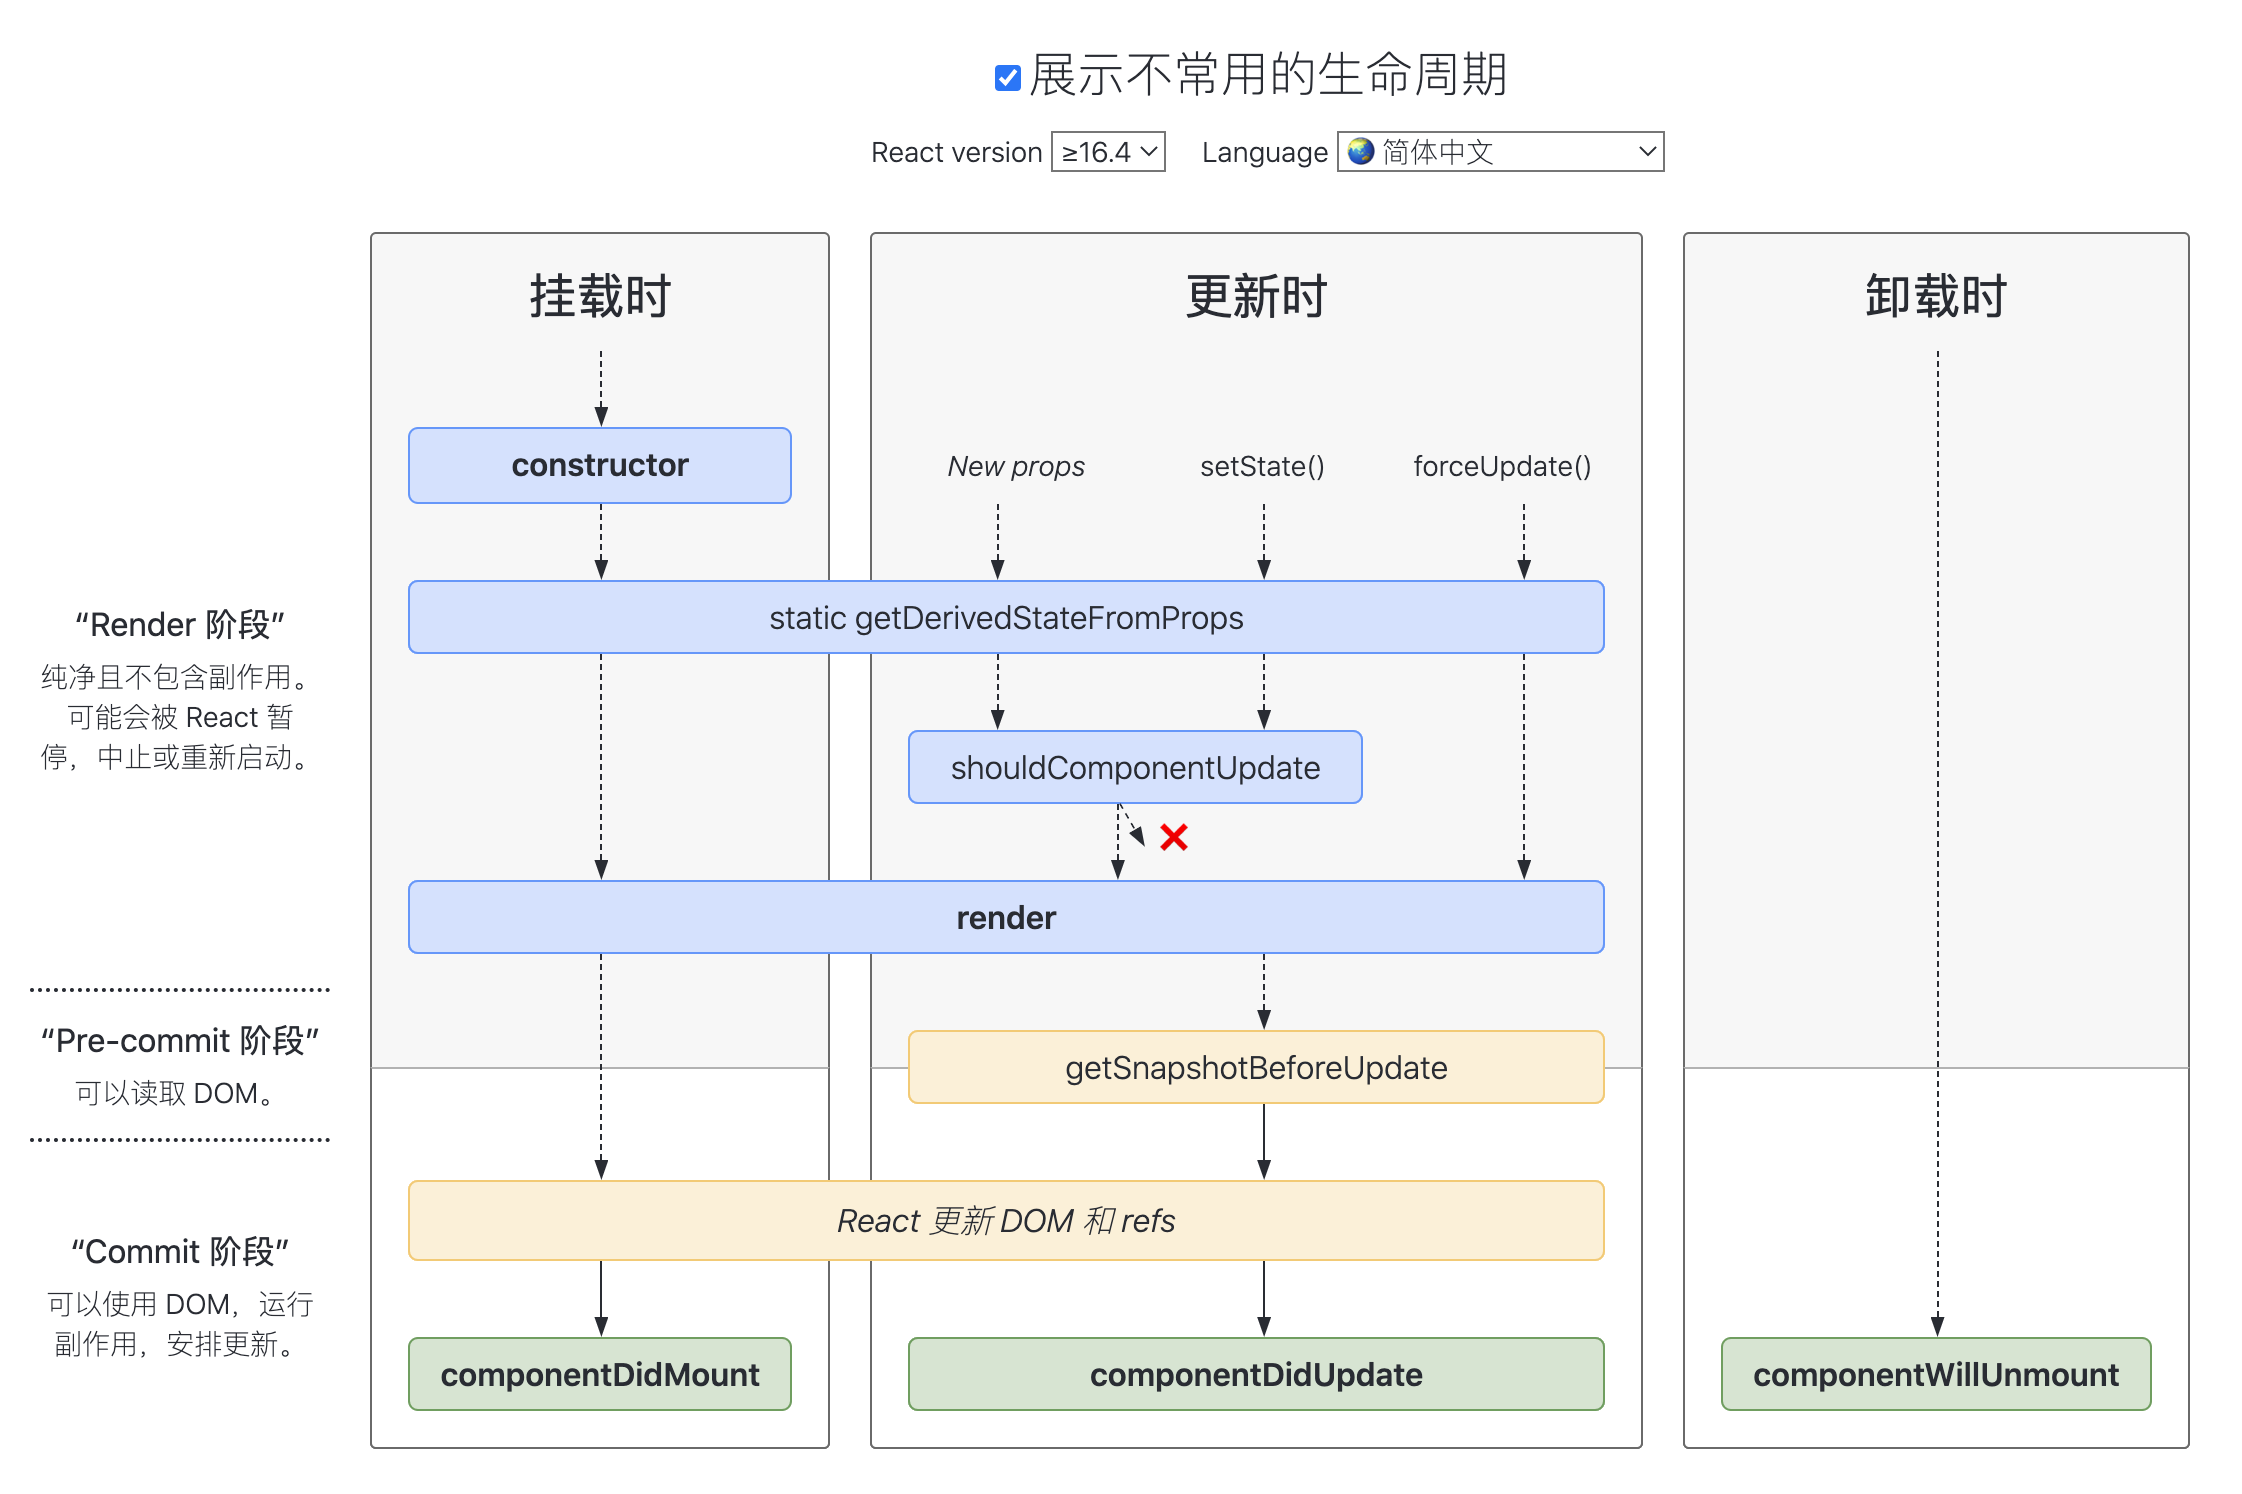
react旧版生命周期函数
初始化阶段
getDefaultProps:获取实例的默认属性getInitialState:获取每个实例的初始化状态componentWillMount:组件即将被装载、渲染到页面上render:组件在这里生成虚拟的DOM节点componentDidMount:组件真正在被装载之后
运行中状态
componentWillReceiveProps:组件将要接收到属性的时候调用- 新版本已被废弃,设置为不安全的生命周期函数
UNSAFE_componentWillReceiveProps - 当
props改变的时候才调用,子组件第二次接收到props的时候
- 新版本已被废弃,设置为不安全的生命周期函数
shouldComponentUpdate:组件接受到新属性或者新状态的时候(可以返回false,接收数据后不更新,阻止render调用,后面的函数不会被继续执行了)componentWillUpdate:组件即将更新不能修改属性和状态render:组件重新描绘componentDidUpdate:组件已经更新
销毁阶段
componentWillUnmount:组件即将销毁
新版生命周期
在新版本中,
React官方对生命周期有了新的 变动建议:
- 使用
getDerivedStateFromProps替换componentWillMount; - 使用
getSnapshotBeforeUpdate替换componentWillUpdate; - 避免使用
componentWillReceiveProps;
其实该变动的原因,正是由于上述提到的
Fiber。首先,从上面我们知道React可以分成reconciliation与commit两个阶段,对应的生命周期如下:
reconciliation
componentWillMountcomponentWillReceivePropsshouldComponentUpdatecomponentWillUpdate
commit
componentDidMountcomponentDidUpdatecomponentWillUnmount
在
Fiber中,reconciliation阶段进行了任务分割,涉及到 暂停 和 重启,因此可能会导致reconciliation中的生命周期函数在一次更新渲染循环中被 多次调用 的情况,产生一些意外错误
新版的建议生命周期如下:
    class Component extends React.Component {
      // 替换 `componentWillReceiveProps` ,
      // 初始化和 update 时被调用
      // 静态函数,无法使用 this
      static getDerivedStateFromProps(nextProps, prevState) {}

      // 判断是否需要更新组件
      // 可以用于组件性能优化
      shouldComponentUpdate(nextProps, nextState) {}

      // 组件被挂载后触发
      componentDidMount() {}

      // 替换 componentWillUpdate
      // 可以在更新之前获取最新 dom 数据
      getSnapshotBeforeUpdate() {}

      // 组件更新后调用
      componentDidUpdate() {}

      // 组件即将销毁
      componentWillUnmount() {}

      // 组件已销毁
      componentDidUnMount() {}
    }
使用建议:
- 在
constructor初始化state; - 在
componentDidMount中进行事件监听,并在componentWillUnmount中解绑事件; - 在
componentDidMount中进行数据的请求,而不是在componentWillMount; - 需要根据
props更新state时,使用getDerivedStateFromProps(nextProps, prevState);- 旧
props需要自己存储,以便比较;
- 旧
react中这两个生命周期会触发死循环
componentWillUpdate生命周期在shouldComponentUpdate返回true后被触发。在这两个生命周期只要视图更新就会触发,因此不能再这两个生命周期中使用setState否则会导致死循环
    public static getDerivedStateFromProps(nextProps, prevState) {
    	// 当新 props 中的 data 发生变化时,同步更新到 state 上
    	if (nextProps.data !== prevState.data) {
    		return {
    			data: nextProps.data
    		}
    	} else {
    		return null1
    	}
    }
可以在
componentDidUpdate监听props或者state的变化,例如:
    componentDidUpdate(prevProps) {
    	// 当 id 发生变化时,重新获取数据
    	if (this.props.id !== prevProps.id) {
    		this.fetchData(this.props.id);
    	}
    }
- 在
componentDidUpdate使用setState时,必须加条件,否则将进入死循环; getSnapshotBeforeUpdate(prevProps, prevState)可以在更新之前获取最新的渲染数据,它的调用是在render之后,update之前;shouldComponentUpdate: 默认每次调用setState,一定会最终走到diff阶段,但可以通过shouldComponentUpdate的生命钩子返回false来直接阻止后面的逻辑执行,通常是用于做条件渲染,优化渲染的性能。
为什么有些react生命周期钩子被标记为UNSAFE
componentWillMount
componentWillMount生命周期发生在首次渲染前,一般使用的小伙伴大多在这里初始化数据或异步获取外部数据赋值。初始化数据,react官方建议放在constructor里面。而异步获取外部数据,渲染并不会等待数据返回后再去渲染
    class Example extends React.Component {
        state = {
            value: ''
        };
        componentWillMount() {
            this.setState({
                value: this.props.source.value
            });
            this.props.source.subscribe(this.handleChange);
        }
        componentWillUnmount() {
            this.props.source.unsubscribe(this.handleChange );
        }
        handleChange = source => {
            this.setState({
                value: source.value
            });
        };
    }
试想一下,假如组件在第一次渲染的时候被中断,由于组件没有完成渲染,所以并不会执行
componentWillUnmount生命周期(注:很多人经常认为componentWillMount和componentWillUnmount总是配对,但这并不是一定的。只有调用componentDidMount后,React才能保证稍后调用componentWillUnmount进行清理)。因此handleSubscriptionChange还是会在数据返回成功后被执行,这时候setState由于组件已经被移除,就会导致内存泄漏。所以建议把异步获取外部数据写在componentDidMount生命周期里,这样就能保证componentWillUnmount生命周期会在组件移除的时候被执行,避免内存泄漏的风险。
componentWillReceiveProps
componentWillReceiveProps生命周期是在props更新时触发。一般用于props参数更新时同步更新state参数。但如果在componentWillReceiveProps生命周期直接调用父组件的某些有调用setState的函数,会导致程序死循环
    // 如下是子组件componentWillReceiveProps里调用父组件改变state的函数示例

    class Parent extends React.Component{
        constructor(){
            super();
            this.state={
                list: [],
                selectedData: {}
            };
        }

        changeSelectData = selectedData => {
            this.setState({
                selectedData
            });
        }

        render(){
            return (
                <Clild list={this.state.list} changeSelectData={this.changeSelectData}/>
            );
        }
    }

    ...
    class Child extends React.Component{
        constructor(){
            super();
            this.state={
                list: []
            };
        }
        componentWillReceiveProps(nextProps){
            this.setState({
                list: nextProps.list
            })
            nextProps.changeSelectData(nextProps.list[0]); //默认选择第一个
        }
        ...
    }
- 如上代码,在
Child组件的componentWillReceiveProps里直接调用Parent组件的changeSelectData去更新Parent组件state的selectedData值。会触发Parent组件重新渲染,而Parent组件重新渲染会触发Child组件的componentWillReceiveProps生命周期函数执行。如此就会陷入死循环。导致程序崩溃。 - 所以,
React官方把componentWillReceiveProps替换为UNSAFE_componentWillReceiveProps,在使用这个生命周期的时候注意它会有缺陷,要注意避免,比如上面例子,Child在componentWillReceiveProps调用changeSelectData时先判断list是否有更新再确定是否要调用,就可以避免死循环。
componentWillUpdate
componentWillUpdate生命周期在视图更新前触发。一般用于视图更新前保存一些数据方便视图更新完成后赋值
    // 如下是列表加载更新后回到当前滚动条位置的案例
    class ScrollingList extends React.Component {
        listRef = null;
        previousScrollOffset = null;
        componentWillUpdate(nextProps, nextState) {
            if (this.props.list.length < nextProps.list.length) {
                this.previousScrollOffset = this.listRef.scrollHeight - this.listRef.scrollTop;
            }
        }
        componentDidUpdate(prevProps, prevState) {
            if (this.previousScrollOffset !== null) {
                this.listRef.scrollTop = this.listRef.scrollHeight - this.previousScrollOffset;
                this.previousScrollOffset = null;
            }
        }
        render() {
            return (
                `<div>` {/* ...contents... */}`</div>`
            );
        }
        setListRef = ref => {    this.listRef = ref;   };
- 由于
componentWillUpdate和componentDidUpdate这两个生命周期函数有一定的时间差(componentWillUpdate后经过渲染、计算、再更新DOM元素,最后才调用componentDidUpdate),如果这个时间段内用户刚好拉伸了浏览器高度,那componentWillUpdate计算的previousScrollOffset就不准确了。如果在componentWillUpdate进行setState操作,会出现多次调用只更新一次的问题,把setState放在componentDidUpdate,能保证每次更新只调用一次。 - 所以,
react官方建议把componentWillUpdate替换为UNSAFE_componentWillUpdate。如果真的有以上案例的需求,可以使用16.3新加入的一个周期函数getSnapshotBeforeUpdate
结论
React意识到componentWillMount、componentWillReceiveProps和componentWillUpdate这三个生命周期函数有缺陷,比较容易导致崩溃。但是由于旧的项目已经在用以及有些老开发者习惯用这些生命周期函数,于是通过给它加UNSAFE_来提醒用它的人要注意它们的缺陷React加入了两个新的生命周期函数getSnapshotBeforeUpdate和getDerivedStateFromProps,目的为了即使不使用这三个生命周期函数,也能实现只有这三个生命周期能实现的功能
在生命周期中的哪一步你应该发起 AJAX 请求
我们应当将AJAX 请求放到
componentDidMount函数中执行,主要原因有下
React下一代调和算法Fiber会通过开始或停止渲染的方式优化应用性能,其会影响到componentWillMount的触发次数。对于componentWillMount这个生命周期函数的调用次数会变得不确定,React可能会多次频繁调用componentWillMount。如果我们将AJAX请求放到componentWillMount函数中,那么显而易见其会被触发多次,自然也就不是好的选择。- 如果我们将
AJAX请求放置在生命周期的其他函数中,我们并不能保证请求仅在组件挂载完毕后才会要求响应。如果我们的数据请求在组件挂载之前就完成,并且调用了setState函数将数据添加到组件状态中,对于未挂载的组件则会报错。而在componentDidMount函数中进行AJAX请求则能有效避免这个问题
8 Portal传送门
- 在以前,
react中所有的组件都会位于#app下,组件默认会按照既定层级嵌套渲染,而使用Portals提供了一种脱离#app的组件 - 因此
Portals适合脱离文档流(out of flow) 的组件(让组件渲染到父组件以外),特别是position: absolute与position: fixed的组件。比如模态框,通知,警告,goTop等
    import React from 'react'
    import ReactDOM from 'react-dom'
    import './style.css'

    class App extends React.Component {
        constructor(props) {
            super(props)
            this.state = {}
        }
        render() {
            // 正常渲染
            // return <div className="modal">
            //     {this.props.children} {/* 类似 vue slot */}
            // </div>

            // 使用 Portals 渲染到 body 上。
            // fixed 元素要放在 body 上,有更好的浏览器兼容性。
            return ReactDOM.createPortal(
                <div className="modal">{this.props.children}</div>,
                document.body // DOM 节点
            )
        }
    }

    export default App
    /* style.css */
    .modal {
        position: fixed;
        width: 300px;
        height: 100px;
        top: 100px;
        left: 50%;
        margin-left: -150px;
        background-color: #000;
        /* opacity: .2; */
        color: #fff;
        text-align: center;
    }
以下是官方一个模态框的示例
    <html>
      <body>
        <div id="app"></div>
        <div id="modal"></div>
        <div id="gotop"></div>
        <div id="alert"></div>
      </body>
    </html>
    const modalRoot = document.getElementById('modal');

    class Modal extends React.Component {
      constructor(props) {
        super(props);
        this.el = document.createElement('div');
      }

      componentDidMount() {
        modalRoot.appendChild(this.el);
      }

      componentWillUnmount() {
        modalRoot.removeChild(this.el);
      }

      render() {
        return ReactDOM.createPortal(
          this.props.children,
          this.el,
        );
      }
    }
9 Context
公共信息(语言、主题)传递给每个组件,用props太繁琐
    import React from 'react'

    // 创建 Context 填入默认值(任何一个 js 变量)
    const ThemeContext = React.createContext('light')

    // 底层组件 - 函数是组件
    function ThemeLink (props) {
        // const theme = this.context // 会报错。函数式组件没有实例,即没有 this

        // 函数式组件可以使用 Consumer
        return <ThemeContext.Consumer>
            { value => <p>link's theme is {value}</p> }
        </ThemeContext.Consumer>
    }

    // 底层组件 - class 组件
    class ThemedButton extends React.Component {
        // 指定 contextType 读取当前的 theme context。
        // static contextType = ThemeContext // 也可以用 ThemedButton.contextType = ThemeContext
        render() {
            const theme = this.context // React 会往上找到最近的 theme Provider,然后使用它的值。
            return <div>
                <p>button's theme is {theme}</p>
            </div>
        }
    }
    ThemedButton.contextType = ThemeContext // 指定 contextType 读取当前的 theme context。

    // 中间的组件再也不必指明往下传递 theme 了。
    function Toolbar(props) {
        return (
            <div>
                <ThemedButton />
                <ThemeLink />
            </div>
        )
    }

    class App extends React.Component {
        constructor(props) {
            super(props)
            this.state = {
                theme: 'light'
            }
        }
        render() {
            return <ThemeContext.Provider value={this.state.theme}>
                <Toolbar />
                <hr/>
                <button onClick={this.changeTheme}>change theme</button>
            </ThemeContext.Provider>
        }
        changeTheme = () => {
            this.setState({
                theme: this.state.theme === 'light' ? 'dark' : 'light'
            })
        }
    }

    export default App
10 异步组件
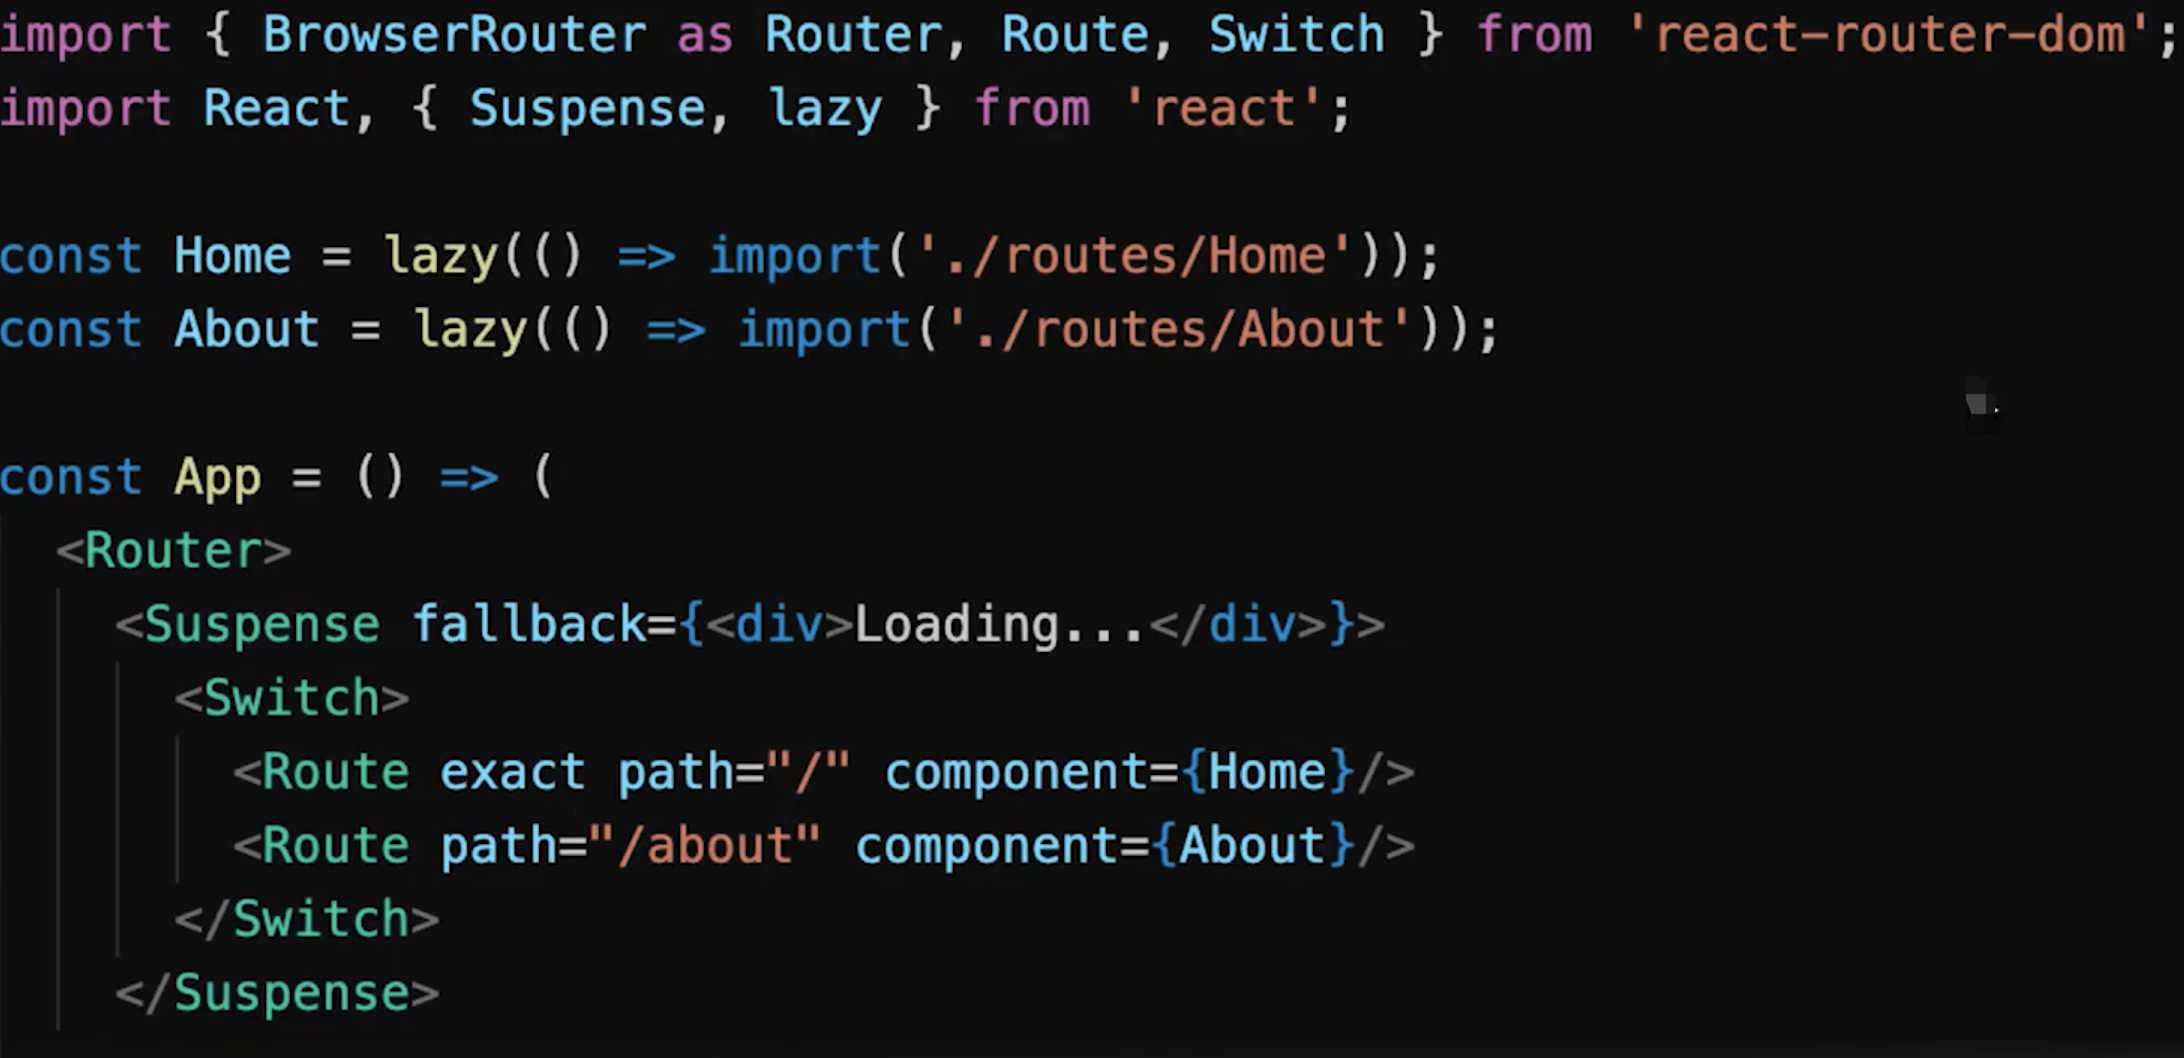
import()React.lazyReact.Suspense
何时使用异步组件
- 加载大组件
- 路由懒加载
    import React from 'react'

    const ContextDemo = React.lazy(() => import('./ContextDemo'))

    class App extends React.Component {
        constructor(props) {
            super(props)
        }
        render() {
            return <div>
                <p>引入一个动态组件</p>
                <hr />
                <React.Suspense fallback={<div>Loading...</div>}>
                    <ContextDemo/>
                </React.Suspense>
            </div>

            // 1. 强制刷新,可看到 loading (看不到就限制一下 chrome 网速)
            // 2. 看 network 的 js 加载
        }
    }

    export default App
react router如何配置懒加载
11 性能优化
使用shouldComponentUpdate优化
shouldComponentUpdate(简称SCU) 允许我们手动地判断是否要进行组件更新,根据组件的应用场景设置函数的合理返回值能够帮我们避免不必要的更新PureComponent和React.memo- 不可变值
immutable.js - 使用
key来帮助React识别列表中所有子组件的最小变化
- React 默认 :
父组件有更新,子组件则无条件也更新!!!- 性能优化对于
React更加重要!SCU一定要每次都用吗?—— 需要的时候才优化
总结
shouldComponentUpdate默认返回true,即react默认重新渲染所有子组件- 必须配合
不可变值使用 - 可先不使用
SCU,有性能问题在考虑
    import React from 'react'

    class App extends React.Component {
        constructor(props) {
            super(props)
            this.state = {
                count: 0
            }
        }
        render() {
            return <div>
                <span>{this.state.count}</span>
                <button onClick={this.onIncrease}>increase</button>
            </div>
        }
        onIncrease = () => {
            this.setState({
                count: this.state.count + 1
            })
        }
        // 演示 shouldComponentUpdate 的基本使用
        shouldComponentUpdate(nextProps, nextState) {
            if (nextState.count !== this.state.count) {
                return true // 可以渲染
            }
            return false // 不重复渲染
        }
    }

    export default App
    import React from 'react'
    import PropTypes from 'prop-types'
    import _ from 'lodash'

    class Input extends React.Component {
        constructor(props) {
            super(props)
            this.state = {
                title: ''
            }
        }
        render() {
            return <div>
                <input value={this.state.title} onChange={this.onTitleChange}/>
                <button onClick={this.onSubmit}>提交</button>
            </div>
        }
        onTitleChange = (e) => {
            this.setState({
                title: e.target.value
            })
        }
        onSubmit = () => {
            const { submitTitle } = this.props
            submitTitle(this.state.title)

            this.setState({
                title: ''
            })
        }
    }
    // props 类型检查
    Input.propTypes = {
        submitTitle: PropTypes.func.isRequired
    }

    class List extends React.Component {
        constructor(props) {
            super(props)
        }
        render() {
            const { list } = this.props

            return <ul>{list.map((item, index) => {
                return <li key={item.id}>
                    <span>{item.title}</span>
                </li>
            })}</ul>
        }

        // 增加 shouldComponentUpdate
        shouldComponentUpdate(nextProps, nextState) {
            // _.isEqual 做对象或者数组的深度比较(一次性递归到底)
            if (_.isEqual(nextProps.list, this.props.list)) {
                // 相等,则不重复渲染
                return false
            }
            return true // 不相等,则渲染
        }
    }
    // props 类型检查
    List.propTypes = {
        list: PropTypes.arrayOf(PropTypes.object).isRequired
    }

    class TodoListDemo extends React.Component {
        constructor(props) {
            super(props)
            this.state = {
                list: [
                    {
                        id: 'id-1',
                        title: '标题1'
                    },
                    {
                        id: 'id-2',
                        title: '标题2'
                    },
                    {
                        id: 'id-3',
                        title: '标题3'
                    }
                ]
            }
        }
        render() {
            return <div>
                <Input submitTitle={this.onSubmitTitle}/>
                <List list={this.state.list}/>
            </div>
        }
        onSubmitTitle = (title) => {
            // 正确的用法
            this.setState({
                list: this.state.list.concat({
                    id: `id-${Date.now()}`,
                    title
                })
            })

            // // 为了演示 SCU ,故意写的错误用法
            // this.state.list.push({
            //     id: `id-${Date.now()}`,
            //     title
            // })
            // this.setState({
            //     list: this.state.list
            // })
        }
    }

    export default TodoListDemo
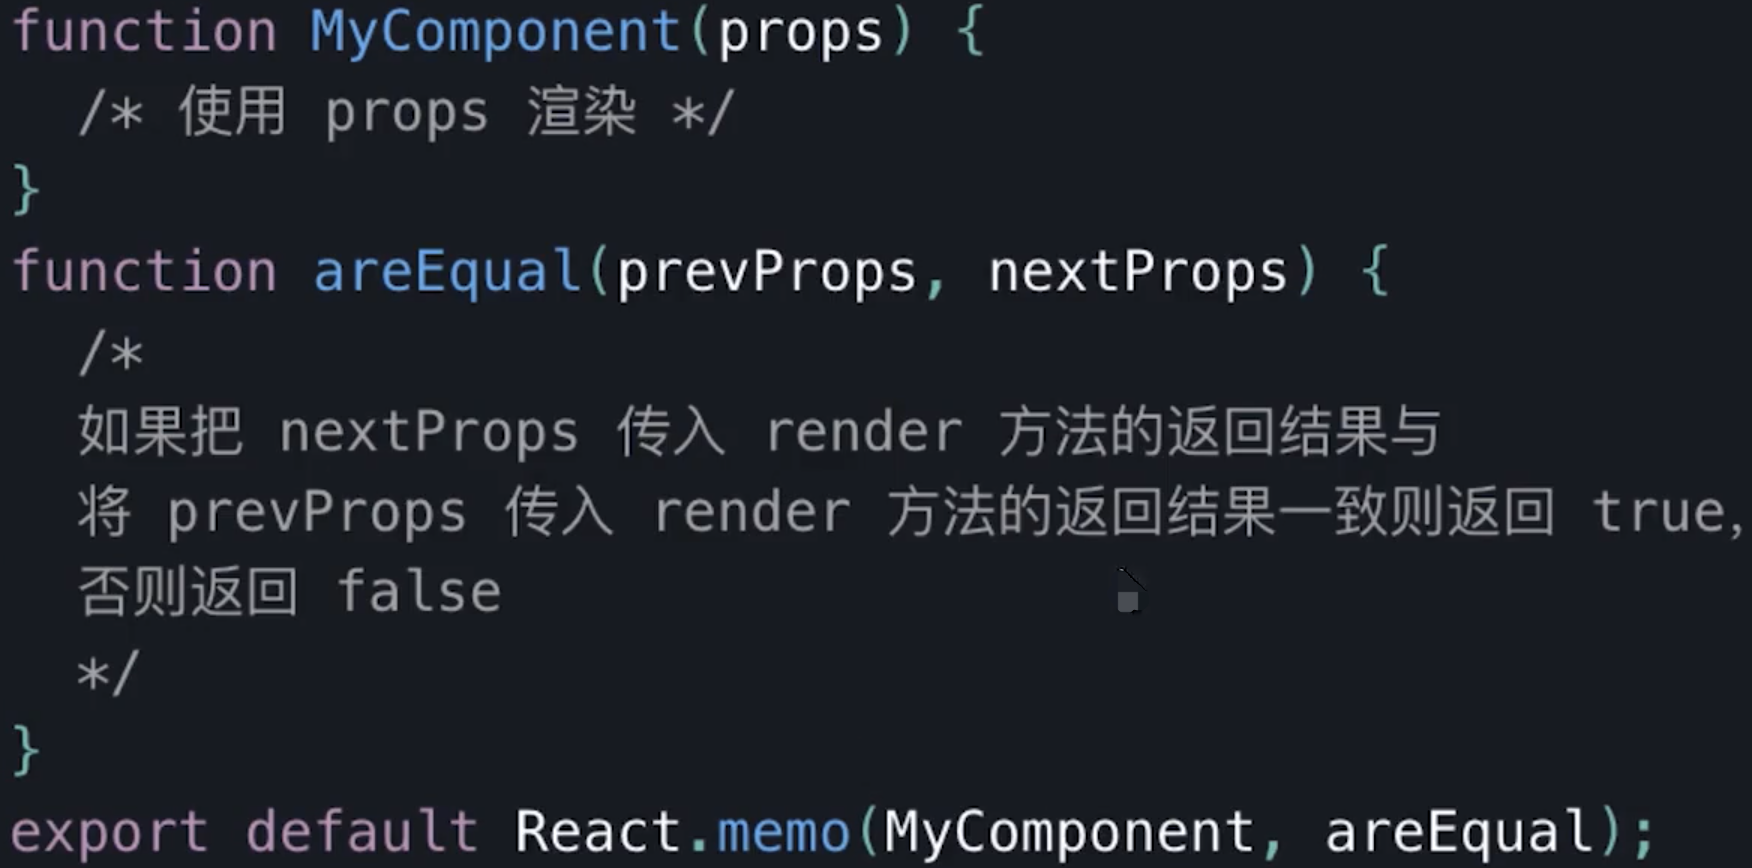
PureComponent和React.memo
PureComponent实现浅比较memo函数组件中的PureComponent- 浅比较已适用大部分情况
    import React from 'react'
    import PropTypes from 'prop-types'

    class Input extends React.Component {
        constructor(props) {
            super(props)
            this.state = {
                title: ''
            }
        }
        render() {
            return <div>
                <input value={this.state.title} onChange={this.onTitleChange}/>
                <button onClick={this.onSubmit}>提交</button>
            </div>
        }
        onTitleChange = (e) => {
            this.setState({
                title: e.target.value
            })
        }
        onSubmit = () => {
            const { submitTitle } = this.props
            submitTitle(this.state.title)

            this.setState({
                title: ''
            })
        }
    }
    // props 类型检查
    Input.propTypes = {
        submitTitle: PropTypes.func.isRequired
    }

    class List extends React.PureComponent {
        constructor(props) {
            super(props)
        }
        render() {
            const { list } = this.props

            return <ul>{list.map((item, index) => {
                return <li key={item.id}>
                    <span>{item.title}</span>
                </li>
            })}</ul>
        }
        shouldComponentUpdate() {/*浅比较*/}
    }
    // props 类型检查
    List.propTypes = {
        list: PropTypes.arrayOf(PropTypes.object).isRequired
    }

    class TodoListDemo extends React.Component {
        constructor(props) {
            super(props)
            this.state = {
                list: [
                    {
                        id: 'id-1',
                        title: '标题1'
                    },
                    {
                        id: 'id-2',
                        title: '标题2'
                    },
                    {
                        id: 'id-3',
                        title: '标题3'
                    }
                ]
            }
        }
        render() {
            return <div>
                <Input submitTitle={this.onSubmitTitle}/>
                <List list={this.state.list}/>
            </div>
        }
        onSubmitTitle = (title) => {
            // 正确的用法
            this.setState({
                list: this.state.list.concat({
                    id: `id-${Date.now()}`,
                    title
                })
            })

            // // 为了演示 SCU ,故意写的错误用法
            // this.state.list.push({
            //     id: `id-${Date.now()}`,
            //     title
            // })
            // this.setState({
            //     list: this.state.list
            // })
        }
    }

    export default TodoListDemo
优化性能的方式小结
类组件中的优化手段
- 使用纯组件
PureComponent作为基类。 - 使用
React.memo高阶函数包装组件。 - 使用
shouldComponentUpdate生命周期函数来自定义渲染逻辑。
方法组件中的优化手段
- 使用
useMemo配合React.memo高阶函数包装组件,避免父组件更新子组件重新渲染 - 使用
useCallBack配合React.memo高阶函数包装组件,避免父组件更新子组件重新渲染
其他方式
- 在列表需要频繁变动时,使用唯一
id作为key,而不是数组下标。 - 必要时通过改变
CSS样式隐藏显示组件,而不是通过条件判断显示隐藏组件。 - 使用
Suspense和lazy进行懒加载,例如:
    import React, { lazy, Suspense } from "react";

    export default class CallingLazyComponents extends React.Component {
      render() {
        var ComponentToLazyLoad = null;

        if (this.props.name == "Mayank") {
          ComponentToLazyLoad = lazy(() => import("./mayankComponent"));
        } else if (this.props.name == "Anshul") {
          ComponentToLazyLoad = lazy(() => import("./anshulComponent"));
        }

        return (
          <div>
            <h1>This is the Base User: {this.state.name}</h1>
            <Suspense fallback={<div>Loading...</div>}>
              <ComponentToLazyLoad />
            </Suspense>
          </div>
        )
      }
    }
React实现的移动应用中,如果出现卡顿,有哪些可以考虑的优化方案
- 增加
shouldComponentUpdate钩子对新旧props进行比较,如果值相同则阻止更新,避免不必要的渲染,或者使用PureReactComponent替代Component,其内部已经封装了shouldComponentUpdate的浅比较逻辑 - 对于列表或其他结构相同的节点,为其中的每一项增加唯一
key属性,以方便React的diff算法中对该节点的复用,减少节点的创建和删除操作 render函数中减少类似onClick={() => {doSomething()}}的写法,每次调用render函数时均会创建一个新的函数,即使内容没有发生任何变化,也会导致节点没必要的重渲染,建议将函数保存在组件的成员对象中,这样只会创建一次- 组件的
props如果需要经过一系列运算后才能拿到最终结果,则可以考虑使用reselect库对结果进行缓存,如果props值未发生变化,则结果直接从缓存中拿,避免高昂的运算代价 webpack-bundle-analyzer分析当前页面的依赖包,是否存在不合理性,如果存在,找到优化点并进行优化
12 高阶组件和Render Props
关于组件公共逻辑的抽离
- 高阶组件
HOC:模式简单,但增加组件层级 Render Props:代码简洁,学习成本较高
高阶组件
高阶组件(
Higher Order Componennt)本身其实不是组件,而是一个函数,这个函数接收一个元组件作为参数,然后返回一个新的增强组件,高阶组件的出现本身也是为了逻辑复用
简述:
- 高阶组件不是组件,是 增强函数,可以输入一个元组件,返回出一个新的增强组件;
- 高阶组件的主要作用是 代码复用,操作 状态和参数;
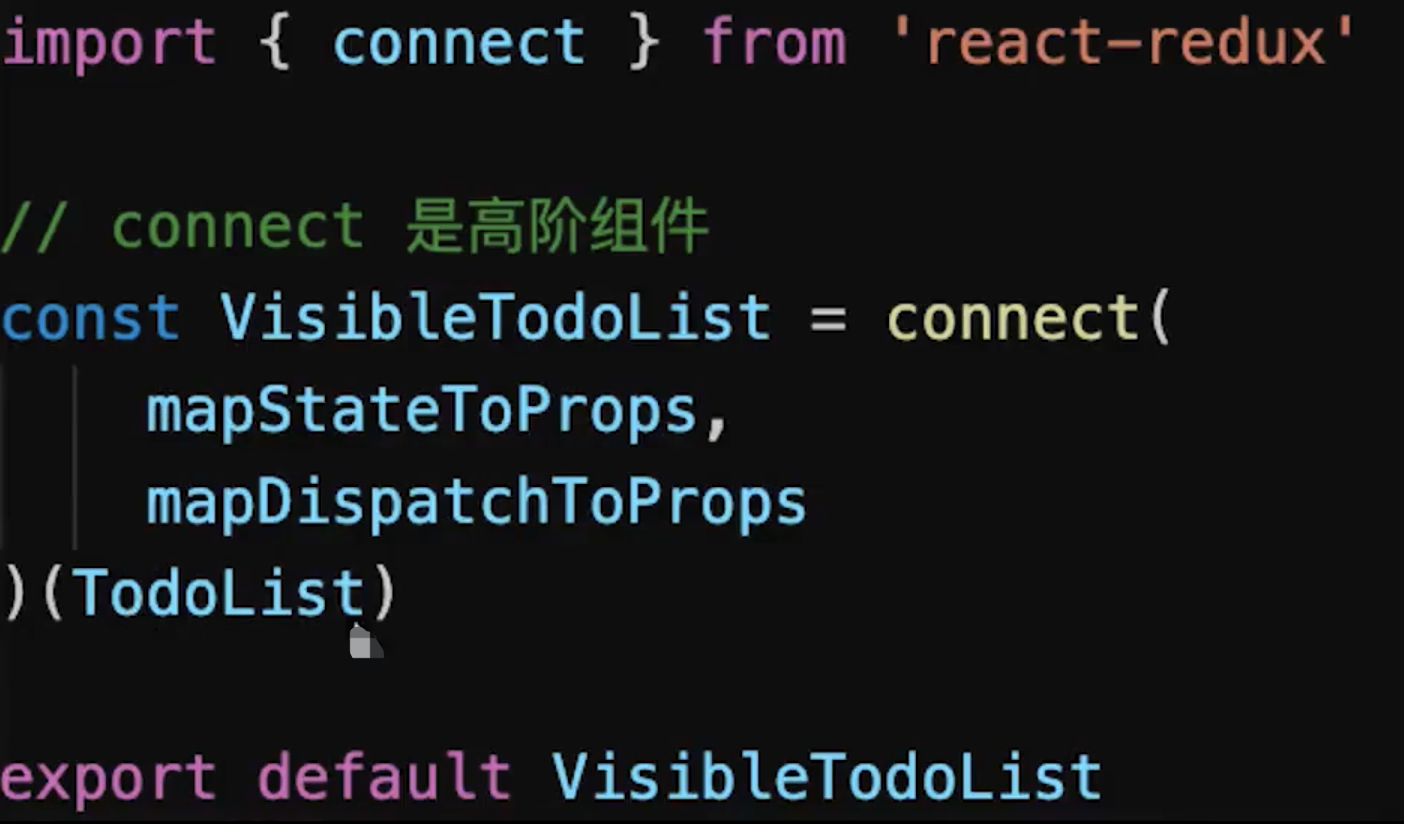
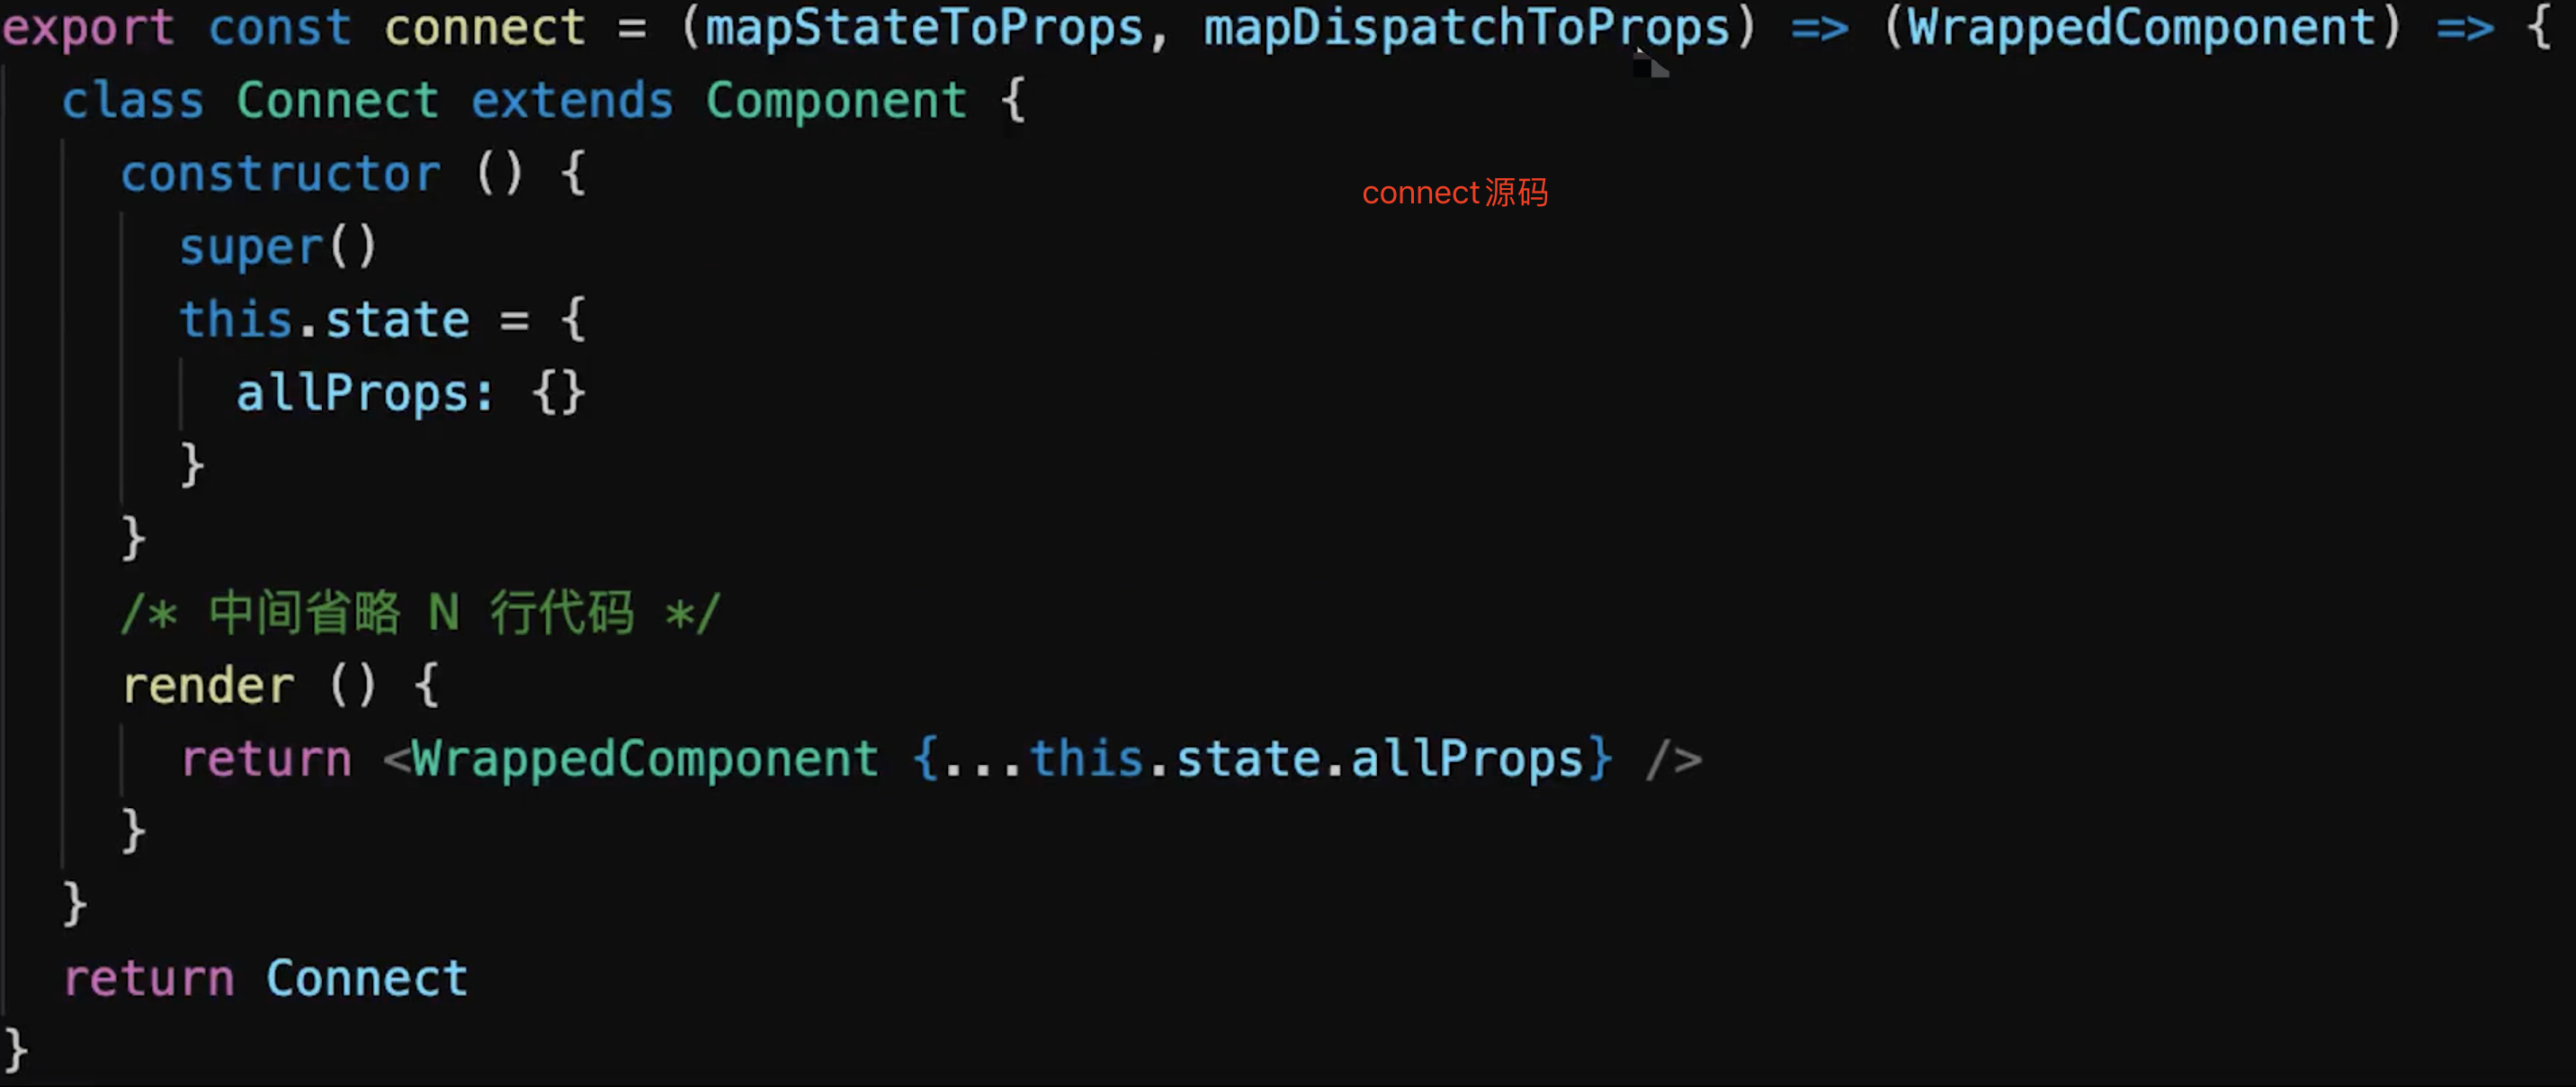
redux connect是高阶组件
    import React from 'react'

    // 高阶组件
    const withMouse = (Component) => {
        class withMouseComponent extends React.Component {
            constructor(props) {
                super(props)
                this.state = { x: 0, y: 0 }
            }

            handleMouseMove = (event) => {
                this.setState({
                    x: event.clientX,
                    y: event.clientY
                })
            }

            render() {
                return (
                    <div style={{ height: '500px' }} onMouseMove={this.handleMouseMove}>
                        {/* 1. 透传所有 props 2. 增加 mouse 属性 */}
                        {/* props从使用高阶组件的地方传入 如<HocDemo a="100" /> */}
                        <Component {...this.props} mouse={this.state}/>
                    </div>
                )
            }
        }
        return withMouseComponent
    }

    const App = (props) => {
        const a = props.a
        const { x, y } = props.mouse // 接收 mouse 属性
        return (
            <div style={{ height: '500px' }}>
                <h1>The mouse position is ({x}, {y})</h1>
                <p>{a}</p>
            </div>
        )
    }

    export default withMouse(App) // 返回高阶函数
用法:
- 属性代理 (
Props Proxy): 返回出一个组件,它基于被包裹组件进行 功能增强;
- 默认参数: 可以为组件包裹一层默认参数;
    function proxyHoc(Comp) {
    	return class extends React.Component {
    		render() {
    			const newProps = {
    				name: 'test1',
    				age: 1,
    			}
    			return <Comp {...this.props} {...newProps} />
    		}
    	}
    }
- 提取状态: 可以通过
props将被包裹组件中的state依赖外层,例如用于转换受控组件:
    function withOnChange(Comp) {
    	return class extends React.Component {
    		constructor(props) {
    			super(props)
    			this.state = {
    				name: '',
    			}
    		}
    		onChangeName = () => {
    			this.setState({
    				name: 'test',
    			})
    		}
    		render() {
    			const newProps = {
    				value: this.state.name,
    				onChange: this.onChangeName,
    			}
    			return <Comp {...this.props} {...newProps} />
    		}
    	}
    }
使用姿势如下,这样就能非常快速的将一个 Input 组件转化成受控组件。
    const NameInput = props => (<input name="name" {...props} />)
    export default withOnChange(NameInput)
包裹组件: 可以为被包裹元素进行一层包装,
    function withMask(Comp) {
      return class extends React.Component {
          render() {
    		  return (
    		      <div>
    				  <Comp {...this.props} />
    					<div style={{
    					  width: '100%',
    					  height: '100%',
    					  backgroundColor: 'rgba(0, 0, 0, .6)',
    				  }}
    			  </div>
    		  )
    	  }
      }
    }
反向继承 (
Inheritance Inversion): 返回出一个组件,继承于被包裹组件,常用于以下操作
    function IIHoc(Comp) {
        return class extends Comp {
            render() {
                return super.render();
            }
        };
    }
渲染劫持 (Render Highjacking)
条件渲染: 根据条件,渲染不同的组件
    function withLoading(Comp) {
        return class extends Comp {
            render() {
                if(this.props.isLoading) {
                    return <Loading />
                } else {
                    return super.render()
                }
            }
        };
    }
可以直接修改被包裹组件渲染出的 React 元素树
操作状态 (Operate State) : 可以直接通过 this.state 获取到被包裹组件的状态,并进行操作。但这样的操作容易使 state 变得难以追踪,不易维护,谨慎使用。
应用场景:
权限控制,通过抽象逻辑,统一对页面进行权限判断,按不同的条件进行页面渲染:
    function withAdminAuth(WrappedComponent) {
        return class extends React.Component {
    		constructor(props){
    			super(props)
    			this.state = {
    		    	isAdmin: false,
    			}
    		}
    		async componentWillMount() {
    		    const currentRole = await getCurrentUserRole();
    		    this.setState({
    		        isAdmin: currentRole === 'Admin',
    		    });
    		}
    		render() {
    		    if (this.state.isAdmin) {
    		        return <Comp {...this.props} />;
    		    } else {
    		        return (<div>您没有权限查看该页面,请联系管理员!</div>);
    		    }
    		}
        };
    }
性能监控 ,包裹组件的生命周期,进行统一埋点:
    function withTiming(Comp) {
        return class extends Comp {
            constructor(props) {
                super(props);
                this.start = Date.now();
                this.end = 0;
            }
            componentDidMount() {
                super.componentDidMount && super.componentDidMount();
                this.end = Date.now();
                console.log(`${WrappedComponent.name} 组件渲染时间为 ${this.end - this.start} ms`);
            }
            render() {
                return super.render();
            }
        };
    }
代码复用,可以将重复的逻辑进行抽象。
使用注意:
- 纯函数: 增强函数应为纯函数,避免侵入修改元组件;
- 避免用法污染: 理想状态下,应透传元组件的无关参数与事件,尽量保证用法不变;
- 命名空间: 为
HOC增加特异性的组件名称,这样能便于开发调试和查找问题; - 引用传递 : 如果需要传递元组件的
refs引用,可以使用React.forwardRef; - 静态方法 : 元组件上的静态方法并无法被自动传出,会导致业务层无法调用;解决:
- 函数导出
- 静态方法赋值
- 重新渲 染: 由于增强函数每次调用是返回一个新组件,因此如果在
Render中使用增强函数,就会导致每次都重新渲染整个HOC,而且之前的状态会丢失;
render props

    import React from 'react'
    import PropTypes from 'prop-types'

    class Mouse extends React.Component {
        constructor(props) {
            super(props)
            this.state = { x: 0, y: 0 }
        }

        handleMouseMove = (event) => {
          this.setState({
            x: event.clientX,
            y: event.clientY
          })
        }

        render() {
          return (
            <div style={{ height: '500px' }} onMouseMove={this.handleMouseMove}>
                {/* 将当前 state 作为 props ,传递给 render (render 是一个函数组件) */}
                {this.props.render(this.state)}
            </div>
          )
        }
    }
    Mouse.propTypes = {
        render: PropTypes.func.isRequired // 必须接收一个 render 属性,而且是函数
    }

    const App = (props) => (
        <div style={{ height: '500px' }}>
            <p>{props.a}</p>
            <Mouse render={
                /* render 是一个函数组件 */
                ({ x, y }) => <h1>The mouse position is ({x}, {y})</h1>
            }/>

        </div>
    )

    /**
     * 即,定义了 Mouse 组件,只有获取 x y 的能力。
     * 至于 Mouse 组件如何渲染,App 说了算,通过 render prop 的方式告诉 Mouse 。
     */

    export default App
拓展:vue中实现高阶组件
function withAvatarURL (InnerComponent) {
return {
props: ['username','url'],
inheritAttrs: false,
data () {
return { id: null }
},
created () {
fetchURL(this.id, url => {
this.username = username
})
},
render (h) {// 使用h函数渲染组件
return h(InnerComponent, {
attrs: this.$attrs,
props: {
src: this.username
}
})
}
}
}
const SmartAvatar = withAvatarURL(Item)
new Vue({
el: '#app',
components: { SmartAvatar }
})
13 React Hooks相关
React Hooks带来了那些便利
- 代码逻辑聚合,逻辑复用
- 解决
HOC嵌套地狱问题 - 代替
class
React 中通常使用 类定义 或者 函数定义 创建组件:
在类定义中,我们可以使用到许多 React 特性,例如 state、 各种组件生命周期钩子等,但是在函数定义中,我们却无能为力,因此 React 16.8 版本推出了一个新功能 (React Hooks),通过它,可以更好的在函数定义组件中使用 React 特性。
好处:
- 跨组件复用: 其实
render props/HOC也是为了复用,相比于它们,Hooks作为官方的底层API,最为轻量,而且改造成本小,不会影响原来的组件层次结构和传说中的嵌套地狱; - 类定义更为复杂
- 不同的生命周期会使逻辑变得分散且混乱,不易维护和管理;
- 时刻需要关注
this的指向问题; - 代码复用代价高,高阶组件的使用经常会使整个组件树变得臃肿;
- 状态与UI隔离: 正是由于
Hooks的特性,状态逻辑会变成更小的粒度,并且极容易被抽象成一个自定义Hooks,组件中的状态和UI变得更为清晰和隔离。
注意:
- 避免在 循环/条件判断/嵌套函数 中调用
hooks,保证调用顺序的稳定; - 只有 函数定义组件 和
hooks可以调用hooks,避免在 类组件 或者 普通函数 中调用; - 不能在
useEffect中使用useState,React会报错提示; - 类组件不会被替换或废弃,不需要强制改造类组件,两种方式能并存;
重要钩子
- 状态钩子 (
useState): 用于定义组件的State,其到类定义中this.state的功能;
    // useState 只接受一个参数: 初始状态
    // 返回的是组件名和更改该组件对应的函数
    const [flag, setFlag] = useState(true);
    // 修改状态
    setFlag(false)

    // 上面的代码映射到类定义中:
    this.state = {
    	flag: true
    }
    const flag = this.state.flag
    const setFlag = (bool) => {
        this.setState({
            flag: bool,
        })
    }
- 生命周期钩子 (
useEffect):
类定义中有许多生命周期函数,而在
React Hooks中也提供了一个相应的函数 (useEffect),这里可以看做componentDidMount、componentDidUpdate和componentWillUnmount的结合。
useEffect(callback, [source])接受两个参数
callback: 钩子回调函数;source: 设置触发条件,仅当source发生改变时才会触发;useEffect钩子在没有传入[source]参数时,默认在每次render时都会优先调用上次保存的回调中返回的函数,后再重新调用回调;
的useEffect是如何区分生命周期钩子的
useEffect可以看成是componentDidMount,componentDidUpdate和componentWillUnmount三者的结合。useEffect(callback, [source])接收两个参数,调用方式如下
    useEffect(() => {
      console.log('mounted');

      return () => {
        console.log('willUnmount');
      }
    }, [source]);
生命周期函数的调用主要是通过第二个参数
[source]来进行控制,有如下几种情况:
[source]参数不传时,则每次都会优先调用上次保存的函数中返回的那个函数,然后再调用外部那个函数;[source]参数传[]时,则外部的函数只会在初始化时调用一次,返回的那个函数也只会最终在组件卸载时调用一次;[source]参数有值时,则只会监听到数组中的值发生变化后才优先调用返回的那个函数,再调用外部的函数。
    useEffect(() => {
    	// 组件挂载后执行事件绑定
    	console.log('on')
    	addEventListener()

    	// 组件 update 时会执行事件解绑
    	return () => {
    		console.log('off')
    		removeEventListener()
    	}
    }, [source]);


    // 每次 source 发生改变时,执行结果(以类定义的生命周期,便于大家理解):
    // --- DidMount ---
    // 'on'
    // --- DidUpdate ---
    // 'off'
    // 'on'
    // --- DidUpdate ---
    // 'off'
    // 'on'
    // --- WillUnmount ---
    // 'off'
通过第二个参数,我们便可模拟出几个常用的生命周期:
componentDidMount: 传入[]时,就只会在初始化时调用一次
const useMount = (fn) => useEffect(fn, [])
componentWillUnmount:传入[],回调中的返回的函数也只会被最终执行一次
const useUnmount = (fn) => useEffect(() => fn, [])
mounted: 可以使用useState封装成一个高度可复用的mounted状态;
    const useMounted = () => {
        const [mounted, setMounted] = useState(false);
        useEffect(() => {
            !mounted && setMounted(true);
            return () => setMounted(false);
        }, []);
        return mounted;
    }
componentDidUpdate:useEffect每次均会执行,其实就是排除了DidMount后即可;
    const mounted = useMounted()
    useEffect(() => {
        mounted && fn()
    })
- 其它内置钩子:
useContext: 获取context对象useReducer: 类似于Redux思想的实现,但其并不足以替代Redux,可以理解成一个组件内部的redux:- 并不是持久化存储,会随着组件被销毁而销毁;
- 属于组件内部,各个组件是相互隔离的,单纯用它并无法共享数据;
- 配合
useContext的全局性,可以完成一个轻量级的Redux;(easy-peasy)
useCallback: 缓存回调函数,避免传入的回调每次都是新的函数实例而导致依赖组件重新渲染,具有性能优化的效果;useMemo: 用于缓存传入的props,避免依赖的组件每次都重新渲染;useRef: 获取组件的真实节点;useLayoutEffectDOM更新同步钩子。用法与useEffect类似,只是区别于执行时间点的不同useEffect属于异步执行,并不会等待DOM真正渲染后执行,而useLayoutEffect则会真正渲染后才触发;- 可以获取更新后的
state;
- 自定义钩子(
useXxxxx): 基于Hooks可以引用其它Hooks这个特性,我们可以编写自定义钩子,如上面的useMounted。又例如,我们需要每个页面自定义标题:
    function useTitle(title) {
      useEffect(
        () => {
          document.title = title;
        });
    }

    // 使用:
    function Home() {
    	const title = '我是首页'
    	useTitle(title)

    	return (
    		<div>{title}</div>
    	)
    }
class组件存在哪些问题
- 函数组件的特点
- 没有组件实例
- 没有生命周期
- 没有
state和setState,只能接收props
- class组件问题
- 大型组件很难拆分和重构,很难测试
- 相同的业务逻辑分散到各个方法中,逻辑混乱
- 复用逻辑变得复杂,如
Mixins、HOC、Render Props
- react组件更易用函数表达
- React提倡函数式编程,
View = fn(props) - 函数更灵活,更易于拆分,更易测试
- 但函数组件太简单,需要增强能力—— 使用
hooks
- React提倡函数式编程,
用useState实现state和setState功能
让函数组件实现state和setState
- 默认函数组件没有
state - 函数组件是一个纯函数,执行完即销毁,无法存储
state - 需要
state hook,即把state“钩”到纯函数中(保存到闭包中)
hooks命名规范
- 规定所有的
hooks都要以use开头,如useXX - 自定义
hook也要以use开头
    // 使用hooks
    import React, { useState } from 'react'

    function ClickCounter() {
        // 数组的解构
        // useState 就是一个 Hook “钩”,最基本的一个 Hook
        const [count, setCount] = useState(0) // 传入一个初始值

        const [name, setName] = useState('test')

        // const arr = useState(0)
        // const count = arr[0]
        // const setCount = arr[1]

        function clickHandler() {
            setCount(count + 1)
            setName(name + '2020')
        }

        return <div>
            <p>你点击了 {count} 次 {name}</p>
            <button onClick={clickHandler}>点击</button>
        </div>
    }

    export default ClickCounter
    // 使用class

    import React from 'react'

    class ClickCounter extends React.Component {
        constructor() {
            super()

            // 定义 state
            this.state = {
                count: 0,
                name: 'test'
            }
        }
        render() {
            return <div>
                <p>你点击了 {this.state.count} 次 {this.state.name}</p>
                <button onClick={this.clickHandler}>点击</button>
            </div>
        }
        clickHandler = ()=> {
            // 修改 state
            this.setState({
                count: this.state.count + 1,
                name: this.state.name + '2020'
            })
        }
    }

    export default ClickCounter
用useEffect模拟组件生命周期
让函数组件模拟生命周期
- 默认函数组件没有生命周期
- 函数组件是一个纯函数,执行完即销毁,自己无法实现生命周期
- 使用
Effect Hook把生命周期"钩"到纯函数中
useEffect让纯函数有了副作用
- 默认情况下,执行纯函数,输入参数,返回结果,无副作用
- 所谓副作用,就是对函数之外造成影响,如设置全局定时器
- 而组件需要副作用,所以需要有
useEffect钩到纯函数中
总结
- 模拟
componentDidMount,useEffect依赖[] - 模拟
componentDidUpdate,useEffect依赖[a,b]或者useEffect(fn)没有写第二个参数 - 模拟
componentWillUnmount,useEffect返回一个函数 - 注意
useEffect(fn)没有写第二个参数:同时模拟componentDidMount+componentDidUpdate
    import React, { useState, useEffect } from 'react'

    function LifeCycles() {
        const [count, setCount] = useState(0)
        const [name, setName] = useState('test')

        // // 模拟 class 组件的 DidMount 和 DidUpdate
        // useEffect(() => {
        //     console.log('在此发送一个 ajax 请求')
        // })

        // // 模拟 class 组件的 DidMount
        // useEffect(() => {
        //     console.log('加载完了')
        // }, []) // 第二个参数是 [] (不依赖于任何 state)

        // // 模拟 class 组件的 DidUpdate
        // useEffect(() => {
        //     console.log('更新了')
        // }, [count, name]) // 第二个参数就是依赖的 state

        // 模拟 class 组件的 DidMount
        useEffect(() => {
            let timerId = window.setInterval(() => {
                console.log(Date.now())
            }, 1000)

            // 返回一个函数
            // 模拟 WillUnMount
            return () => {
                window.clearInterval(timerId)
            }
        }, [])

        function clickHandler() {
            setCount(count + 1)
            setName(name + '2020')
        }

        return <div>
            <p>你点击了 {count} 次 {name}</p>
            <button onClick={clickHandler}>点击</button>
        </div>
    }

    export default LifeCycles
用useEffect模拟WillUnMount时的注意事项
useEffect中返回函数
useEffect依赖项[],组件销毁是执行fn,等于willUnmountuseEffect第二个参数没有或依赖项[a,b],组件更新时执行fn,即下次执行useEffect之前,就会执行fn,无论更新或卸载(props更新会导致willUnmount多次执行)
    import React from 'react'

    class FriendStatus extends React.Component {
        constructor(props) {
            super(props)
            this.state = {
                status: false // 默认当前不在线
            }
        }
        render() {
            return <div>
                好友 {this.props.friendId} 在线状态:{this.state.status}
            </div>
        }
        componentDidMount() {
            console.log(`开始监听 ${this.props.friendId} 的在线状态`)
        }
        componentWillUnMount() {
            console.log(`结束监听 ${this.props.friendId} 的在线状态`)
        }
        // friendId 更新
        componentDidUpdate(prevProps) {
            console.log(`结束监听 ${prevProps.friendId} 在线状态`)
            console.log(`开始监听 ${this.props.friendId} 在线状态`)
        }
    }

    export default FriendStatus
    import React, { useState, useEffect } from 'react'

    function FriendStatus({ friendId }) {
        const [status, setStatus] = useState(false)

        // DidMount 和 DidUpdate
        useEffect(() => {
            console.log(`开始监听 ${friendId} 在线状态`)

            // 【特别注意】
            // 此处并不完全等同于 WillUnMount
            // props 发生变化,即更新,也会执行结束监听
            // 准确的说:返回的函数,会在下一次 effect 执行之前,被执行
            return () => {
                console.log(`结束监听 ${friendId} 在线状态`)
            }
        })

        return <div>
            好友 {friendId} 在线状态:{status.toString()}
        </div>
    }

    export default FriendStatus
useRef和useContext
useRef
    import React, { useRef, useEffect } from 'react'

    function UseRef() {
        const btnRef = useRef(null) // 初始值

        // const numRef = useRef(0)
        // numRef.current

        useEffect(() => {
            console.log(btnRef.current) // DOM 节点
        }, [])

        return <div>
            <button ref={btnRef}>click</button>
        </div>
    }

    export default UseRef
useContext
    import React, { useContext } from 'react'

    // 主题颜色
    const themes = {
        light: {
            foreground: '#000',
            background: '#eee'
        },
        dark: {
            foreground: '#fff',
            background: '#222'
        }
    }

    // 创建 Context
    const ThemeContext = React.createContext(themes.light) // 初始值

    function ThemeButton() {
        const theme = useContext(ThemeContext)

        return <button style={{ background: theme.background, color: theme.foreground }}>
            hello world
        </button>
    }

    function Toolbar() {
        return <div>
            <ThemeButton></ThemeButton>
        </div>
    }

    function App() {
        return <ThemeContext.Provider value={themes.dark}>
            <Toolbar></Toolbar>
        </ThemeContext.Provider>
    }

    export default App
useReducer能代替redux吗
useReducer是useState的代替方案,用于state复杂变化useReducer是单个组件状态管理,组件通讯还需要propsredux是全局的状态管理,多组件共享数据
    import React, { useReducer } from 'react'

    const initialState = { count: 0 }

    const reducer = (state, action) => {
        switch (action.type) {
            case 'increment':
                return { count: state.count + 1 }
            case 'decrement':
                return { count: state.count - 1 }
            default:
                return state
        }
    }

    function App() {
        // 很像 const [count, setCount] = useState(0)
        const [state, dispatch] = useReducer(reducer, initialState)

        return <div>
            count: {state.count}
            <button onClick={() => dispatch({ type: 'increment' })}>increment</button>
            <button onClick={() => dispatch({ type: 'decrement' })}>decrement</button>
        </div>
    }

    export default App
使用useMemo做性能优化
- 状态变化,React会默认更新所有子组件
class组件使用shouldComponentUpdate和PureComponent优化Hooks中使用useMemo缓存对象,避免子组件更新useMemo需要配合React.memo使用才生效
    import React, { useState, memo, useMemo } from 'react'

    // 子组件
    // function Child({ userInfo }) {
    //     console.log('Child render...', userInfo)

    //     return <div>
    //         <p>This is Child {userInfo.name} {userInfo.age}</p>
    //     </div>
    // }
    // 类似 class PureComponent ,对 props 进行浅层比较
    const Child = memo(({ userInfo }) => {
        console.log('Child render...', userInfo)

        return <div>
            <p>This is Child {userInfo.name} {userInfo.age}</p>
        </div>
    })

    // 父组件
    function App() {
        console.log('Parent render...')

        const [count, setCount] = useState(0)
        const [name, setName] = useState('test')

        // const userInfo = { name, age: 20 }
        // 用 useMemo 缓存数据,有依赖
        // useMemo包裹后返回的对象是同一个,没有创建新的对象地址,不会触发子组件的重新渲染
        const userInfo = useMemo(() => {
            return { name, age: 21 }
        }, [name])

        return <div>
            <p>
                count is {count}
                <button onClick={() => setCount(count + 1)}>click</button>
            </p>
            <Child userInfo={userInfo}></Child>
        </div>
    }

    export default App
使用useCallback做性能优化
Hooks中使用useCallback缓存函数,避免子组件更新useCallback需要配合React.memo使用才生效
    import React, { useState, memo, useMemo, useCallback } from 'react'

    // 子组件,memo 相当于 PureComponent
    const Child = memo(({ userInfo, onChange }) => {
        console.log('Child render...', userInfo)

        return <div>
            <p>This is Child {userInfo.name} {userInfo.age}</p>
            <input onChange={onChange}></input>
        </div>
    })

    // 父组件
    function App() {
        console.log('Parent render...')

        const [count, setCount] = useState(0)
        const [name, setName] = useState('test')

        // 用 useMemo 缓存数据
        const userInfo = useMemo(() => {
            return { name, age: 21 }
        }, [name])

        // function onChange(e) {
        //     console.log(e.target.value)
        // }
        // 用 useCallback 缓存函数,避免在组件多次渲染中多次创建函数导致引用地址一致
        const onChange = useCallback(e => {
            console.log(e.target.value)
        }, [])

        return <div>
            <p>
                count is {count}
                <button onClick={() => setCount(count + 1)}>click</button>
            </p>
            <Child userInfo={userInfo} onChange={onChange}></Child>
        </div>
    }

    export default App
什么是自定义Hook
- 封装通用的功能
- 开发和使用第三方
Hooks - 自定义
Hooks带来无限的拓展性,解耦代码
    import { useState, useEffect } from 'react'
    import axios from 'axios'

    // 封装 axios 发送网络请求的自定义 Hook
    function useAxios(url) {
        const [loading, setLoading] = useState(false)
        const [data, setData] = useState()
        const [error, setError] = useState()

        useEffect(() => {
            // 利用 axios 发送网络请求
            setLoading(true)
            axios.get(url) // 发送一个 get 请求
                .then(res => setData(res))
                .catch(err => setError(err))
                .finally(() => setLoading(false))
        }, [url])

        return [loading, data, error]
    }

    export default useAxios

    // 第三方 Hook
    // https://nikgraf.github.io/react-hooks/
    // https://github.com/umijs/hooks
    import { useState, useEffect } from 'react'

    function useMousePosition() {
        const [x, setX] = useState(0)
        const [y, setY] = useState(0)

        useEffect(() => {
            function mouseMoveHandler(event) {
                setX(event.clientX)
                setY(event.clientY)
            }

            // 绑定事件
            document.body.addEventListener('mousemove', mouseMoveHandler)

            // 解绑事件
            return () => document.body.removeEventListener('mousemove', mouseMoveHandler)
        }, [])

        return [x, y]
    }

    export default useMousePosition
    // 使用
    function App() {
        const url = 'http://localhost:3000/'
        // 数组解构
        const [loading, data, error] = useAxios(url)

        if (loading) return <div>loading...</div>

        return error
            ? <div>{JSON.stringify(error)}</div>
            : <div>{JSON.stringify(data)}</div>

        // const [x, y] = useMousePosition()
        // return <div style={{ height: '500px', backgroundColor: '#ccc' }}>
        //     <p>鼠标位置 {x} {y}</p>
        // </div>
    }
使用Hooks的两条重要规则
- 只能用于函数组件和自定义
Hook中,其他地方不可以 - 只能用于顶层代码,不能在判断、循环中使用
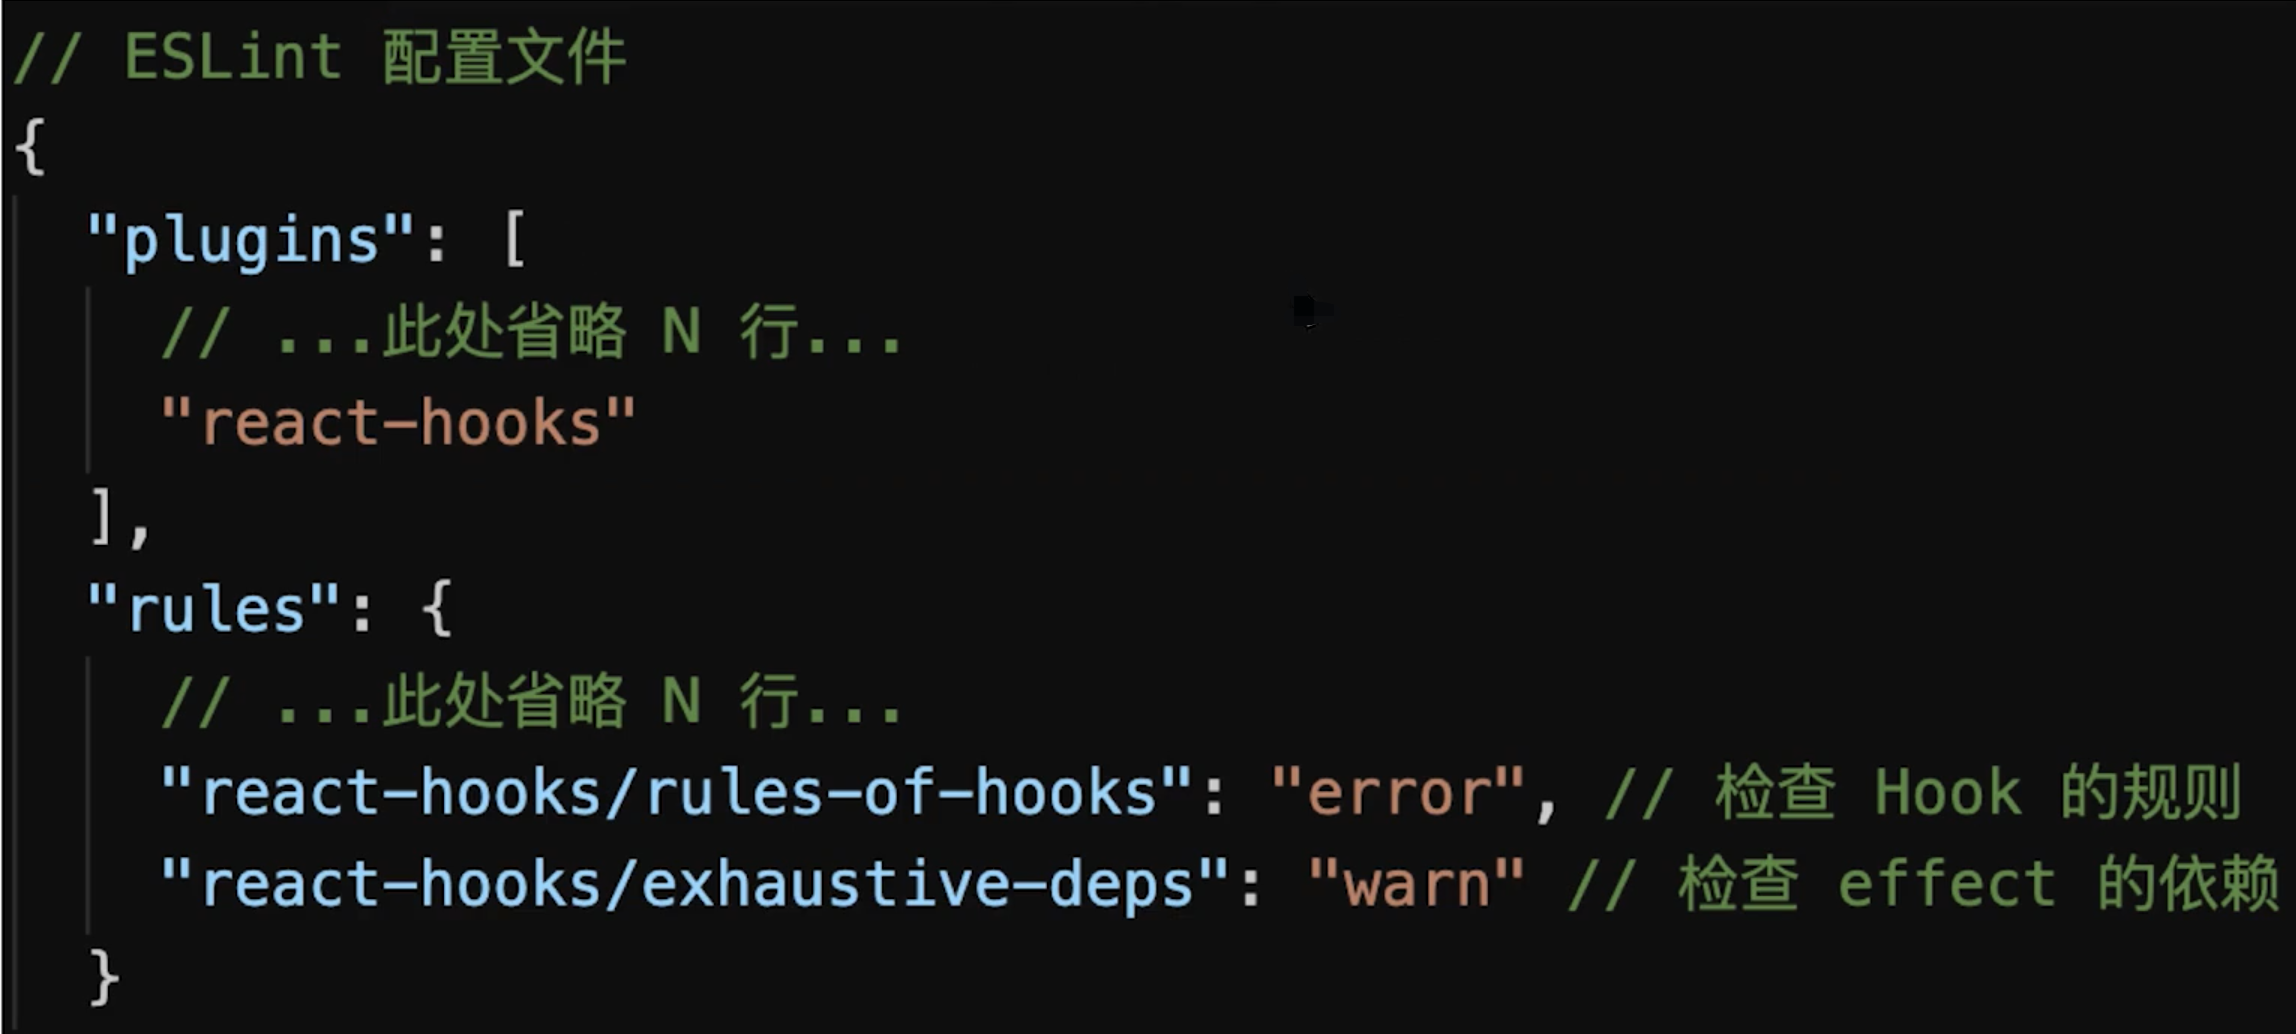
Hooks eslint插件eslint-plugin-react-hooks可以帮助检查Hooks的使用规则
为何Hooks要依赖于调用顺序
- 无论是
render还是re-render,Hooks调用顺序必须一致 - 如果
Hooks出现在循环、判断里,则无法保证顺序一致 Hooks严重依赖调用顺序
    import React, { useState, useEffect } from 'react'

    function Teach({ couseName }) {
        // 函数组件,纯函数,执行完即销毁
        // 所以,无论组件初始化(render)还是组件更新(re-render)
        // 都会重新执行一次这个函数,获取最新的组件
        // 这一点和 class 组件不一样:有组件实例,组件实例一旦声声明不会销毁(除非组件销毁)

        // render: 初始化 state 的值 '张三'
        // re-render: 读取 state 的值 '张三'
        const [studentName, setStudentName] = useState('张三')

        // if (couseName) {
        //     const [studentName, setStudentName] = useState('张三')
        // }

        // render: 初始化 state 的值 'poetry'
        // re-render: 读取 state 的值 'poetry'
        const [teacherName, setTeacherName] = useState('poetry')

        // if (couseName) {
        //     useEffect(() => {
        //         // 模拟学生签到
        //         localStorage.setItem('name', studentName)
        //     })
        // }

        // render: 添加 effect 函数
        // re-render: 替换 effect 函数(内部的函数也会重新定义)
        useEffect(() => { // 内部函数执行完就销毁
            // 模拟学生签到
            localStorage.setItem('name', studentName)
        })

        // render: 添加 effect 函数
        // re-render: 替换 effect 函数(内部的函数也会重新定义)
        useEffect(() => {// 内部函数执行完就销毁
            // 模拟开始上课
            console.log(`${teacherName} 开始上课,学生 ${studentName}`)
        })

        return <div>
            课程:{couseName},
            讲师:{teacherName},
            学生:{studentName}
        </div>
    }

    export default Teach
class组件逻辑复用有哪些问题
- 高级组件HOC
- 组件嵌套层级过多,不易于渲染、调试
HOC会劫持props,必须严格规范
- Render Props
- 学习成本高,不利于理解
- 只能传递纯函数,而默认情况下纯函数功能有限
Hooks组件逻辑复用有哪些好处
- 变量作用域很明确
- 不会产生组件嵌套
Hooks使用中的几个注意事项
useState初始化值,只有第一次有效useEffect内部不能修改state,第二个参数需要是空的依赖[]useEffect可能出现死循环,依赖[]里面有对象、数组等引用类型,把引用类型拆解为值类型
// 第一个坑:`useState`初始化值,只有第一次有效
import React, { useState } from 'react'
// 子组件
function Child({ userInfo }) {
// render: 初始化 state
// re-render: 只恢复初始化的 state 值,不会再重新设置新的值
// 只能用 setName 修改
const [ name, setName ] = useState(userInfo.name)
return <div>
<p>Child, props name: {userInfo.name}</p>
<p>Child, state name: {name}</p>
</div>
}
function App() {
const [name, setName] = useState('test')
const userInfo = { name }
return <div>
<div>
Parent
<button onClick={() => setName('test1')}>setName</button>
</div>
<Child userInfo={userInfo}/>
</div>
}
export default App
    // 第二个坑:`useEffect`内部不能修改`state`
    import React, { useState, useRef, useEffect } from 'react'

    function UseEffectChangeState() {
        const [count, setCount] = useState(0)

        // 模拟 DidMount
        const countRef = useRef(0)
        useEffect(() => {
            console.log('useEffect...', count)

            // 定时任务
            const timer = setInterval(() => {
                console.log('setInterval...', countRef.current) // 一直是0 闭包陷阱
                // setCount(count + 1)
                setCount(++countRef.current) // 解决方案使用useRef
            }, 1000)

            // 清除定时任务
            return () => clearTimeout(timer)
        }, []) // 依赖为 []

        // 依赖为 [] 时: re-render 不会重新执行 effect 函数
        // 没有依赖:re-render 会重新执行 effect 函数

        return <div>count: {count}</div>
    }

    export default UseEffectChangeState
14 Redux相关
简述flux 思想
Flux的最大特点,就是数据的"单向流动"。
- 用户访问
View View发出用户的ActionDispatcher收到Action,要求Store进行相应的更新Store更新后,发出一个"change"事件View收到"change"事件后,更新页面
redux中间件
中间件提供第三方插件的模式,自定义拦截
action->reducer的过程。变为action->middlewares->reducer。这种机制可以让我们改变数据流,实现如异步action,action过滤,日志输出,异常报告等功能
redux-logger:提供日志输出redux-thunk:处理异步操作redux-promise:处理异步操作,actionCreator的返回值是promise
redux有什么缺点
- 一个组件所需要的数据,必须由父组件传过来,而不能像
flux中直接从store取。 - 当一个组件相关数据更新时,即使父组件不需要用到这个组件,父组件还是会重新
render,可能会有效率影响,或者需要写复杂的shouldComponentUpdate进行判断。
Redux设计理念
为什么要用redux
在
React中,数据在组件中是单向流动的,数据从一个方向父组件流向子组件(通过props),所以,两个非父子组件之间通信就相对麻烦,redux的出现就是为了解决state里面的数据问题
Redux设计理念
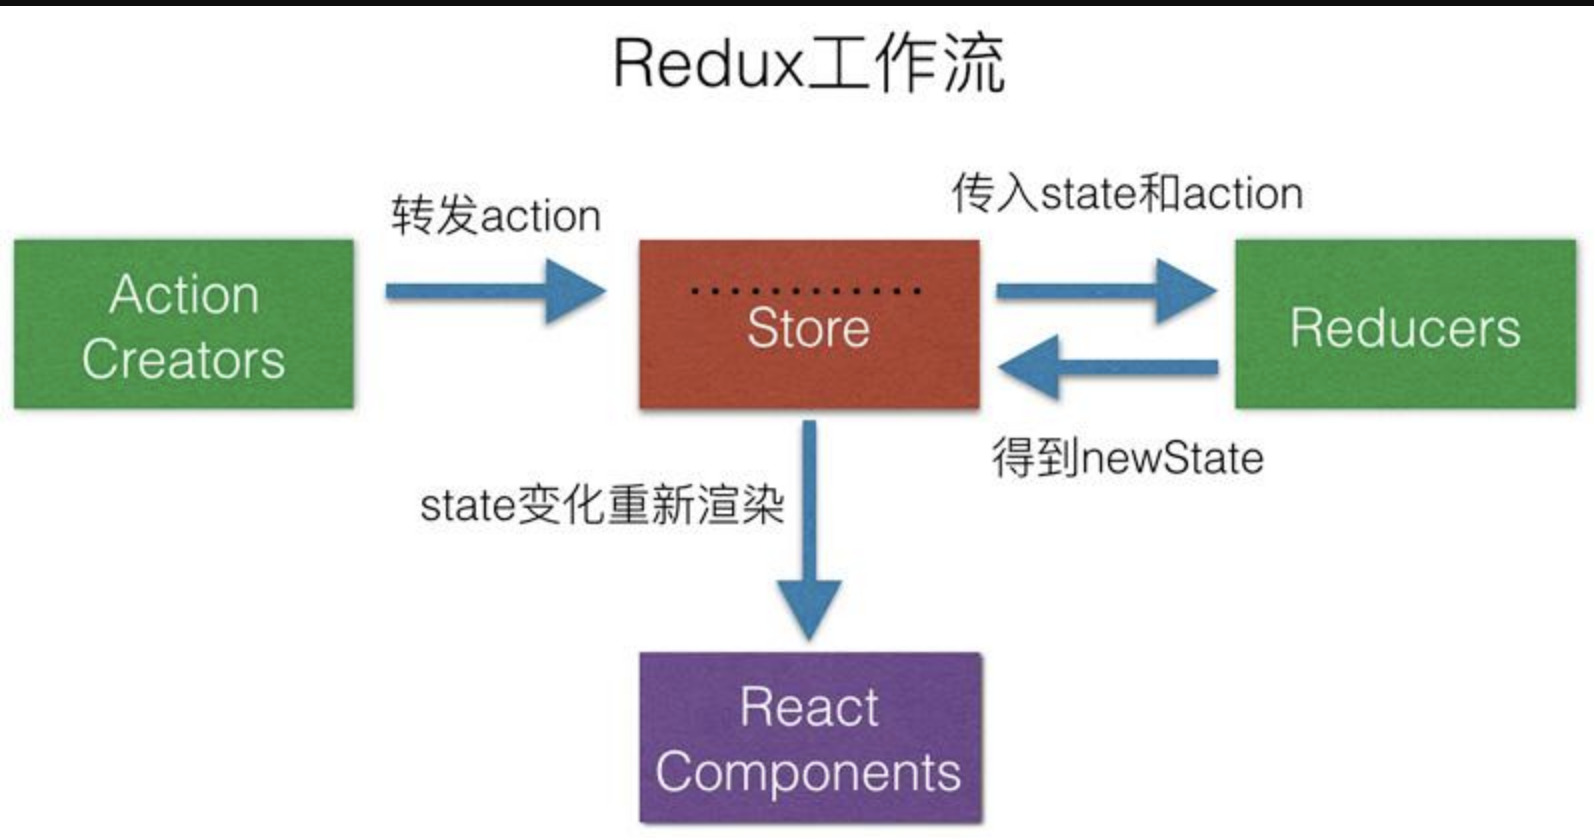
Redux是将整个应用状态存储到一个地方上称为store,里面保存着一个状态树store tree,组件可以派发(dispatch)行为(action)给store,而不是直接通知其他组件,组件内部通过订阅store中的状态state来刷新自己的视图
Redux三大原则
- 唯一数据源
整个应用的state都被存储到一个状态树里面,并且这个状态树,只存在于唯一的store中
- 保持只读状态
state是只读的,唯一改变state的方法就是触发action,action是一个用于描述以发生时间的普通对象
- 数据改变只能通过纯函数来执行
使用纯函数来执行修改,为了描述
action如何改变state的,你需要编写reducers
Redux源码
    let createStore = (reducer) => {
        let state;
        //获取状态对象
        //存放所有的监听函数
        let listeners = [];
        let getState = () => state;
        //提供一个方法供外部调用派发action
        let dispath = (action) => {
            //调用管理员reducer得到新的state
            state = reducer(state, action);
            //执行所有的监听函数
            listeners.forEach((l) => l())
        }
        //订阅状态变化事件,当状态改变发生之后执行监听函数
        let subscribe = (listener) => {
            listeners.push(listener);
        }
        dispath();
        return {
            getState,
            dispath,
            subscribe
        }
    }
    let combineReducers=(renducers)=>{
        //传入一个renducers管理组,返回的是一个renducer
        return function(state={},action={}){
            let newState={};
            for(var attr in renducers){
                newState[attr]=renducers[attr](state[attr],action)

            }
            return newState;
        }
    }
    export {createStore,combineReducers};
Redux怎么实现dispstch一个函数
以
redux-thunk中间件作为例子,下面就是thunkMiddleware函数的代码
    // 部分转为ES5代码,运行middleware函数会返回一个新的函数,如下:
    return ({ dispatch, getState }) => {
        // next实际就是传入的dispatch
        return function (next) {
            return function (action) {
                // redux-thunk核心
                if (typeof action === 'function') {
                    return action(dispatch, getState, extraArgument);
                }
                return next(action);
            };
        };
    }
redux-thunk库内部源码非常的简单,允许action是一个函数,同时支持参数传递,否则调用方法不变
redux创建Store:通过combineReducers函数合并reducer函数,返回一个新的函数combination(这个函数负责循环遍历运行reducer函数,返回全部state)。将这个新函数作为参数传入createStore函数,函数内部通过dispatch,初始化运行传入的combination,state生成,返回store对象redux中间件:applyMiddleware函数中间件的主要目的就是修改dispatch函数,返回经过中间件处理的新的dispatch函数redux使用:实际就是再次调用循环遍历调用reducer函数,更新state
connect高级组件原理
- 首先
connect之所以会成功,是因为Provider组件: - 在原应用组件上包裹一层,使原来整个应用成为
Provider的子组件 接收Redux的store作为props,通过context对象传递给子孙组件上的connect
connect做了些什么。它真正连接Redux和React,它包在我们的容器组件的外一层,它接收上面Provider提供的store里面的state和dispatch,传给一个构造函数,返回一个对象,以属性形式传给我们的容器组件
connect是一个高阶函数,首先传入mapStateToProps、mapDispatchToProps,然后返回一个生产Component的函数(wrapWithConnect),然后再将真正的Component作为参数传入wrapWithConnect,这样就生产出一个经过包裹的Connect组件,
该组件具有如下特点
- 通过
props.store获取祖先Component的store props包括stateProps、dispatchProps、parentProps,合并在一起得到nextState,作为props传给真正的Component componentDidMount时,添加事件this.store.subscribe(this.handleChange),实现页面交互 shouldComponentUpdate时判断是否有避免进行渲染,提升页面性能,并得到nextStatecomponentWillUnmount时移除注册的事件this.handleChange
由于
connect的源码过长,我们只看主要逻辑
    export default function connect(mapStateToProps, mapDispatchToProps, mergeProps, options = {}) {
      return function wrapWithConnect(WrappedComponent) {
        class Connect extends Component {
          constructor(props, context) {
            // 从祖先Component处获得store
            this.store = props.store || context.store
            this.stateProps = computeStateProps(this.store, props)
            this.dispatchProps = computeDispatchProps(this.store, props)
            this.state = { storeState: null }
            // 对stateProps、dispatchProps、parentProps进行合并
            this.updateState()
          }
          shouldComponentUpdate(nextProps, nextState) {
            // 进行判断,当数据发生改变时,Component重新渲染
            if (propsChanged || mapStateProducedChange || dispatchPropsChanged) {
              this.updateState(nextProps)
              return true
            }
            componentDidMount() {
              // 改变Component的state
              this.store.subscribe(() = {
                this.setState({
                  storeState: this.store.getState()
                })
              })
            }
            render() {
              // 生成包裹组件Connect
              return (
                <WrappedComponent {...this.nextState} />
              )
            }
          }
          Connect.contextTypes = {
            store: storeShape
          }
          return Connect;
        }
      }
Dva工作原理
集成
redux+redux-saga
工作原理
改变发生通常是通过用户交互行为或者浏览器行为(如路由跳转等)触发的,当此类行为会改变数据的时候可以通过
dispatch发起一个action,如果是同步行为会直接通过Reducers改变State,如果是异步行为(副作用)会先触发Effects然后流向Reducers最终改变State
15 React中Ref几种创建方式
React 提供了 Refs,帮助我们访问 DOM 节点或在 render 方法中创建的 React 元素
三种使用 Ref 的方式
String Refs
    class App extends React.Component {
        constructor(props) {
            super(props)
        }
        componentDidMount() {
            setTimeout(() => {
                 // 2. 通过 this.refs.xxx 获取 DOM 节点
                 this.refs.textInput.value = 'new value'
            }, 2000)
        }
        render() {
            // 1. ref 直接传入一个字符串
            return (
                <div>
                  <input ref="textInput" value='value' />
                </div>
            )
        }
    }
回调 Refs
    class App extends React.Component {
        constructor(props) {
            super(props)
        }
        componentDidMount() {
            setTimeout(() => {
                  // 2. 通过实例属性获取 DOM 节点
                  this.textInput.value = 'new value'
            }, 2000)
        }
        render() {
            // 1. ref 传入一个回调函数
            // 该函数中接受 React 组件实例或 DOM 元素作为参数
            // 我们通常会将其存储到具体的实例属性(this.textInput)
            return (
                <div>
                  <input ref={(element) => {
                    this.textInput = element;
                  }} value='value' />
                </div>
            )
        }
    }
createRef
这是最被推荐使用的方式
    class App extends React.Component {
        constructor(props) {
            super(props)
            // 1. 使用 createRef 创建 Refs
            // 并将 Refs 分配给实例属性 textInputRef,以便在整个组件中引用
            this.textInputRef = React.createRef();
        }
        componentDidMount() {
            setTimeout(() => {
                // 3. 通过 Refs 的 current 属性进行引用
                this.textInputRef.current.value = 'new value'
            }, 2000)
        }
        render() {
            // 2. 通过 ref 属性附加到 React 元素
            return (
                <div>
                  <input ref={this.textInputRef} value='value' />
                </div>
            )
        }
    }
使用Ref获取组件实例
Refs除了用于获取具体的DOM节点外,也可以获取Class组件的实例,当获取到实例后,可以调用其中的方法,从而强制执行,比如动画之类的效果
    class TextInput extends React.Component{
      constructor(props){
        super(props);
        this.inputRef = React.createRef();
      }
      getTextInputFocus = ()=>{
        this.inputRef.current.focus();
      }
      render(){
        return <input ref={this.inputRef}/>
      }
    }
    class Form extends React.Component{
      constructor(props){
        super(props);
        this.textInputRef = React.createRef();
      }
      getFormFocus = ()=>{
        //this.textInputRef.current就会指向TextInput类组件的实例
        this.textInputRef.current.getTextInputFocus();
      }
      render(){
        return (
          <>
            <TextInput ref={this.textInputRef}/>
            <button onClick={this.getFormFocus}>获得焦点</button>
          </>
        )
      }
    }
函数组件传递forwardRef
- 我们不能在函数组件上使用
ref属性,因为函数组件没有实例 - 使用
forwardRef(forward在这里是「传递」的意思)后,就能跨组件传递ref。 - 在例子中,我们将
inputRef从Form跨组件传递到MyInput中,并与input产生关联
    //  3. 子组件通过 forwardRef 获取 ref,并通过 ref 属性绑定 React 元素
    const MyInput = forwardRef((props, ref) => {
      return <input {...props} ref={ref} />;
    });

    function Form() {
      // // 1. 创建 refs
      const inputRef = useRef(null);

      function handleClick() {
        // // 4. 使用 this.inputRef.current 获取子组件中渲染的 DOM 节点
        inputRef.current.focus();
      }

      return (
        <>
         {/* 2. 传给子组件的 ref 属性 */}
          <MyInput ref={inputRef} />
          <button onClick={handleClick}>
            Focus the input
          </button>
        </>
      );
    }
useImperativeHandle
除了「限制跨组件传递
ref」外,还有一种「防止ref失控的措施」,那就是useImperativeHandle,他的逻辑是这样的:既然「ref失控」是由于「使用了不该被使用的DOM方法」(比如appendChild),那我可以限制「ref中只存在可以被使用的方法」。用useImperativeHandle修改我们的MyInput组件:
    const MyInput = forwardRef((props, ref) => {
      const realInputRef = useRef(null);
      // 函数组件自定义暴露给父组件ref对象,这样更安全避免外部修改删除dom
      useImperativeHandle(ref, () => ({
        focus() {
          realInputRef.current.focus();
        },
      }));
      return <input {...props} ref={realInputRef} />;
    });
现在,Form组件中通过inputRef.current只能取到如下数据结构:
    {
      focus() {
        realInputRef.current.focus();
      },
    }
就杜绝了
「开发者通过ref取到DOM后,执行不该被使用的API,出现ref失控」的情况
- 为了防止错用/滥用导致
ref失控,React限制「默认情况下,不能跨组件传递ref」 - 为了破除这种限制,可以使用
forwardRef。 - 为了减少
ref对DOM的滥用,可以使用useImperativeHandle限制ref传递的数据结构。
16 为什么 React 元素有一个 $$typeof 属性
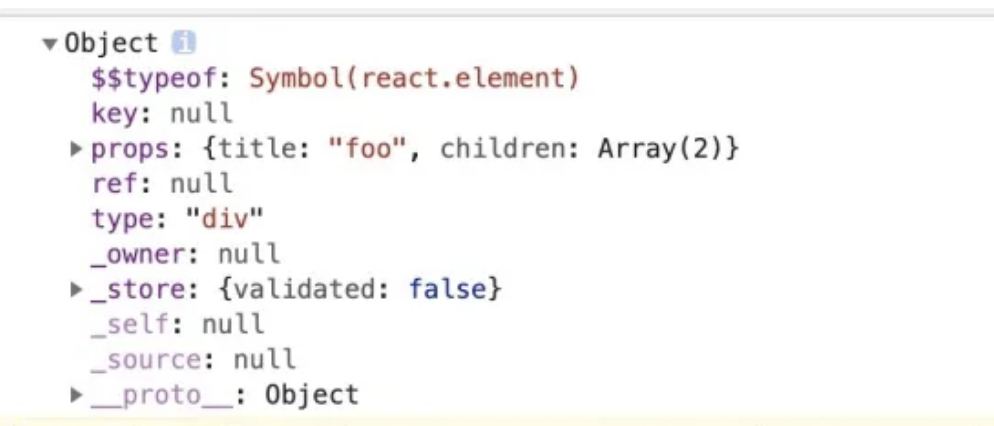
目的是为了防止
XSS攻击。因为Synbol无法被序列化,所以React可以通过有没有$$typeof属性来断出当前的element对象是从数据库来的还是自己生成的。
- 如果没有
$$typeof这个属性,react会拒绝处理该元素。 - 在
React的古老版本中,下面的写法会出现XSS攻击:
    // 服务端允许用户存储 JSON
    let expectedTextButGotJSON = {
      type: 'div',
      props: {
        dangerouslySetInnerHTML: {
          __html: '/* 把你想的搁着 */'
        },
      },
      // ...
    };
    let message = { text: expectedTextButGotJSON };

    // React 0.13 中有风险
    <p>
      {message.text}
    </p>
17 React 如何区分 Class组件 和 Function组件
一般的方式是借助 typeof 和 Function.prototype.toString 来判断当前是不是 class,如下:
    function isClass(func) {
      return typeof func === 'function'
        && /^class\s/.test(Function.prototype.toString.call(func));
    }
但是这个方式有它的局限性,因为如果用了 babel 等转换工具,将 class 写法全部转为 function 写法,上面的判断就会失效。
React区分Class组件 和Function组件的方式很巧妙,由于所有的类组件都要继承React.Component,所以只要判断原型链上是否有React.Component就可以了:
AComponent.prototype instanceof React.Component
18 react组件的划分业务组件技术组件
- 根据组件的职责通常把组件分为UI组件和容器组件。
- UI 组件负责 UI 的呈现,容器组件负责管理数据和逻辑。
- 两者通过
React-Redux提供connect方法联系起来
19 React如何进行组件/逻辑复用?
抛开已经被官方弃用的
Mixin,组件抽象的技术目前有三种比较主流:
- 高阶组件:
- 属性代理
- 反向继承
- 渲染属性
Render Props react-hooks
20 说说你用react有什么坑点
JSX做表达式判断时候,需要强转为boolean类型- 如果不使用
!!b进行强转数据类型,会在页面里面输出0。
- 如果不使用
                render() {
            const b = 0;
            return <div>
                {
                  !!b && <div>这是一段文本</div>
                }
            </div>
        }
- 尽量不要在
componentWillReviceProps里使用setState,如果一定要使用,那么需要判断结束条件,不然会出现无限重渲染,导致页面崩溃 - 给组件添加
ref时候,尽量不要使用匿名函数,因为当组件更新的时候,匿名函数会被当做新的prop处理,让ref属性接受到新函数的时候,react内部会先清空ref,也就是会以null为回调参数先执行一次ref这个props,然后在以该组件的实例执行一次ref,所以用匿名函数做ref的时候,有的时候去ref赋值后的属性会取到null - 遍历子节点的时候,不要用
index作为组件的key进行传入
21 react和vue的区别
共同
- 都支持组件化
- 都是数据驱动视图
- 都用
vdom操作DOM
区别
React使用JSX拥抱JS,Vue使用模板拥抱HTMLReact函数式编程,Vue是声明式编程React更多的是自力更生,Vue把你想要的都给你
22 对React实现原理的理解
前言介绍
react和vue都是基于vdom的前端框架,之所以用vdom是因为可以精准的对比关心的属性,而且还可以跨平台渲染- 但是开发不会直接写
vdom,而是通过jsx这种接近html语法的DSL,编译产生render function,执行后产生vdom vdom的渲染就是根据不同的类型来用不同的dom api来操作dom- 渲染组件的时候,如果是函数组件,就执行它拿到
vdom。class组件就创建实例然后调用render方法拿到vdom。vue的那种option对象的话,就调用render方法拿到vdom - 组件本质上就是对一段
vdom产生逻辑的封装,函数、class、option对象甚至其他形式都可以 react和vue最大的区别在状态管理方式上,vue是通过响应式,react是通过setState的api。我觉得这个是最大的区别,因为它导致了后面react架构的变更react的setState的方式,导致它并不知道哪些组件变了,需要渲染整个vdom才行。但是这样计算量又会比较大,会阻塞渲染,导致动画卡顿。所以react后来改造成了fiber架构,目标是可打断的计算- 为了这个目标,不能变对比变更新
dom了,所以把渲染分为了render和commit两个阶段,render阶段通过schedule调度来进行reconcile,也就是找到变化的部分,创建dom,打上增删改的tag,等全部计算完之后,commit阶段一次性更新到dom - 打断之后要找到父节点、兄弟节点,所以
vdom也被改造成了fiber的数据结构,有了parent、sibling的信息 - 所以
fiber既指这种链表的数据结构,又指这个render、commit的流程 reconcile阶段每次处理一个fiber节点,处理前会判断下shouldYield,如果有更高优先级的任务,那就先执行别的commit阶段不用再次遍历fiber树,为了优化,react把有effectTag的fiber都放到了effectList队列中,遍历更新即可- 在
dom操作前,会异步调用useEffect的回调函数,异步是因为不能阻塞渲染 - 在
dom操作之后,会同步调用useLayoutEffect的回调函数,并且更新ref - 所以,
commit阶段又分成了before mutation、mutation、layout这三个小阶段,就对应上面说的那三部分
理解了
vdom、jsx、组件本质、fiber、render(reconcile + schedule)+commit(before mutation、mutation、layout)的渲染流程,就算是对react原理有一个比较深的理解
下面展开分析
vdom
为什么 react 和 vue 都要基于 vdom 呢?直接操作真实 dom 不行么?
考虑下这样的场景:
- 渲染就是用
dom api对真实dom做增删改,如果已经渲染了一个dom,后来要更新,那就要遍历它所有的属性,重新设置,比如id、clasName、onclick等。 - 而
dom的属性是很多的:
- 有很多属性根本用不到,但在更新时却要跟着重新设置一遍。
- 能不能只对比我们关心的属性呢?
- 把这些单独摘出来用
JS对象表示不就行了? - 这就是为什么要有
vdom,是它的第一个好处。 - 而且有了
vdom之后,就没有和dom强绑定了,可以渲染到别的平台,比如native、canvas等等。 - 这是
vdom的第二个好处。 - 我们知道了
vdom就是用JS对象表示最终渲染的dom的,比如:
    {
      type: 'div',
      props: {
        id: 'aaa',
        className: ['bbb', 'ccc'],
        onClick: function() {}
      },
      children: []
    }
然后用渲染器把它渲染出来,但是要让开发去写这样的 vdom 么?那肯定不行,这样太麻烦了,大家熟悉的是 html 那种方式,所以我们要引入编译的手段
dsl 的编译
dsl是domain specific language,领域特定语言的意思,html、css都是web领域的dsl- 直接写
vdom太麻烦了,所以前端框架都会设计一套dsl,然后编译成render function,执行后产生vdom。 vue和react都是这样

这套 dsl 怎么设计呢?前端领域大家熟悉的描述
dom的方式是html,最好的方式自然是也设计成那样。所以vue的template,react的jsx就都是这么设计的。vue的template compiler是自己实现的,而react的jsx的编译器是babel实现的,是两个团队合作的结果。
编译成 render function 后再执行就是我们需要的 vdom。接下来渲染器把它渲染出来就行了。那渲染器怎么渲染 vdom 的呢?
渲染 vdom
渲染 vdom 也就是通过 dom api 增删改 dom。比如一个 div,那就要 document.createElement 创建元素,然后 setAttribute 设置属性,addEventListener 设置事件监听器。如果是文本,那就要 document.createTextNode 来创建。所以说根据 vdom 类型的不同,写个 if else,分别做不同的处理就行了。没错,不管 vue 还是 react,渲染器里这段 if else 是少不了的:
    switch (vdom.tag) {
      case HostComponent:
        // 创建或更新 dom
      case HostText:
        // 创建或更新 dom
      case FunctionComponent:
        // 创建或更新 dom
      case ClassComponent:
        // 创建或更新 dom
    }
react里是通过tag来区分vdom类型的,比如HostComponent就是元素,HostText就是文本,FunctionComponent、ClassComponent就分别是函数组件和类组件。那么问题来了,组件怎么渲染呢?这就涉及到组件的原理了:
组件
我们的目标是通过
vdom描述界面,在react里会使用jsx。这样的jsx有的时候是基于state来动态生成的。如何把state和jsx关联起来呢?封装成function、class或者option对象的形式。然后在渲染的时候执行它们拿到vdom就行了。
这就是组件的实现原理:
    switch (vdom.tag) {
      case FunctionComponent:
           const childVdom = vdom.type(props);

           render(childVdom);
           //...
      case ClassComponent:
         const instance = new vdom.type(props);
         const childVdom = instance.render();

         render(childVdom);
         //...
    }
如果是函数组件,那就传入 props 执行它,拿到 vdom 之后再递归渲染。如果是 class 组件,那就创建它的实例对象,调用 render 方法拿到 vdom,然后递归渲染。所以,大家猜到 vue 的 option 对象的组件描述方式怎么渲染了么?
    {
        data: {},
        props: {}
        render(h) {
            return h('div', {}, '');
        }
    }
没错,就是执行下 render 方法就行:
    const childVdom = option.render();

    render(childVdom);
大家可能平时会写单文件组件 sfc的形式,那个会有专门的编译器,把 template 编译成 render function,然后挂到 option 对象的render` 方法上
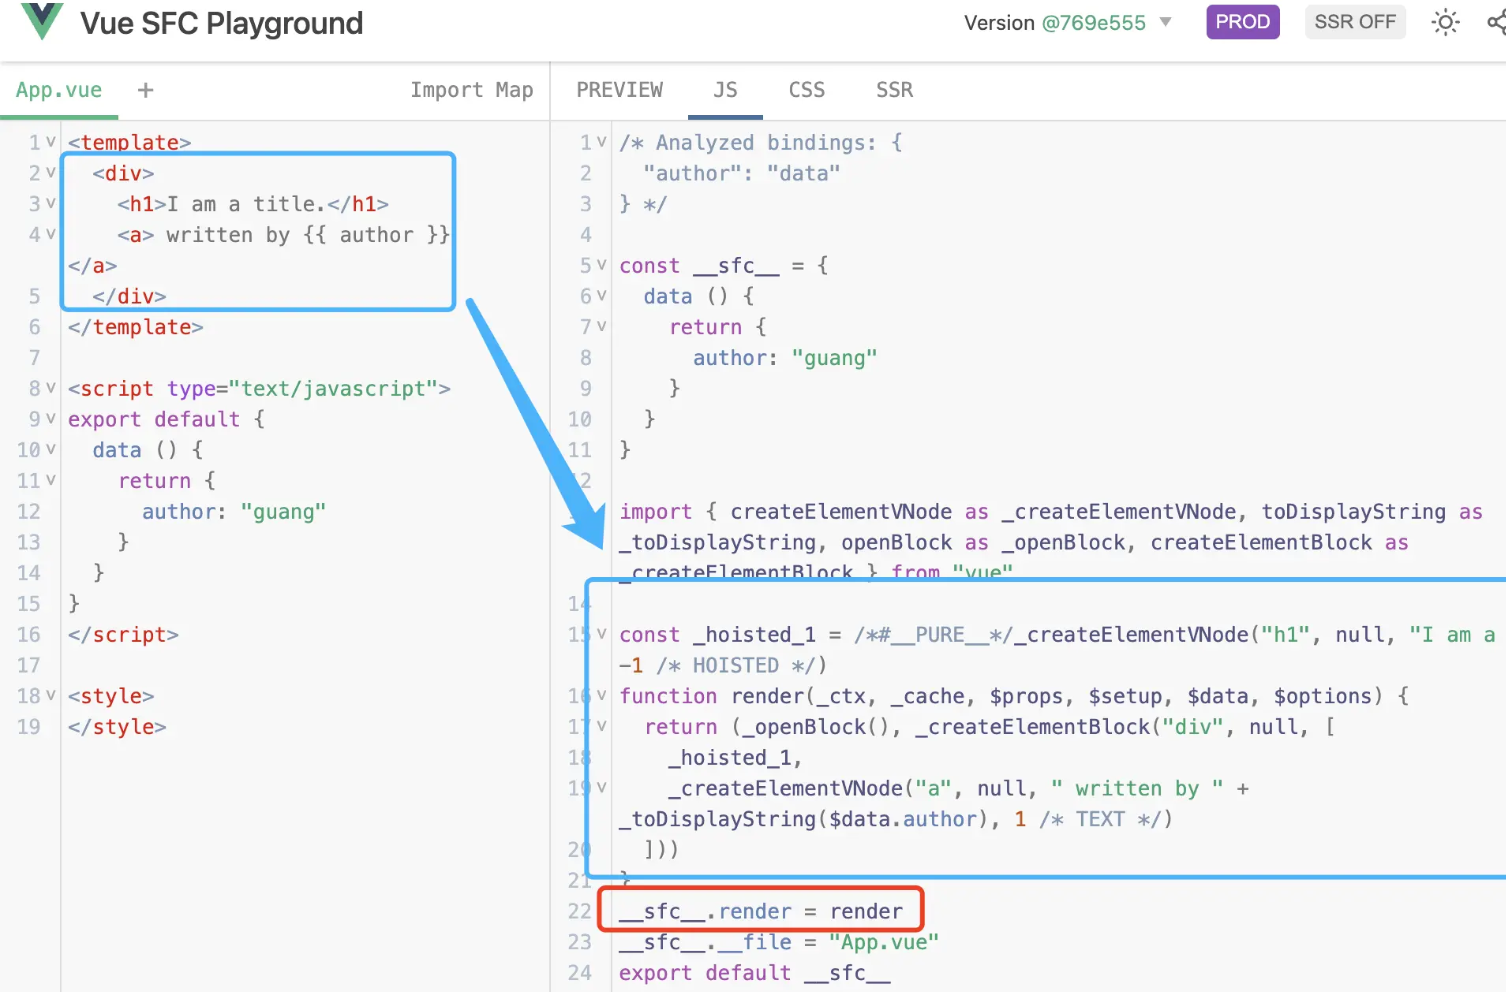
所以组件本质上只是对产生 vdom 的逻辑的封装,函数的形式、option 对象的形式、class 的形式都可以。就像 vue3 也有了函数组件一样,组件的形式并不重要。基于 vdom 的前端框架渲染流程都差不多,vue 和 react 很多方面是一样的。但是管理状态的方式不一样,vue 有响应式,而 react 则是 setState 的 api 的方式。真说起来,vue 和 react 最大的区别就是状态管理方式的区别,因为这个区别导致了后面架构演变方向的不同。
状态管理
react是通过setState的api触发状态更新的,更新以后就重新渲染整个vdom。而vue是通过对状态做代理,get的时候收集以来,然后修改状态的时候就可以触发对应组件的render了。
有的同学可能会问,为什么 react 不直接渲染对应组件呢?
想象一下这个场景:
父组件把它的 setState 函数传递给子组件,子组件调用了它。这时候更新是子组件触发的,但是要渲染的就只有那个组件么?明显不是,还有它的父组件。同理,某个组件更新实际上可能触发任意位置的其他组件更新的。所以必须重新渲染整个 vdom 才行。
那 vue 为啥可以做到精准的更新变化的组件呢?因为响应式的代理呀,不管是子组件、父组件、还是其他位置的组件,只要用到了对应的状态,那就会被作为依赖收集起来,状态变化的时候就可以触发它们的 render,不管是组件是在哪里的。这就是为什么 react 需要重新渲染整个 vdom,而 vue 不用。这个问题也导致了后来两者架构上逐渐有了差异。
react 架构的演变
react15的时候,和vue的渲染流程还是很像的,都是递归渲染vdom,增删改dom就行。但是因为状态管理方式的差异逐渐导致了架构的差异。react的setState会渲染整个vdom,而一个应用的所有vdom可能是很庞大的,计算量就可能很大。浏览器里js计算时间太长是会阻塞渲染的,会占用每一帧的动画、重绘重排的时间,这样动画就会卡顿。作为一个有追求的前端框架,动画卡顿肯定是不行的。但是因为setState的方式只能渲染整个vdom,所以计算量大是不可避免的。那能不能把计算量拆分一下,每一帧计算一部分,不要阻塞动画的渲染呢?顺着这个思路,react就改造为了fiber架构。
fiber 架构
优化的目标是打断计算,分多次进行,但现在递归的渲染是不能打断的,有两个方面的原因导致的:
- 渲染的时候直接就操作了 dom 了,这时候打断了,那已经更新到 dom 的那部分怎么办?
- 现在是直接渲染的 vdom,而 vdom 里只有 children 的信息,如果打断了,怎么找到它的父节点呢?
第一个问题的解决还是容易想到的:
- 渲染的时候不要直接更新到
dom了,只找到变化的部分,打个增删改的标记,创建好dom,等全部计算完了一次性更新到dom就好了。 - 所以
react把渲染流程分为了两部分:render和commit。 render阶段会找到vdom中变化的部分,创建dom,打上增删改的标记,这个叫做reconcile,调和。reconcile是可以打断的,由schedule调度。- 之后全部计算完了,就一次性更新到
dom,叫做commit。 - 这样,
react就把之前的和vue很像的递归渲染,改造成了render(reconcile + schdule) + commit两个阶段的渲染。 - 从此以后,
react和vue架构上的差异才大了起来。
第二个问题,如何打断以后还能找到父节点、其他兄弟节点呢?
现有的 vdom 是不行的,需要再记录下 parent、silbing 的信息。所以 react 创造了 fiber 的数据结构。
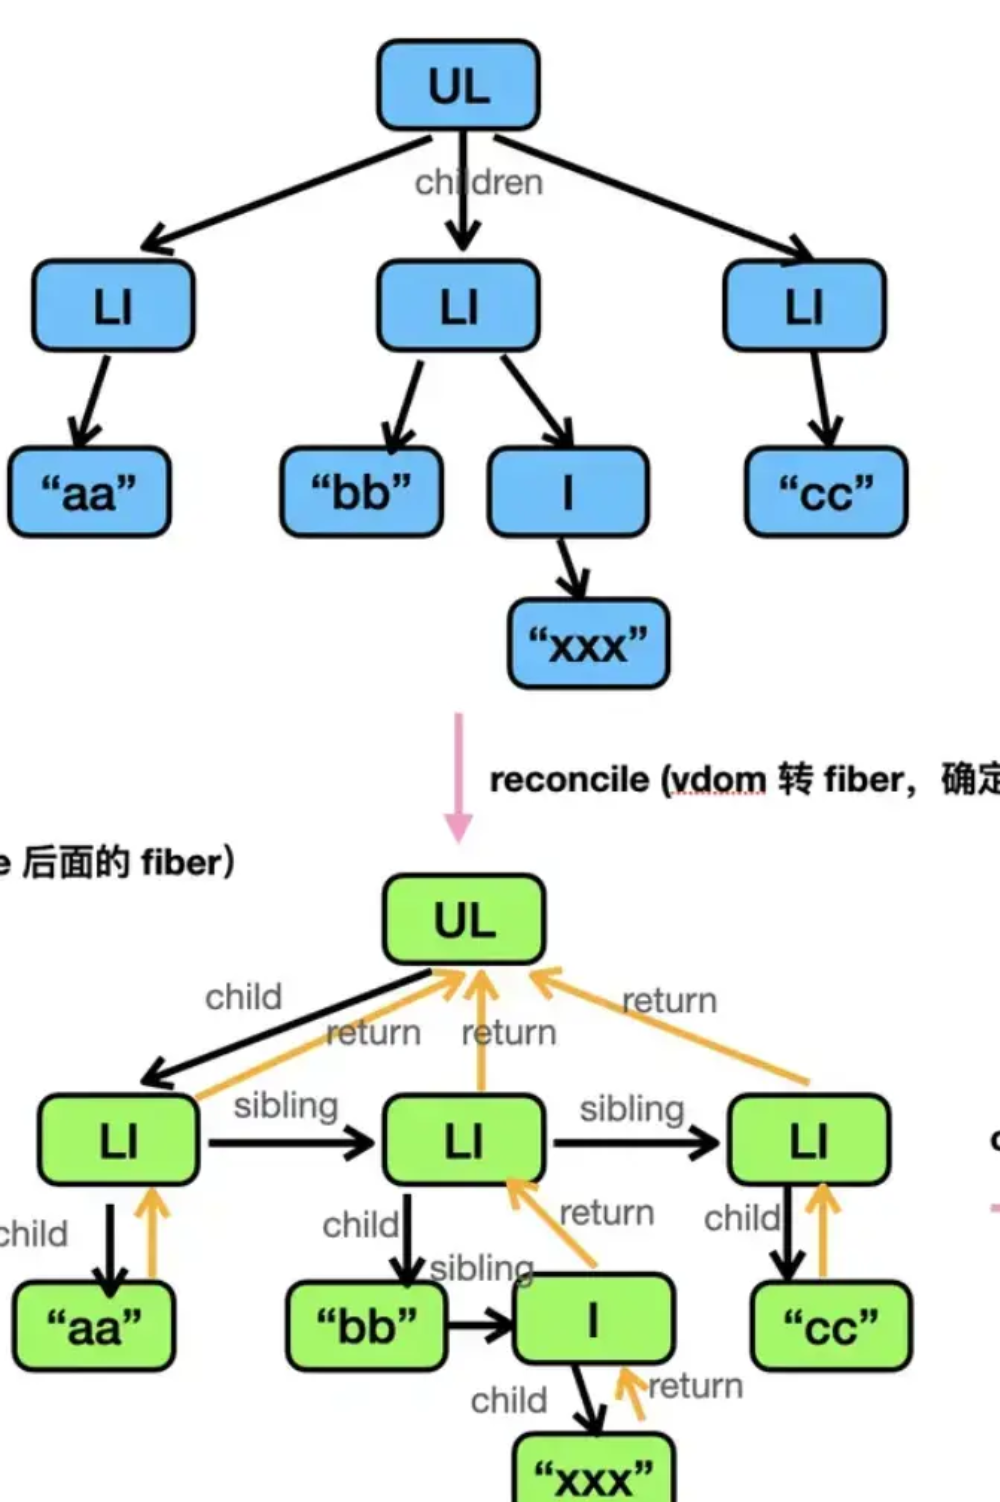
- 除了
children信息外,额外多了sibling、return,分别记录着兄弟节点、父节点的信息。 - 这个数据结构也叫做
fiber。(fiber既是一种数据结构,也代表render + commit的渲染流程)react会先把vdom转换成fiber,再去进行reconcile,这样就是可打断的了。 - 为什么这样就可以打断了呢?因为现在不再是递归,而是循环了:
    function workLoop() {
      while (wip) {
        performUnitOfWork();
      }

      if (!wip && wipRoot) {
        commitRoot();
      }
    }
react里有一个 workLoop 循环,每次循环做一个fiber的reconcile,当前处理的fiber会放在workInProgress这个全局变量上。- 当循环完了,也就是
wip为空了,那就执行commit阶段,把reconcile的结果更新到dom。 - 每个
fiber的reconcile是根据类型来做的不同处理。当处理完了当前fiber节点,就把wip指向sibling、return来切到下个fiber节点。:
    function performUnitOfWork() {
      const { tag } = wip;

      switch (tag) {
        case HostComponent:
          updateHostComponent(wip);
          break;

        case FunctionComponent:
          updateFunctionComponent(wip);
          break;

        case ClassComponent:
          updateClassComponent(wip);
          break;
        case Fragment:
          updateFragmentComponent(wip);
          break;
        case HostText:
          updateHostTextComponent(wip);
          break;
        default:
          break;
      }

      if (wip.child) {
        wip = wip.child;
        return;
      }

      let next = wip;

      while (next) {
        if (next.sibling) {
          wip = next.sibling;
          return;
        }
        next = next.return;
      }

      wip = null;
    }
函数组件和
class组件的reconcile和之前讲的一样,就是调用render拿到vdom,然后继续处理渲染出的vdom:
    function updateClassComponent(wip) {
      const { type, props } = wip;
      const instance = new type(props);
      const children = instance.render();

      reconcileChildren(wip, children);
    }

    function updateFunctionComponent(wip) {
      renderWithHooks(wip);

      const { type, props } = wip;

      const children = type(props);
      reconcileChildren(wip, children);
    }
- 循环执行
reconcile,那每次处理之前判断一下是不是有更高优先级的任务,就能实现打断了。 - 所以我们在每次处理
fiber节点的reconcile之前,都先调用下shouldYield方法:
    function workLoop() {
      while (wip && shouldYield()) {
        performUnitOfWork();
      }

      if (!wip && wipRoot) {
        commitRoot();
      }
    }
shouldYiled方法就是判断待处理的任务队列有没有优先级更高的任务,有的话就先处理那边的fiber,这边的先暂停一下。- 这就是
fiber架构的reconcile可以打断的原理。通过fiber的数据结构,加上循环处理前每次判断下是否打断来实现的。 - 聊完了
render阶段(reconcile + schedule),接下来就进入commit阶段了。 - 前面说过,为了变为可打断的,
reconcile阶段并不会真正操作dom,只会创建dom然后打个effectTag的增删改标记。 commit阶段就根据标记来更新dom就可以了。- 但是
commit阶段要再遍历一次fiber来查找有effectTag的节点,更新dom么? - 这样当然没问题,但没必要。完全可以在 reconcile 的时候把有 effectTag 的节点收集到一个队列里,然后 commit 阶段直接遍历这个队列就行了。
- 这个队列叫做
effectList。 react会在commit阶段遍历effectList,根据effectTag来增删改dom。dom创建前后就是useEffect、useLayoutEffect还有一些函数组件的生命周期函数执行的时候。useEffect被设计成了在dom操作前异步调用,useLayoutEffect是在dom操作后同步调用。- 为什么这样呢?
- 因为都要操作
dom了,这时候如果来了个effect同步执行,计算量很大,那不是把 fiber 架构带来的优势有毁了么? - 所以
effect是异步的,不会阻塞渲染。 - 而
useLayoutEffect,顾名思义是想在这个阶段拿到一些布局信息的,dom 操作完以后就可以了,而且都渲染完了,自然也就可以同步调用了。 - 实际上
react把commit阶段也分成了3个小阶段。 before mutation、mutation、layout。mutation就是遍历effectList来更新dom的。- 它的之前就是
before mutation,会异步调度useEffect的回调函数。 - 它之后就是
layout阶段了,因为这个阶段已经可以拿到布局信息了,会同步调用useLayoutEffect的回调函数。而且这个阶段可以拿到新的dom节点,还会更新下ref。 - 至此,我们对
react的新架构,render、commit两大阶段都干了什么就理清了。
23 React18新增了哪些特性
前言
- 在
2021年6月份,React 18 Working Group(React 18工作组,简称reactwg)成立了,并且公布了v18版本的发布计划,经过将近一年的迭代和准备,在2022年3月29日,React 18正式版终于发布了 react 17的发布时间是2020年10月20号,距离React 18发布足足间隔一年半,并且v17中只有三个小版本,分别是17.0.0、17.0.1、17.0.217.0.0-React 17正式版发布17.0.1- 只改动了1个文件,修复ie兼容问题,同时提升了V8内部对数组的执行性能17.0.2- 改动集中于Scheduler包, 主干逻辑没有变动,只与性能统计相关
- 在
React 17的两次迭代中,都是只更新了补丁号,并且都是一些比较细节的更新,直到React 18正式版发布,React 17都没有任何更新
注意
React 18 已经放弃了对 ie11 的支持,将于 2022年6月15日 停止支持 ie,如需兼容,需要回退到 React 17 版本
React 18中引入的新特性是使用现代浏览器的特性构建的,在IE中无法支持的polyfill,比如micro-tasks
新特性一览
- 新增了
useId,startTransition,useTransition,useDeferredValue,useSyncExternalStore,useInsertionEffect等新的hook API - 针对浏览器和服务端渲染的
React DOM API都有新的变化React DOM Client新增createRoot和hydrateRoot方法React DOM Server新增renderToPipeableStream和renderToReadableStream方法
- 部分弃用特性
ReactDOM.render已被弃用。使用它会警告:在React 17模式下运行您的应用程序ReactDOM.hydrate已被弃用。使用它会警告:在React 17模式下运行您的应用程序ReactDOM.unmountComponentAtNode已被弃用。ReactDOM.renderSubtreeIntoContainer已被弃用ReactDOMServer.renderToNodeStream已被弃用
- breaking change
setState自动批处理Stricter Strict Mode严格模式
Render API
为了更好的管理root节点,React 18 引入了一个新的 root API,新的 root API 还支持 new concurrent renderer(并发模式的渲染),它允许你进入concurrent mode(并发模式)
    // React 17
    import React from 'react';
    import ReactDOM from 'react-dom';
    import App from './App';

    const root = document.getElementById('root')!;

    ReactDOM.render(<App />, root);

    // React 18
    import React from 'react';
    import ReactDOM from 'react-dom/client';
    import App from './App';

    const root = document.getElementById('root')!;

    ReactDOM.createRoot(root).render(<App />);
同时,在卸载组件时,我们也需要将
unmountComponentAtNode升级为root.unmount
    // React 17
    ReactDOM.unmountComponentAtNode(root);

    // React 18
    root.unmount();
在新版本中,如果需要在 render 方法中使用回调函数,我们可以在组件中通过 useEffect 实现
    // React 17
    const root = document.getElementById('root')!;
    ReactDOM.render(<App />, root, () => {
      console.log('渲染完成');
    });

    // React 18
    // React 18 从 render 方法中删除了回调函数,因为当使用Suspense时,它通常不会有预期的结果
    const AppWithCallback = () => {
      useEffect(() => {
        console.log('渲染完成');
      }, []);
      return <App />;
    };
    const root = document.getElementById('root')!;
    ReactDOM.createRoot(root).render(<AppWithCallback />);
如果你的项目使用了
ssr服务端渲染,需要把hydration升级为hydrateRoot
    // React 17
    import ReactDOM from 'react-dom';
    const root = document.getElementById('root');
    ReactDOM.hydrate(<App />, root);

    // React 18
    import ReactDOM from 'react-dom/client';
    const root = document.getElementById('root')!;
    ReactDOM.hydrateRoot(root, <App />);
另外,还需要更新
TypeScript类型定义,如果你的项目使用了TypeScript,最值得注意的变化是,现在在定义props类型时,如果需要获取子组件children,那么你需要显式的定义它,例如这样:
    // React 17
    interface MyButtonProps {
      color: string;
    }

    const MyButton: React.FC<MyButtonProps> = ({ children }) => {
      // 在 React 17 的 FC 中,默认携带了 children 属性
      return <div>{children}</div>;
    };

    export default MyButton;

    // React 18
    interface MyButtonProps {
      color: string;
      children?: React.ReactNode;
    }

    const MyButton: React.FC<MyButtonProps> = ({ children }) => {
      // 在 React 18 的 FC 中,不存在 children 属性,需要手动申明
      return <div>{children}</div>;
    };

    export default MyButton;
setState合并更新
React 18通过在默认情况下执行批处理来实现了开箱即用的性能改进- 批处理是指为了获得更好的性能,在数据层,将
多个状态更新批量处理,合并成一次更新(在视图层,将多个渲染合并成一次渲染)
在 React 18 之前
在
React 18之前,setState在React的合成事件中是合并更新的,在setTimeout的原生事件中是同步按序更新的。例如
    handleClick = () => {
      this.setState({ age: this.state.age + 1 });
      console.log(this.state.age); // 0
      this.setState({ age: this.state.age + 1 });
      console.log(this.state.age); // 0
      this.setState({ age: this.state.age + 1 });
      console.log(this.state.age); // 0
      setTimeout(() => {
        this.setState({ age: this.state.age + 1 });
        console.log(this.state.age); // 2
        this.setState({ age: this.state.age + 1 });
        console.log(this.state.age); // 3
      });
    };
而在
React 18中,不论是在合成事件中,还是在宏任务中,都是会合并更新
    function handleClick() {
      setState({ age: state.age + 1 }, onePriority);
      console.log(state.age);// 0
      setState({ age: state.age + 1 }, onePriority);
      console.log(state.age); // 0
      setTimeout(() => {
        setState({ age: state.age + 1 }, towPriority);
        console.log(state.age); // 1
        setState({ age: state.age + 1 }, towPriority);
        console.log(state.age); // 1
      });
    }
总结:
- 在
18之前,只有在react事件处理函数中,才会自动执行批处理,其它情况会多次更新 - 在
18之后,任何情况都会自动执行批处理,多次更新始终合并为一次
flushSync
批处理是一个
破坏性改动,如果你想退出批量更新,你可以使用flushSync,建议尽量不要这么做
    import React, { useState } from 'react';
    import { flushSync } from 'react-dom';

    const App: React.FC = () => {
      const [count, setCount] = useState(0);
      return (
        <div
          onClick={() => {
            flushSync(() => {
              setCount(count => count + 1);
            });
            flushSync(() => {
              setCount(count => count + 2);
            });
          }}
        >
          <div>count1: {count1}</div>
          <div>count2: {count2}</div>
        </div>
      );
    };

    export default App;
注意:
flushSync函数内部的多个setState仍然为批量更新
改进Suspense
Suspense用于数据获取,可以“等待”目标代码加载,并且可以直接指定一个加载的界面(像是个 spinner),让它在用户等待的时候显示。
    import {useState, Suspense} from "react";
    import User from "../components/User";
    import Num from "../components/Num";
    import {fetchData} from "../utils";
    import ErrorBoundaryPage from "./ErrorBoundaryPage";

    const initialResource = fetchData();

    export default function SuspensePage(props) {
      const [resource, setResource] = useState(initialResource);

      return (
        <div>
          <h3>SuspensePage</h3>
          <ErrorBoundaryPage fallback={<h1>网络出错了</h1>}>
            <Suspense fallback={<h1>loading - user</h1>}>
              <User resource={resource} />
            </Suspense>
          </ErrorBoundaryPage>

          <Suspense fallback={<h1>loading-num</h1>}>
            <Num resource={resource} />
          </Suspense>

          <button onClick={() => setResource(fetchData())}>refresh</button>
        </div>
      );
    }
错误处理
每当使用
Promises,大概率我们会用catch()来做错误处理。但当我们用Suspense时,我们不等待Promises就直接开始渲染,这时catch()就不适用了。这种情况下,错误处理该怎么进行呢?
在 Suspense 中,获取数据时抛出的错误和组件渲染时的报错处理方式一样——你可以在需要的层级渲染一个错误边界组件来“捕捉”层级下面的所有的报错信息。
    export default class ErrorBoundaryPage extends React.Component {
      state = {hasError: false, error: null};
      static getDerivedStateFromError(error) {
        return {
          hasError: true,
          error,
        };
      }
      render() {
        if (this.state.hasError) {
          return this.props.fallback;
        }
        return this.props.children;
      }
    }
支持Concurrent模式
带来新的API,如startTransition、useDeferredValue等
- 为了支持以上特性,
React18不仅加入了多任务处理,还加入了基于优先级的渲染、调度和打断 React18加入的新的模式,即"并发渲染(concurrent rendering)"模式,当然这个模式是可选的,这个模式也使得React能够同时支持多个UI版本。这个变化对于开发者来说大部分是不可见的,但是它解锁了React应用在性能提升方面的一些新特性
Concurrent模式是一组React的新功能,可帮助应用保持响应,并根据用户的设备性能和网速进行适当的调整
在 Concurrent 模式中,React 可以 同时 更新多个状态 —— 就像分支可以让不同的团队成员独立地工作一样
- 对于
CPU-bound的更新 (例如创建新的DOM节点和运行组件中的代码),并发意味着一个更急迫的更新可以“中断”已经开始的渲染。 - 对于
IO-bound的更新 (例如从网络加载代码或数据),并发意味着React甚至可以在全部数据到达之前就在内存中开始渲染,然后跳过令人不愉快的空白加载状态
重要的是,你使用 React 的方式是相同的。components,props,和 state 等概念的基本工作方式是相同的。当你想更新屏幕,设置 state即可
React 使用一种启发式方法决定更新的“紧急性”,并且允许你用几行代码对其进行调整,以便你可以在每次交互中实现理想的用户体验
简单来说,
Concurrent模式想做到的事情就是用户可以自定义更新任务优先级并且能够通知到React,React再来处理不同优先级的更新任务,当然,优先处理高优先级任务,并且低优先级任务可以中断
Concurrent 模式减少了防抖和节流在 UI 中的需求。因为渲染是可以中断的,React 不需要人为地 延迟 工作以避免卡顿(比如使用setTimeout)。它可以立即开始渲染,但是当需要保持应用响应时中断这项工作
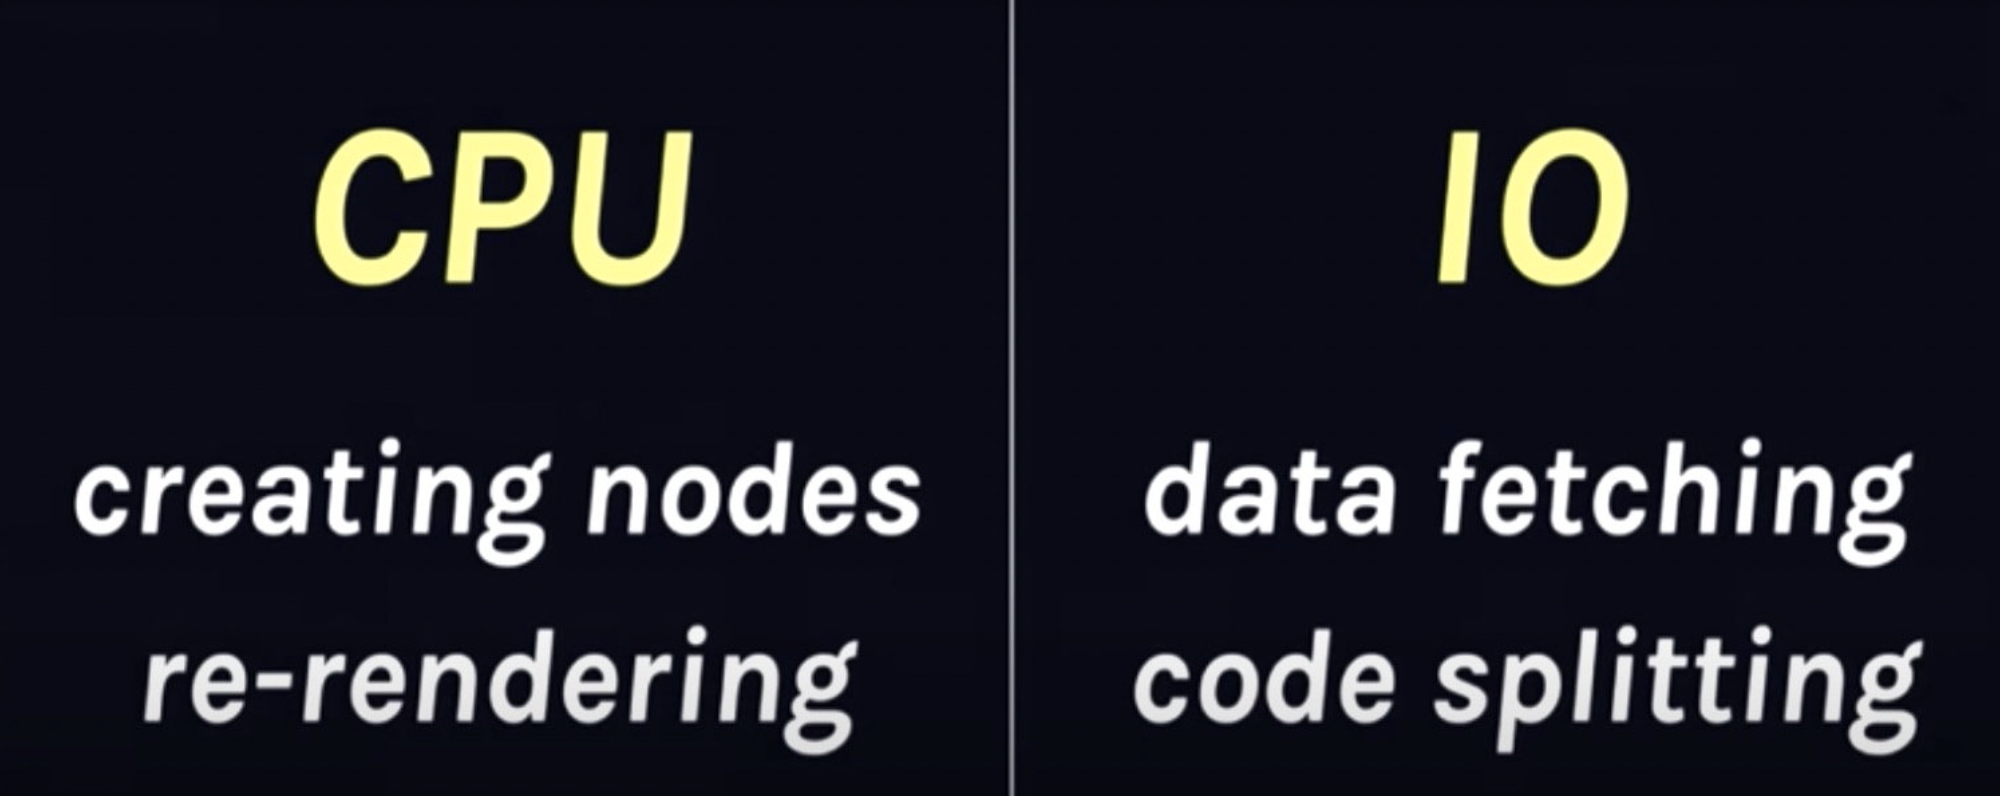
组件返回undefined不再报错
    export default function UndefinedPage(props) {
      return undefined;
    }
React以前之所以返回undefined会报错,是为了帮助用户快速排错,因为用户可能会忘记返回组件。这是当时2017年把组件返回undefined报错处理的原因,但是现在来看呢,今时不同往日了,现在的类型检测工具都非常流行并且可靠了,比如ts。所以现在React可以不再帮助用户排查忘记给组件添加返回值的情况了。
并且还有一点,这个改动和React18之后的特性也相关。比如Suspense,如果我不想要fallback所以才赋值undefined,但是React报错,这理论上有点矛盾
startTransition
startTransition包裹里的更新函数被当做是非紧急事件,如果有别的紧急更新(urgent update)进来,那么这个startTransition包裹里的更新则会被打断
React把状态更新分成两种:
Urgent updates紧急更新,指直接交互。如点击、输入、滚动、拖拽等Transition updates过渡更新,如UI从一个视图向另一个视图的更新
    import {useEffect, useState, Suspense} from "react";
    import Button from "../components/Button";
    import User from "../components/User";
    import Num from "../components/Num";
    import {fetchData} from "../utils";

    const initialResource = fetchData();

    export default function TransitionPage(props) {
      const [resource, setResource] = useState(initialResource);

      // useEffect(() => {
      //   console.log("resource", resource); //sy-log
      // }, [resource]);

      return (
        <div>
          <h3>TransitionPage</h3>
          <Suspense fallback={<h1>loading - user</h1>}>
            <User resource={resource} />
          </Suspense>

          <Suspense fallback={<h1>loading-num</h1>}>
            <Num resource={resource} />
          </Suspense>

          <Button
            refresh={() => {
              setResource(fetchData());
            }}
          />
        </div>
      );
    }
    import {
      //startTransition,
      useTransition,
    } from "react";

    export default function Button({refresh}) {
      const [isPending, startTransition] = useTransition();

      return (
        <div className="border">
          <h3>Button</h3>
          <button
            onClick={() => {
              startTransition(() => {
                refresh();
              });
            }}
            disabled={isPending}>
            点击刷新数据
          </button>
          {isPending ? <div>loading...</div> : null}
        </div>
      );
    }
与setTimeout异同
- 在
startTransition出现之前,我们可以使用setTimeout来实现优化。但是现在在处理上面的优化的时候,有了startTransition基本上可以抛弃setTimeout了,原因主要有以三点: - 首先,与
setTimeout不同的是,startTransition并不会延迟调度,而是会立即执行,startTransition接收的函数是同步执行的,只是这个update被加了一个“transitions"的标记。而这个标记,React内部处理更新的时候是会作为参考信息的。这就意味着,相比于setTimeout, 把一个update交给startTransition能够更早地被处理。而在于较快的设备上,这个过度是用户感知不到的
使用场景
startTransition可以用在任何你想更新的时候。但是从实际来说,以下是两种典型适用场景:
- 渲染慢:如果你有很多没那么着急的内容要渲染更新。
- 网络慢:如果你的更新需要花较多时间从服务端获取。这个时候也可以再结合
Suspense
useTransition
在使用startTransition更新状态的时候,用户可能想要知道transition的实时情况,这个时候可以使用React提供的hook api useTransition
    import { useTransition } from 'react';
    const [isPending, startTransition] = useTransition();
如果transition未完成,isPending值为true,否则为false
useDeferredValue
使得我们可以延迟更新某个不那么重要的部分
举例:如下图,当用户在输入框输入“书”的时候,用户应该立马看到输入框的反应,而相比之下,下面的模糊查询框如果延迟出现一会儿其实是完全可以接受的,因为用户可能会继续修改输入框内容,这个过程中模糊查询结果还是会变化,但是这个变化对用户来说相对没那么重要,用户最关心的是看到最后的匹配结果
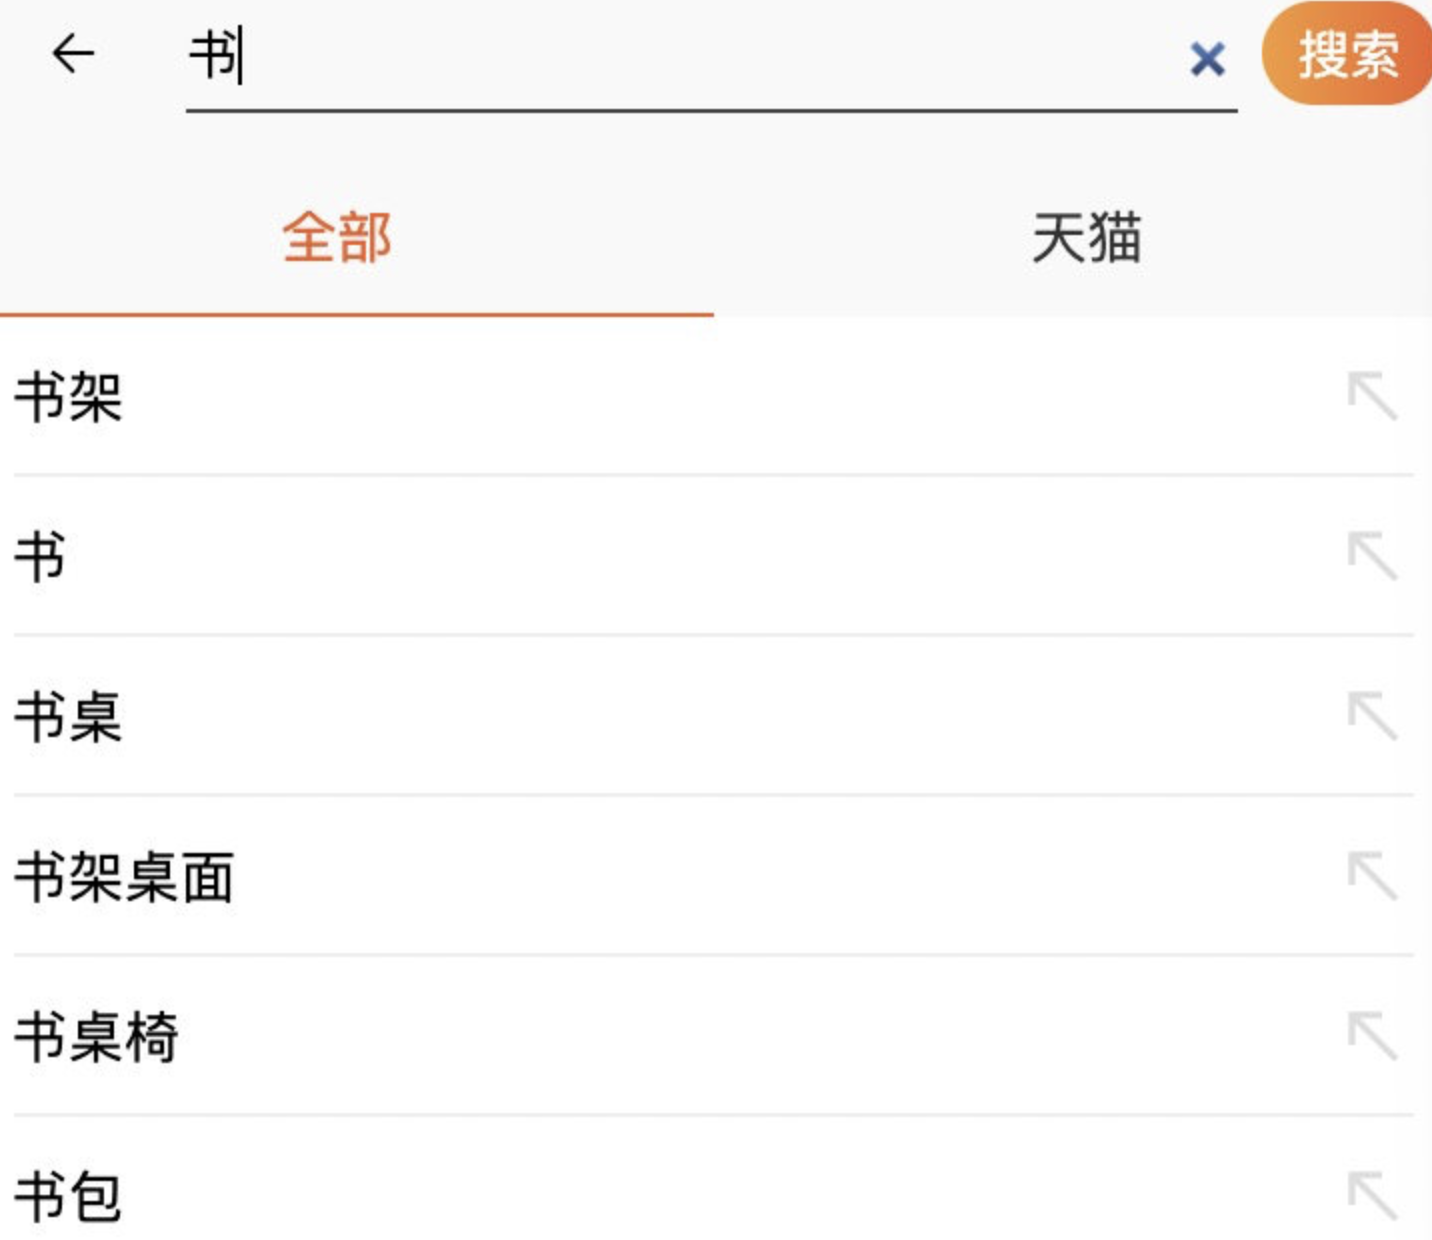
    import {useDeferredValue, useState} from "react";
    import MySlowList from "../components/MySlowList";

    export default function UseDeferredValuePage(props) {
      const [text, setText] = useState("hello");
      const deferredText = useDeferredValue(text);

      const handleChange = (e) => {
        setText(e.target.value);
      };
      return (
        <div>
          <h3>UseDeferredValuePage</h3>
          {/* 保持将当前文本传递给 input */}
          <input value={text} onChange={handleChange} />
          {/* 但在必要时可以将列表“延后” */}
          <p>{deferredText}</p>

          <MySlowList text={deferredText} />
        </div>
      );
    }
    // MySlowList.js

    import React, {memo} from "react";

    function ListItem({children}) {
      let now = performance.now();
      while (performance.now() - now < 3) {}
      return <div className="ListItem">{children}</div>;
    }

    export default memo(function MySlowList({text}) {
      let items = [];
      for (let i = 0; i < 80; i++) {
        items.push(
          <ListItem key={i}>
            Result #{i} for "{text}"
          </ListItem>
        );
      }
      return (
        <div className="border">
          <p>
            <b>Results for "{text}":</b>
          </p>
          <ul className="List">{items}</ul>
        </div>
      );
    });
源码
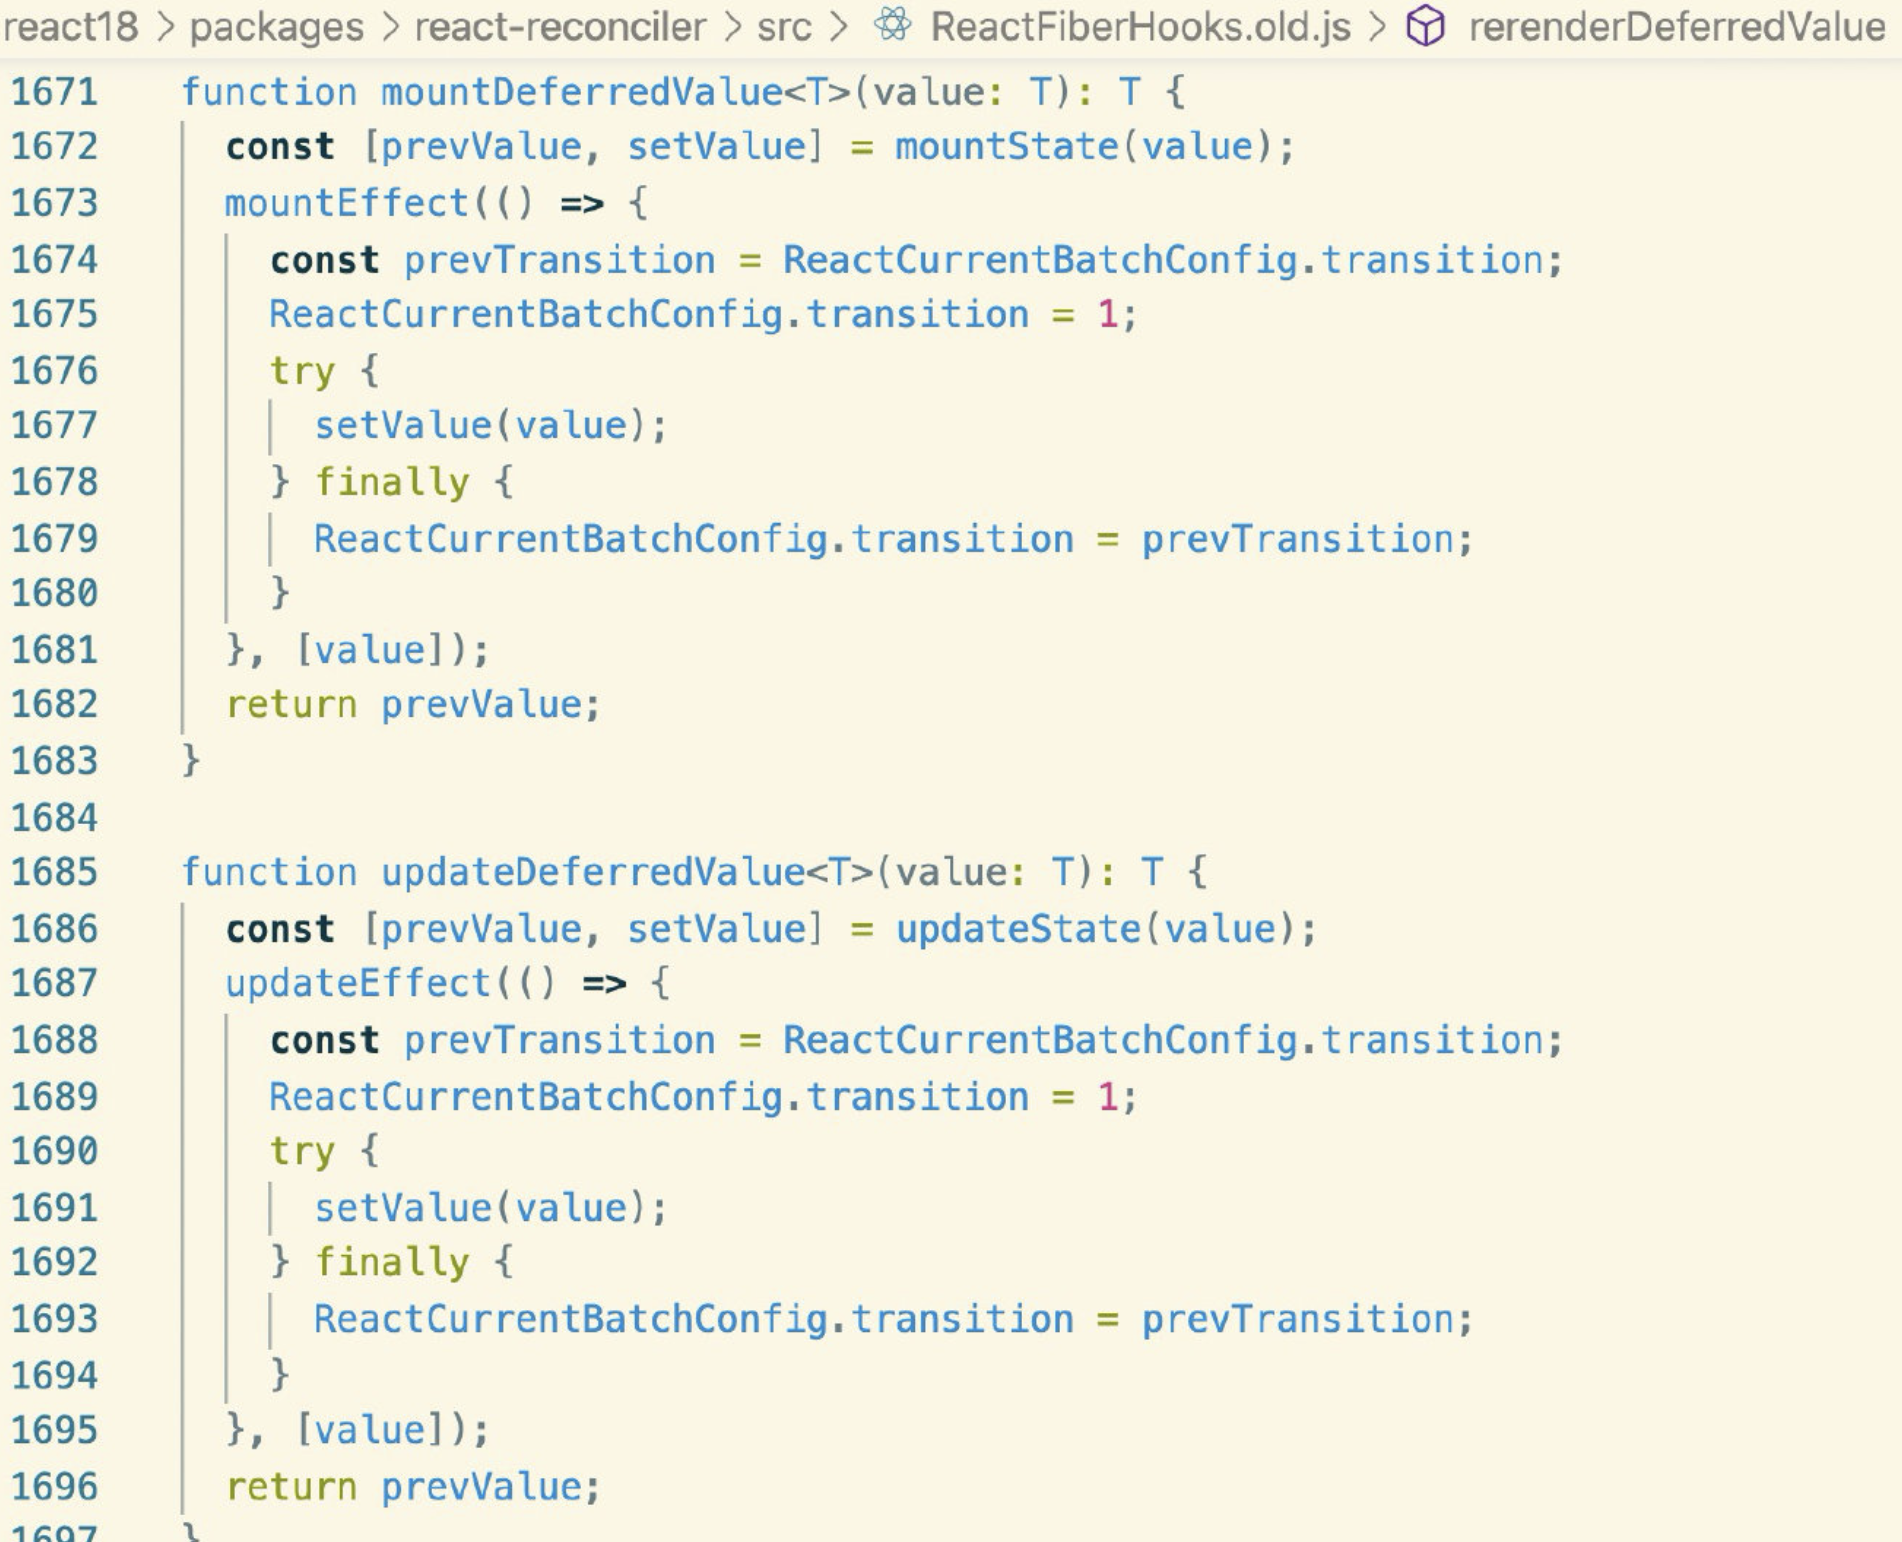
阅读全文
